
User Guide


216 Chapter 6 Introduction to Creating Menus
• Square Pixels and Rectangle Pixels: You can choose to switch between viewing the
menu images with square pixels or scaled to the video aspect ratio (either 4:3 or
16:9). See “Understanding Pixel Differences in Graphics and Video” on page 84 for
more information. You can also press P to toggle the pixel display type.
• Show Single Field: Optimizes playback when using field-based video sources. This is
especially important with video that has fast motion, because it will reduce the
motion artifacts. However, selecting Show Single Field with frame-based video
sources results in reduced resolution (edges may appear jagged).
Menu Editor Tools
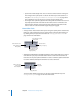
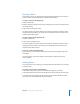
• Arrange controls: These buttons allow you to change the priority of the selected item,
letting you control which items have a higher priority by bringing them forward, or
by sending lower-priority items to the back. See “Changing the Button Order” on
page 264 for more information.
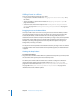
• Add Submenu, Add Slideshow, and Add Track buttons: These buttons allow you to create a
new element in your project and add a button to the current menu that connects to
them. You can also press Option-Command-Y to create a submenu, Option-Command-K
to create a slideshow, and Option-Command- T to create a new track.
The new button added to the menu uses the menu’s default button style. See
“Setting Default Styles” on page 312 for more information.
Brings the item to the
front, making it the
highest priority.
Sends the item’s priority
one step back.
Sends the item to the
back, making it the
lowest priority.
Moves the item’s
priority one step up.
Creates an
empty slideshow.
Creates an
empty track.
Creates a submenu
that uses this
menu’s template.