
User Guide


232 Chapter 7 Creating Menus Using the Standard Method
See “Configuring Motion Menu Settings” on page 282 for more information on setting
looping options.
Assigning a Background to a Menu
There are several ways to assign a background to a menu. Use the method that you feel
most comfortable with. In all cases, these methods also replace an existing background.
Assigning a Menu Background Using the Inspector
You can assign a menu background using the Inspector. With this method, you can
only choose from assets already imported into DVD Studio Pro.
To assign a menu background using the Inspector:
1 Select the menu and make sure the Menu Inspector displays the menu properties.
2 Choose a background from the Background pop-up menu.
The selected file appears as the menu background.
Assigning a Menu Background by Dragging
You can assign a background to a menu by dragging the asset from the Assets tab, the
Palette, or a Finder window.
To assign a menu background by dragging it to the Menu Editor:
1 Select the menu in the Outline or Graphical tab or choose it from the Menu Editor’s
View pop-up menu to display it in the Menu Editor.
2 Locate the background file you want to use in the Assets tab, Palette, or Finder window.
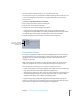
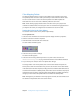
3 Drag the asset to an empty part of the Menu Editor and pause until the Drop
Palette appears.
4 Choose Set Background from the Drop Palette.
The background appears in the Menu Editor.
To assign a menu background by dragging it to the Outline or Graphical tab:
1 Select the menu in the Outline or Graphical tab or choose it from the Menu Editor’s
View pop-up menu to display it in the Menu Editor.
2 Locate the background file you want to use in the Assets tab, Palette, or Finder window.
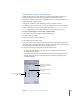
3 Assign the background file to the menu by dragging it to the menu’s name in the
Outline tab or the menu’s tile in the Graphical tab. A box appears around the name or
tile to let you know the menu will receive the background file.
The background appears in the Menu Editor when you release the mouse button.