
User Guide


Chapter 11 Creating and Editing Tracks 381
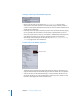
If you convert a slideshow to a track, each still clip has a marker placed at its beginning.
The markers are named the same as the still asset used for its clip. These markers retain
any pause and DVD@CCESS settings that may have been set in the Slideshow editor. If
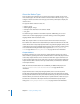
any slides use transitions, the transitions appear as a shaded area in the timeline with a
cell marker at their beginning.
You can configure the transition by selecting the clip and making changes in the Clip
Inspector’s Transition tab. If a still with a transition also has a pause, the marker for the
next clip is placed at the beginning of the transition instead of at the next clip’s start.
See “Using Still Clip Transitions” on page 398 and “Converting a Slideshow to a Track”
on page 424 for more information.
See “Working With GOP Settings” on page 59 for more information about GOP
structures, and “Adding Markers to Your Video” on page 70 for information on using
Final Cut Pro, Final Cut Express, and iMovie to add markers to a clip.
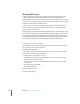
Creating and Editing Markers
Each track always contains a chapter marker at its beginning. You can add up to 98
additional chapter markers to a track.
Markers appear along the top of the timeline display. A vertical line extends across all
streams at the position of each marker.
To add a marker to a track, do one of the following:
m
Click in the area above the timeline display. A marker is added at the point where
you clicked.
m
Position the playhead at the point where you want to add the marker, then press M.
By default, the marker is set to be a chapter marker, and is purple. See “About the
Marker Types” on page 386 for more information about the marker types.
Transition indication