
User Guide


Chapter 2 Preparing Assets 75
Adding Markers in iMovie
You can add up to 36 chapter markers in an iMovie movie. These markers can be used
by either iDVD or DVD Studio Pro.
Note: The following is based on iMovie 4 and iMovie HD.
To add chapter markers in iMovie:
1 Edit your movie in iMovie.
2 Click the iDVD button.
3 Position the playhead, using either the scrubber or timeline, to the point at which you
want to insert a chapter marker.
Note: You cannot export markers placed within one second of the start or end of the
movie or within one second of each other.
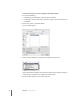
4 Click Add Chapter in the iDVD pane.
A marker is added at the playhead and an entry is added to the iDVD pane. The entry
shows the marker’s position, the marker’s name, and its timecode.
5 Enter a name for the marker in the iDVD pane.
By default, the marker is named with the project’s name. Since these names are
imported into DVD Studio Pro and used to identify the markers and name buttons, you
should be sure to enter appropriate names for each marker.
6 Add any additional markers, up to 36 total.
7 Save the project.
Saving an iMovie project creates a reference movie that contains the edits and markers.
It is this reference movie, which has the same name as the project, that you need to
import into DVD Studio Pro. How you do this depends on whether you are using
iMovie 4 or iMovie HD.
• iMovie 4 places the movie in the project’s folder. You import the movie using the
same methods as importing other assets.
• iMovie HD saves the project as a package. In this case, you import the iMovie HD
project using the same methods as importing other assets, and the movie
automatically appears in the Assets tab.