Contents Guide Introduction 4 General System Requirements The DVD Creation Workflow Compressor Mini-Guide 7 Understanding DVDs 10 5 6 DVD Disc Standards DVD Disc Capacity Video Definitions Aspect Ratio & Correction Planning a DVD 11 Targetting Your Audience Choosing Your Content Determining Encoding Rates Storyboarding Your Project Gathering Your Assets Setting Up DVD Studio Pro 12 Choosing a Configuration DVD Studio Pro Preferences 12 Project Tab General Tab Menu Tab Track Tab Allignment Tab Te
Welcome to Polk County Instructional Television’s DVD Studio Pro Quick Reference Guide, Summer 2008 Edition. This guide seeks to cover the basics of DVD Studio Pro and Compressor, its complement program, as well as provide training in more advanced uses of the application. In order to appreciate an application like DVD Studio Pro, you must first appreciate the end result of any DVD Studio Pro project: a DVD.
General System Requirements Minimum System Requirements A Macintosh computer with a 733 megahertz (MHz) or faster PowerPC G4 or G5 processor (G5 required for HD authoring and playback) * 8 megabytes (MB) of video memory (32 MB recommended) * 512 MB of RAM (1 GB required for HD) * AGP Quartz Extreme graphics card * For application installation: DVD drive, 10 gigabytes (GB) of disk space * For writing finished projects to disc: Apple SuperDrive or other DVD recorder * For writing finished projects t
Compressor After mapping out a plan for your DVD and moving all of the files you’re going to need into your DVD project folder, the next step is to prepare your movies and audio files for use in DVD Studio Pro. The only files that can be written to a DVD-Video are MPEG-1 or MPEG-2 video files and AIFF or Dolby Digital audio files. Also, all movies, when imported to a DVD project, must be separated into individual files, a video file (MPEG-2) and an audio file (Dolby Digital).
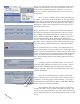
Step 6 - Set a destination where the encoded files will be saved. Compressor automatically saves the encoded files in the same folder as their original counterparts. However, it is always a good idea to create a separate folder where you can store your encoded files. Once you have created this folder within your main project folder, you’ll need to set the destination of your clips. Highlight the clips by clicking on their picture in the Batch Window.
Compressor comes packed with several encoding presets. These are predetermined qualities of encoding based on the output you desire. For instance, since we are creating a DVD, we want to use Apple’s DVD encoding presets.
Understanding DVDs DVD Disc Standards If you’ve ever tried to purchase DVDs for the purpose of burning your projects on them, you’ll have probably noticed the many different formats of DVD disc that are available. While most DVD burners are capable of burning to many if not all of the formats available, some formats operate better in DVD players than others. Generally the best DVD discs for burning are DVD-R, as they are capatable with the largest range of DVD burners and players.
Planning a DVD Targeting Your Audience The first step to creating any DVD is determining the audience that will be watching your project. For instance, will the viewer need extensive playback control, such as customizing languages, subtitles, etc.
Setting Up DVD Studio Pro The first time you open DVD Studio Pro, a dialogue appears where you choose the user interface configuration, the video standard, the DVD standard, and the default language to use. Refer to the image below for the correct settings for steps 2-4. When opened after this, DVD Studio Pro uses the same settings as when it was last open.
General (Tab 2) • Default Slide Length - sets the default time that each slide in a slideshow is displayed. • Background Color - sets the color that is visible behind the slides. • SD DVD Menus, Tracks, and Subtitles - sets the default display mode for all Standard Definition (SD) assets in the project. See the section on Aspect Ratios for more information. • Thumbnail Size - dicates the size of the element previes in the palette and slideshow windows.
Track (Tab 4) • Marker Prefix (Root) Name - The name that all new markers use as their prefix. “Check for unique name” ensures that you will not have two markers with the same name within a track. • Generate Marker Names - controls whether each marker is followed by a timecode value or a number. “Automatically” generates a number that increments each time you add a new marker.
Destinations (Tab 9) • Show - Choose the process whose path you want to configure. • Encoding: Specifies the location for the video and audio files that are created by DVDSP when it is used as the encoder of video files imported into the project. These files should be kept in your project folder, and within that, in a specific folder for encoded versions of your video files. Choose “Specified Folder/Fallback Folder” and select the appropriate folder.
The DVD Studio Pro Interface DVD Studio Pro Layout Disc Open Add Meter Add Inspector Add Language Add Layered Slideshow Script Format Open Palette Palette Build Simulate Menu Add Story Add Window Window Track Burn Add Menu Build/Format Import Asset Outline View Menu Track Viewer Tab Graphical View Asset Window Slide Show, Story, Script Editors Connections Tab Menu Editor Track Timeline Window Inspector Window DVDSP Toolbar (Advanced Configuration) • Import Asset: Opens the Import Asset dialog, a
DVDSP Toolbar (Advanced Configuration) - continued • Build/Format: First builds the video title set, then writes it to a DVD drive or as a disk image to a hard disk. • Disc Meter: A progress bar that shows both the amount of disc space used and what is still available (based on the Disc Media you select in the Disc/Volume tab in the Disc Inspector). The number underneath the progress bar shows the amount of space used. • Open Palette Window: Displays the Palette in its last configuration.
Outline Tab The Outline tab provides an orgainized list of all project elements. Each element is grouped by type, such as Menus or Tracks, in sections that function a bit like folders. Next to each section name is a triangle that expands or collapses the folder. Like in the graphical tab, the outline tab allows you to rearrange the elements. Simply drag and drop the elements of your project into whatever order you wish.
Palette Window The Palette prives easy access to the templates, styles, and shapes used to create menus. Additionally, the Palette includes three media tabs that connect to the Audio, Still Image, and Video folders in your User Folder of Macintosh HD. While these shortcuts are convenient, it is recommended that any media that you wish to use from these folders be copied into your project folder and imported from there. The Palette also allows you to save your own templates, buttons, text settings, etc.
Menu Editor Window Menu Selection Menu Window Settings Action Safe Guide Selected Button Status Title Safe Guide Normal Button Status Video Asset in Drop Zone Button Outlines Rulers Empty Dropzone Text Guides Send to Back Send to Front Start/Stop Motion Menu Send Backward Send Forward Create New Submenu Create New Slideshow Create New Track Selected Button State Normal Button State Show/HideButton Outlines Show/Hide Guides Activated Button State The Menu Editor window is the primary
The following items are listen in counter-clockwise order beginning with Menu Selection. • Menu Selection: Choose the menu you want to open in the Menu Editor from this pop-up menu. This is an alternative way to selecting the menu in the Outline or Graphical tab. • Action Safe/Title Safe Guides: Shaded area around the outside edge of the menu, indicating portions of the menu that may not be visible on most consumer monitors. The title safe area is most crucial.
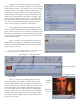
Timeline Window Track View Menu Stream Height Playhead Timecode Timeline Zoom Zoom Handles Audio Stream 1 Subtitle Stream Chapter Marker Playhead Video Stream 1 Audio Stream 2 The Timeline window works in conjunction with the viewer to allow you to move through the video, audio, and subtitle streams. As you drag the playhead, the viewer gives you a live preview of what the user will see when viewing your DVD. The timeline window also works with the Inspector.
Creating a DVD The following section will walk you through the process of creating a simple DVD in DVD Studio Pro. You will need to have an endcoded video ready, complete with audio. For instructions on how to encode video properly for a DVD, see the Compressor section earlier in this guide. Have these files ready inside your project folder before you begin. New Blank Menu New Blank Track Step 1 - Create a New Project. When you open DVD Studio Pro, a new project is automatically created.
To insert video or audio onto a track, drag the video and audio files from the Asset Window onto the timeline. You can drag both at the same time, and DVD Studio Pro will place the files on the appropriate tracks. See Figure 6. Step 4 - Set the Track Properties. The Inspector Window displays item properties and allows you to define numerous settings for the various elements of your DVD. You need to name the track you just created. Select the track from the Graphical View.
Step 6 - Design the Menu. Each template provides several elements, such as buttons, drop zones (areas where you can place video to play in the menu) and text boxes. The Frames Cover menu contains eight buttons, but you only need one. Change the first button to say “Play Movie”. Click once on “Button One” to select it, click again to edit the text. Type in “Play Movie”. Step 7 - Create a Button. Now you need to adjust the button’s properties. Select the button by clicking on it in the Menu viewer.
Step 9 - Set Connections. In a DVD, a connection is a link from one element to another. In this project, we need two connections. One is the button, which takes the viewer from the menu to the track. The other is a connection from the track to the menu. Once the track is finished playing, you need to define what the viewer sees next. Otherwise, the DVD will simply stop. Select the track from the Graphical view.
Graphical View Below is an example of a graphical outline of a DVD project. This outline, created in DVDSP, gives a visual overview of the connections between the various assets included in the project.
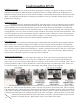
DVD Authoring Terminology Assets - Any audio, video, still image files, or LiveType graphics which are a part of your DVD Studio Pro project. Be sure to move these files or copies of these files into your DVD Studio Pro project folder before importing. Audio_TS Folder - One of two folder required on DVD-Video discs. Reserved for used on DVD-Audio titles, and is always created but left empty when building projects with DVDSP. Authorize - The process of creating a DVD.
DVD-ROM - A DVD with files in addition to those included on a standard DVD-Video disc. These files can be accessed when the disc is played on a computer. Elements - The parts of a DVD project, such as menus, tracks, stories, and slideshows. Authoring a project involves creating the elements and connecting them together. Encoding - The process of converting audio or video to a different format.
Scripts - Programs within a DVD that allow the DVD to access specialized information from the DVD Player, and to perform advanced functions, such as playing all tracks randomly. Story - An element in a project that is specific to a particular track, allowing you to create a customized version of that track. For example, you can use stories to create alternate versions of a track that just plays the track’s highlights.