LL2522.
LL2522.book Page 2 Wednesday, February 18, 2004 11:53 AM K Apple Computer, Inc. © 2004 Apple Computer, Inc. All rights reserved. Under the copyright laws, this manual may not be copied, in whole or in part, without the written consent of Apple. The Apple logo is a trademark of Apple Computer, Inc., registered in the U.S. and other countries.
LL2522.
LL2522.
LL2522.book Page 5 Wednesday, February 18, 2004 11:53 AM 1 1 Getting Started Your eMac has been designed so that you can set it up quickly and start using it right away. If you have never used an eMac or are new to Macintosh computers, read this section for instructions on getting started. If you are an experienced user, you may already know enough to get started. Be sure to look over the information in Chapter 2, “Getting to Know Your eMac,” to find out about the new features of this eMac.
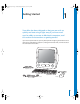
LL2522.book Page 6 Wednesday, February 18, 2004 11:53 AM Setting Up Your eMac 1 Plug the power cord firmly into the power socket and plug the other end into a grounded outlet or power strip. See inside the optical drive door panel for voltage requirements. 2 To enable Internet connectivity, connect your computer’s Ethernet port to an Ethernet network or to your DSL or cable modem using an Ethernet cable.
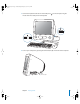
LL2522.book Page 7 Wednesday, February 18, 2004 11:53 AM 3 Connect the keyboard cable to one of the USB ports ( ) on the computer. Plug the mouse cable into a USB port on the keyboard. 4 Turn on your computer by pressing the Power button (®) on the side of the computer.
LL2522.book Page 8 Wednesday, February 18, 2004 11:53 AM Adjusting Your Display To adjust the settings for your display, choose Apple (K) > System Preferences (click the Apple menu and choose System Preferences) and click Displays. To increase display contrast, press the F15 key on your keyboard. To decrease contrast, press F14. Where to Go From Here You’ve done everything you need to get your eMac up and running.
LL2522.book Page 9 Wednesday, February 18, 2004 11:53 AM What to Do When You Have Finished Using Your eMac When you have finished working with your eMac, you have two options. Put Your eMac to Sleep If you will be away from your eMac for less than a few days, put the computer to sleep. When the computer is in sleep, its screen is dark and a small white light pulsates to the right of the optical drive. You can quickly wake it, which takes much less time than the startup process.
LL2522.
LL2522.book Page 11 Wednesday, February 18, 2004 11:53 AM 2 Getting to Know Your eMac 2 This chapter gives you some basic information you’ll need to know about your eMac. Read on for an overview of the different parts of your computer and Mac OS X, and summary information on common tasks such as customizing the way your desktop looks, connecting to a printer, playing a CD, connecting a digital camera, using the Internet, getting answers when you need help, and more.
LL2522.
LL2522.book Page 13 Wednesday, February 18, 2004 11:53 AM Microphone Record sounds directly on your eMac or talk with friends live over the Internet using the included iChat AV application. Optical disc drive Your computer has a CD-ROM drive, a DVD-ROM/CD-RW Combo drive, or a SuperDrive. Each drive can read CD-ROM discs, photo CDs, standard audio discs, and other kinds of media.
LL2522.book Page 14 Wednesday, February 18, 2004 11:53 AM eMac – Side View Security slot Memory access (inside) Power port Headphone jack Audio line-in port 14 ® Power button USB 2.
LL2522.book Page 15 Wednesday, February 18, 2004 11:53 AM Memory access (inside) Your eMac comes with at least 256 megabytes (MB) of Double Data Rate Synchronous Dynamic Random Access Memory (DDR-SDRAM). There are two memory slots, one of which is usually available for expansion. The maximum amount of memory you can have in your eMac is 1 gigabyte (GB), using two 512 MB memory modules. For instructions, see “Installing Additional Memory” on page 37.
LL2522.book Page 16 Wednesday, February 18, 2004 11:53 AM Learning About Mac OS X Your computer comes with Mac OS X and features Classic, an environment for using Mac OS 9 applications while the computer is running Mac OS X. Note: Mac OS 9 cannot be installed as the primary operating system on your eMac. Mac OS X features include an elegant user interface, advanced graphics capabilities, and added system stability and performance.
LL2522.book Page 17 Wednesday, February 18, 2004 11:53 AM Customizing Your Desktop and Setting Your Preferences You can quickly make your desktop look the way you want using System Preferences. Choose Apple (K) > System Preferences from the menu bar. Feel free to make changes and experiment with the following: • Desktop & Screen Saver: Select this preference pane to change the background color or pattern of your desktop, or change it to a photo or image you like.
LL2522.book Page 18 Wednesday, February 18, 2004 11:53 AM Connecting to a Printer To use a printer with your eMac, follow the instructions that came with the printer to install required software and connect the printer. Many printers connect via a USB cable; others are accessed via a network connection, such as Ethernet. For more information about your USB ports, see “Ethernet (10/100Base-T)” on page 29.
LL2522.book Page 19 Wednesday, February 18, 2004 11:53 AM Monitoring Printing Once you’ve sent a document to a printer, you can monitor printing and halt or put it temporarily on hold. m To monitor printing: Click the Printer icon in the Dock to open the Printer window. You can now see the print jobs in the print queue and work with them. For more information, open Mac OS Help (see page 22) and search for “printing.
LL2522.book Page 20 Wednesday, February 18, 2004 11:53 AM Connecting a Digital Videocamera or Other FireWire Device If you have an iPod, iSight camera, digital videocamera, or other device that has a FireWire connector, you can connect it to your eMac. Follow the installation instructions that came with your device. For more information about FireWire, see “FireWire” on page 26.
LL2522.book Page 21 Wednesday, February 18, 2004 11:53 AM When an Application Freezes On rare occasions, an application may freeze on the screen. Mac OS X provides a way to quit a frozen application without restarting your computer. Quitting a frozen application may allow you to save your work in other open applications. To force an application to quit: 1 Press Command (x)-Option-Esc. The Force Quit Applications dialog appears with the application selected. 2 Click Force Quit.
LL2522.book Page 22 Wednesday, February 18, 2004 11:53 AM Getting Answers to Your Questions Using Mac OS Help You can find answers to most of your questions about using your computer and Mac OS X using Mac OS Help onscreen. To use Mac OS Help: 1 Click the Finder icon in the Dock. 2 Choose Help > Mac Help (click the Help menu and choose Mac Help). 3 Type a question and press the Return key on your keyboard. 4 Double-click an item in the list of Help topics.
LL2522.book Page 23 Wednesday, February 18, 2004 11:53 AM 3 Using Your Computer 3 Your eMac has many built-in features and expansion capabilities you can use to customize your computer to fit your needs. Here are some of your computer’s features and capabilities: • Universal Serial Bus (USB) 2.0 ports for connecting additional equipment, such as printers, scanners, joysticks, keyboards, digital cameras, and floppy disk drives.
LL2522.book Page 24 Wednesday, February 18, 2004 11:53 AM Universal Serial Bus (USB) Your eMac comes with five USB ports ( ) (three high-speed USB 2.0 ports on the computer and two USB 1.1 ports on the keyboard), which you can use to connect many types of external devices, including printers, scanners, digital cameras, game pads, joysticks, keyboards, and floppy disk drives. USB makes it easy to connect external equipment.
LL2522.book Page 25 Wednesday, February 18, 2004 11:53 AM Using Multiple USB Devices at the Same Time If all of your USB ports are being used and you want to connect more USB devices, you can purchase a USB hub. The USB hub connects to an open USB port on your computer and provides additional USB ports (usually four or seven). Most USB hubs also have a power adapter and should be plugged into an outlet.
LL2522.book Page 26 Wednesday, February 18, 2004 11:53 AM FireWire Your computer has two FireWire 400 ports ( ). FireWire lets you easily connect and disconnect external high-speed devices—such as an iPod, an iSight camera, DV cameras, printers, scanners, and hard disks. You can connect and disconnect FireWire devices without restarting your computer.
LL2522.book Page 27 Wednesday, February 18, 2004 11:53 AM Using FireWire Devices To use a FireWire device with your computer, simply connect the device to the computer. Apple has already included software to work with many FireWire devices. When you connect a FireWire device, if your eMac cannot find the correct software, you can install the software that came with the device or check the device manufacturer’s website for the latest software.
LL2522.book Page 28 Wednesday, February 18, 2004 11:53 AM AirPort Extreme Wireless Internet and Networking Your eMac is AirPort Extreme-ready. If you ordered an AirPort Extreme Card when you purchased your eMac, the card is already installed. If you do not have an AirPort Extreme Card installed and would like to install one, see page 41 for more information. AirPort offers an easy and affordable way to provide wireless Internet access anywhere in the home, at work, or in the classroom.
LL2522.book Page 29 Wednesday, February 18, 2004 11:53 AM For More Information on AirPort To purchase an AirPort Extreme Base Station, contact your Apple-authorized dealer or go to the Apple Store at www.apple.com/store. Additional information on AirPort is available in AirPort Help. Choose Help > Mac Help, then choose Library > AirPort Help. You can also find information on the Apple AirPort website at www.apple.com/airport and in the Apple Knowledge Base at kbase.info.apple.com.
LL2522.book Page 30 Wednesday, February 18, 2004 11:53 AM Connecting to a network gives you access to other computers. You may be able to store and retrieve information; use network printers, modems, and electronic mail; or connect to the Internet. You can also use Ethernet to share files between two computers or set up a small network. The Ethernet port on your eMac automatically detects other Ethernet devices. You don’t need an Ethernet crossover cable to connect to other Ethernet devices.
LL2522.book Page 31 Wednesday, February 18, 2004 11:53 AM Note: The Apple Video Adapter is not compatible with some previous models of eMac. Apple VGA adapter Æ S-video out port Composite video port Apple Video adapter Æ When an external monitor or television is connected, the same image appears on both the eMac display and the external monitor (known as video mirroring).
LL2522.book Page 32 Wednesday, February 18, 2004 11:53 AM Connecting a Television, VCR, or Other Video Device To connect a TV, VCR, or other video device to the eMac: 1 Connect the single-plug end of the Apple Video Adapter to the video out port on your eMac. 2 Connect the other end of the adapter to the composite video port or the S-video port on the TV or VCR using a composite or S-video cable. 3 Turn on the external device.
LL2522.book Page 33 Wednesday, February 18, 2004 11:53 AM Inserting a CD or DVD Disc To install or use programs from a CD or DVD disc, follow these steps: 1 With the computer turned on, press the Media Eject key ( ) on the keyboard to open the drive tray. 2 Place the disc flat on the tray, with the label facing up, and press the Media Eject key again to close the tray. Note: Some DVD discs are two-sided. 3 When the icon for the disc appears on the desktop, the disc is ready to use.
LL2522.book Page 34 Wednesday, February 18, 2004 11:53 AM Playing DVD Discs If your eMac has a DVD/CD-RW Combo drive or a SuperDrive, you can play standard DVD-Video discs. To play a DVD, insert the DVD disc. DVD Player opens automatically and starts playing the disc. If your eMac is connected to a TV so that you can watch DVD playback on the TV screen, select 720 x 480 NTSC (in the United States) or 720 x 576 PAL (in Europe and other regions) in the Displays pane of System Preferences.
LL2522.book Page 35 Wednesday, February 18, 2004 11:53 AM Recording Information on a DVD If your eMac has a SuperDrive, you can record your own digital movies on a blank DVD-R (DVD-Recordable) disc. You can also record other kinds of digital data (for example, you can back up your files to DVD-R discs). With iDVD, you can create your own customized DVD, burn it on a blank DVD-R disc, and play it on most standard DVD players.
LL2522.book Page 36 Wednesday, February 18, 2004 11:53 AM Securing Your Computer Use a locking cable and the built-in security slot to attach your eMac to a stationary object. Sample locking device with security cable Additional information on the software security features of your eMac, including multiple user passwords and file encryption, is available in Mac OS Help (see page 22). Choose Help > Mac Help and search for “security” or “multiple users.
LL2522.book Page 37 Wednesday, February 18, 2004 11:53 AM 4 Enhancing Your Computer 4 This chapter provides information and instructions for enhancing your computer. Instructions are provided for the following procedures: • “Installing Additional Memory” on page 37 • “Installing an AirPort Extreme Card” on page 41 Warning: Apple recommends that you have an Apple-certified technician install memory.
LL2522.book Page 38 Wednesday, February 18, 2004 11:53 AM To install additional memory: 1 Turn your computer off by choosing Apple (K) > Shut Down. Disconnect all cables except the power cord from your computer. 2 Place a soft, clean towel or cloth on the desk or surface. Slowly lift up and turn the computer so the screen is facing down on the cloth. 3 Use a Phillips screwdriver to loosen the captive screw on the memory access panel. Then gently remove the access panel.
LL2522.book Page 39 Wednesday, February 18, 2004 11:53 AM 4 Touch metal inside the computer to protect the computer from damage caused by electrostatic discharge. Important: Always discharge static electricity before you touch any parts or install any components inside the computer. To avoid generating static electricity, do not walk around the room until you have finished installing the memory and closed the computer. 5 Disconnect the power cord from the computer.
LL2522.book Page 40 Wednesday, February 18, 2004 11:53 AM 7 Hold the access panel against the base of the computer and tighten the screw. 8 Gently turn the computer right side up. Then reconnect the cables you disconnected from your computer. 9 Press the Power button on the side of your computer to turn it on. Warning: Operating the computer when it is open or missing parts can be dangerous and could damage your computer.
LL2522.book Page 41 Wednesday, February 18, 2004 11:53 AM The total includes the amount of memory that originally came with the computer plus the new memory you added. For a more detailed breakdown of the amount of memory installed in your computer, open Apple System Profiler by clicking More Info.
LL2522.book Page 42 Wednesday, February 18, 2004 11:53 AM 3 Loosen the captive screws on the AirPort access panel using a Phillips screwdriver. Then remove the panel and unhook the antenna from the panel. 4 Insert the AirPort Extreme Card partially into the slot, with the logo facing down, then connect the antenna firmly to the card.
LL2522.book Page 43 Wednesday, February 18, 2004 11:53 AM 5 Push the AirPort Extreme Card firmly into the slot and tuck the antenna down into the computer. You may need to lift the card slightly as you push it in. Important: Be sure to push the AirPort Extreme Card firmly all the way into the slot. 6 Tuck the tab on the AirPort Extreme Card down into the computer.
LL2522.book Page 44 Wednesday, February 18, 2004 11:53 AM 7 Replace the AirPort access panel. 8 Press the Power button on the side of your computer to turn it on. If there is an AirPort network in range, you can select it using the AirPort status icon in the menu bar. If you want to set up an AirPort Base Station, use the AirPort Setup Assistant, in Applications/Utilities.
LL2522.book Page 45 Wednesday, February 18, 2004 11:53 AM To replace the internal backup battery: 1 Turn your computer off by choosing Apple (K) > Shut Down. Disconnect all cables except the power cord from your computer. 2 Place a soft, clean towel or cloth on the desk or surface. Slowly lift up and turn the computer so the screen is facing down on the cloth. 3 Use a Phillips screwdriver to loosen the captive screw on the memory access panel. Then gently remove the access panel.
LL2522.book Page 46 Wednesday, February 18, 2004 11:53 AM 4 Touch metal inside the computer to protect the computer from damage caused by electrostatic discharge. Important: Always discharge static electricity before you touch any parts or install any components inside the computer. To avoid generating static electricity, do not walk around the room until you have finished installing the memory and closed the computer. 5 Disconnect the power cord from the computer.
LL2522.book Page 47 Wednesday, February 18, 2004 11:53 AM 7 Locate the Power Management Unit reset button inside the computer. Push the button for one second using a pen or pencil. 8 Hold the access panel against the base of the computer and tighten the screw.
LL2522.book Page 48 Wednesday, February 18, 2004 11:53 AM 9 Gently turn the computer right side up. Then reconnect the cables you disconnected from your computer. 10 Press the Power button on the side of your computer to turn it on. Warning: Operating the computer when it is open or missing parts can be dangerous and could damage your computer. 11 Dispose of the old battery according to your local environmental guidelines.
LL2522.book Page 49 Wednesday, February 18, 2004 11:53 AM 5 Troubleshooting 5 Occasionally you may have problems while working with your eMac. This chapter gives you some solutions to try when you have a problem. Most problems occur because your software isn’t properly set up or you’re using software that isn’t compatible with the version of the Mac OS (system software) installed on your computer.
LL2522.book Page 50 Wednesday, February 18, 2004 11:53 AM Problems That Prevent You From Using Your Computer If the computer won’t respond or the pointer won’t move • First, make sure the mouse and keyboard are connected. Unplug and then plug in the connectors and make sure they are secure. • If that doesn’t work, try to force problem applications to quit. Hold down the Option and Command (x) keys and then press the Esc key. If a dialog appears, select the application and click Force Quit.
LL2522.book Page 51 Wednesday, February 18, 2004 11:53 AM Restoring Your Computer’s Software Use the Software Install and Restore discs that came with your computer to reinstall Mac OS X, applications, or Classic support. Some models of eMac come with a series of Software Install CDs and another series of Software Restore CDs, and some models come with a single series of Software Install and Restore DVDs.
LL2522.book Page 52 Wednesday, February 18, 2004 11:53 AM Other Problems If you have a problem with an application • For problems with software from a manufacturer other than Apple, contact the manufacturer. Software manufacturers often provide updates to their software on their websites. You can configure your eMac to automatically check for and install the latest Apple software using the Software Update pane of System Preferences.
LL2522TS Page 53 Wednesday, February 18, 2004 3:14 PM If you have a problem using your computer or working with the Mac OS • If the answers to your questions are not in this manual, look in Mac OS Help for instructions and troubleshooting information. • Check the Apple Support website at www.apple.com/support for the latest troubleshooting information and software updates. If your date and time settings get lost repeatedly • You may need to replace the internal backup battery.
LL2522.book Page 54 Wednesday, February 18, 2004 11:53 AM Locating Your Product Serial Number You can find the serial number for your eMac on the inside of the optical drive door. Press the Media Eject ( ) key on the keyboard to open the door. If you can’t turn on your computer, you can open the drive door using your fingernail.
A Specifications A Appendix LL2522.book Page 55 Wednesday, February 18, 2004 11:53 AM You can use System Profiler to find out detailed information about your eMac, such as the amount of built-in memory, hard disk size, devices connected, and the product serial number. To access the information in System Profiler, choose Apple (K) > About This Mac from the menu bar and then click More Info, or open System Profiler, located in Applications/ Utilities.
LL2522.
B Care, Use, and Safety Information B Appendix LL2522.book Page 57 Wednesday, February 18, 2004 11:53 AM For your safety and that of your equipment, follow the rules in this appendix for cleaning and handling your computer, as well as the guidelines for working more comfortably. Cleaning Your eMac Follow these general rules when cleaning the outside of your computer and its components: • Shut down your eMac and disconnect all cables. • Use a damp, soft, lint-free cloth to clean the computer’s exterior.
LL2522.book Page 58 Wednesday, February 18, 2004 11:53 AM Carrying Your eMac Your eMac weighs about 50 pounds (22.7 kilograms). If possible, use two people to lift it. If you are lifting your eMac by yourself, stand with the screen facing you and hold the bottom of the computer with both hands. Lift using your legs, rather than your back. Safety Instructions for Setting Up and Using Your Computer For your own safety and that of your equipment, always take the following precautions.
LL2522.book Page 59 Wednesday, February 18, 2004 11:53 AM Warning: Your AC cord came equipped with a three-wire grounding plug (a plug that has a third grounding pin). This plug will fit only a grounded AC outlet. If you are unable to insert the plug into an outlet because the outlet is not grounded, contact a licensed electrician to replace the outlet with a properly grounded outlet. Do not defeat the purpose of the grounding plug.
LL2522.book Page 60 Wednesday, February 18, 2004 11:53 AM Ergonomics Keyboard When you use the keyboard, your shoulders should be relaxed. Your upper arm and forearm should form an angle that is slightly greater than a right angle, with your wrist and hand in roughly a straight line. Use a light touch when typing and keep your hands and fingers relaxed. Avoid rolling your thumbs under your palms. Change hand positions often to avoid fatigue.
C Connecting to the Internet C Appendix LL2522.book Page 61 Wednesday, February 18, 2004 11:53 AM You can use your computer to browse the World Wide Web, send email to friends and family, and chat in real time over the Internet. Use this detailed guide to connect to the Internet. When you first start up Mac OS X, the Setup Assistant helps you enter your Internet configuration information and sign up for an Internet service provider (ISP) if you don’t already have one.
LL2522.book Page 62 Wednesday, February 18, 2004 11:53 AM 2 Gather the connection information you need from your ISP or network administrator. See the next section, “Setup Assistant Worksheet” on page 63 to find out what information to get for each type of connection. In some cases, if another computer in the same location is already connected to the Internet, you may be able to use its settings. To find the settings on a Mac OS X computer: • Open the Network pane of System Preferences.
LL2522.book Page 63 Wednesday, February 18, 2004 11:53 AM Setup Assistant Worksheet You can write the information you get from your Internet service provider (ISP), your network administrator, or your other computer on these pages, then enter it in Network Setup Assistant. Select how your computer connects to the Internet.
LL2522.book Page 64 Wednesday, February 18, 2004 11:53 AM 2 Enter information from your ISP: If you selected “Manually” or “Manually using DHCP Router,”* enter the following: IP Address Subnet Mask Router Address * If you selected “Manually using DHCP Router,” you don’t need to enter a subnet mask or router address. If you selected “Using DHCP,” enter the following: DHCP Client ID Note: DHCP Client ID is optional and may not be required. Ask your ISP.
LL2522.book Page 65 Wednesday, February 18, 2004 11:53 AM Setting Up Your Internet Connection Manually Once you have completed the steps on the previous pages using the Setup Assistant, you are done setting up your Internet connection. If you don’t wish to use the Setup Assistant, or if you only want to make changes to specific parts of your Internet setup configuration, you can use the instructions below to set up your connection manually.
LL2522.book Page 66 Wednesday, February 18, 2004 11:53 AM Dial-Up Connection A dial-up modem is the most common way to connect to the Internet. Your modem uses a method called Point-to-Point Protocol (PPP) to connect to an ISP. Make sure your modem is plugged into a phone line and you have the information from your ISP available (see page 63). To set up Network preferences for the internal modem port: 1 Choose Apple (K) > System Preferences from the menu bar. 2 Click Network.
LL2522.book Page 67 Wednesday, February 18, 2004 11:53 AM 5 Choose Internal Modem from the Show pop-up menu and click PPP. 6 Enter the information from your ISP and click Apply Now. To test your Internet configuration: 1 Open the Internet Connect application (in the Applications folder). 2 Click the Internal Modem icon, if necessary. 3 Enter your dial-up telephone number, account name, and password, if necessary. 4 Click Connect. Internet Connect dials your ISP and establishes a connection.
LL2522.book Page 68 Wednesday, February 18, 2004 11:53 AM To connect automatically when you start an Internet application, such as a web browser or email: 1 Click PPP Options (in the PPP pane of Network preferences). 2 Select the “Connect automatically when needed” checkbox. 3 Click OK and Apply Now.
LL2522.book Page 69 Wednesday, February 18, 2004 11:53 AM To set up Network preferences for the built-in Ethernet port: 1 Choose Apple (K) > System Preferences from the menu bar. 2 Click Network. 3 Choose Network Port Configurations from the Show pop-up menu. 4 Select the On checkbox next to Built-in Ethernet. 5 Drag Built-in Ethernet to the top of the Port Configurations list to make it the preferred, or primary, network interface.
LL2522.book Page 70 Wednesday, February 18, 2004 11:53 AM Manual Configuration Have your static IP address, router address, and subnet mask from your ISP ready (see page 63). To set up a manual configuration: 1 In Network preferences, choose Built-in Ethernet from the Show pop-up menu. 2 Click TCP/IP, if necessary. 3 In the Configure IPv4 pop-up menu, choose Manually. 4 Type the other information into the corresponding fields. 5 Click Apply Now. Once you configure your network, your connection is ready.
LL2522.book Page 71 Wednesday, February 18, 2004 11:53 AM DHCP Configuration After you set up a DHCP configuration, the DHCP server automatically provides your network information. To set up a DHCP configuration: 1 In Network preferences, choose Built-in Ethernet from the Show pop-up menu. 2 Click TCP/IP, if necessary. 3 Choose Using DHCP from the Configure IPv4 pop-up menu. 4 Click Apply Now. Open your web browser (or another TCP/IP application) to test your Internet connection.
LL2522.book Page 72 Wednesday, February 18, 2004 11:53 AM PPPoE Configuration Some DSL-based ISPs use Point-to-Point Protocol over Ethernet (PPPoE). If you use a DSL modem and need a user name and password to connect to the Internet, check with your ISP to determine if you should connect using PPPoE. To set up a PPPoE connection: Have your user name, password, and if required, the domain name server (DNS) address from your ISP available as you configure your network (see page 63).
LL2522.book Page 73 Wednesday, February 18, 2004 11:53 AM 4 Click TCP/IP and choose either Using PPP or Manually from the Configure IPv4 pop-up menu, as instructed by your ISP. If you have a static IP address from your ISP, choose Manually and type the address in the IP Address field. 5 Type the domain name server (DNS) addresses in the DNS Servers field. 6 Click Apply Now. Once you configure your network, your Internet connection is ready.
LL2522.book Page 74 Wednesday, February 18, 2004 11:53 AM AirPort Extreme Wireless Connection If your iMac has an AirPort Extreme Card installed, you can configure your AirPort Extreme network and Internet connection using AirPort Setup Assistant, located in the Utilities folder within your Applications folder. The assistant helps you configure the AirPort Extreme Base Station and set up your computer to use AirPort Extreme.
LL2522.book Page 75 Wednesday, February 18, 2004 11:53 AM To set up Network preferences for an AirPort Extreme connection: 1 Choose Apple (K) > System Preferences from the menu bar. 2 Click Network. 3 Choose Network Port Configurations from the Show pop-up menu. 4 Select the On checkbox next to AirPort. Next, follow the instructions to configure your network either manually or using DHCP, as instructed by your ISP or network administrator.
LL2522.book Page 76 Wednesday, February 18, 2004 11:53 AM 5 Choose AirPort from the Show pop-up menu. 6 Click TCP/IP, if necessary. 7 In the Configure IPv4 pop-up menu, choose either Manually or Using DHCP. • If you chose Manually, type the other information into the corresponding fields. • If you chose Using DHCP, you don’t need to enter any further information unless your system administrator has instructed you to do so.
LL2522.book Page 77 Wednesday, February 18, 2004 11:53 AM Troubleshooting Your Connection Cable Modem, DSL, and LAN Internet Connections If you can’t connect to the Internet using your cable modem, DSL, or local area network (LAN), see the following steps. Important: Instructions that refer to modems do not apply to LAN users. LAN users may have hubs, switches, routers, or connection pods that cable and DSL modem users do not. LAN users should contact their network administrator rather than an ISP.
LL2522.book Page 78 Wednesday, February 18, 2004 11:53 AM Network Connections If you have two or more computers attempting to share an Internet connection, be sure that your network is set up properly. You need to know if your ISP provides only one IP address or if it provides multiple IP addresses, one for each computer. If only one IP address is used, then you must have a router capable of sharing the connection, also known as network address translation (NAT) or “IP masquerading.
LL2522.book Page 79 Wednesday, February 18, 2004 11:53 AM Communications Regulation Information FCC Compliance Statement This device complies with part 15 of the FCC rules. Operation is subject to the following two conditions: (1) This device may not cause harmful interference, and (2) this device must accept any interference received, including interference that may cause undesired operation. See instructions if interference to radio or television reception is suspected.
LL2522.book Page 80 Wednesday, February 18, 2004 11:53 AM Laser Information Korea Statement Warning: Making adjustments or performing procedures other than those specified in your equipment’s manual may result in hazardous radiation exposure. Do not attempt to disassemble the cabinet containing the laser. The laser beam used in this product is harmful to the eyes. The use of optical instruments, such as magnifying lenses, with this product increases the potential hazard to your eyes.
LL2522.book Page 81 Wednesday, February 18, 2004 11:53 AM Information You Need in the United States The internal modem complies with Part 68 of the FCC rules. On the back of this equipment is a label that contains, among other information, the FCC registration number and ringer equivalence number (REN). If requested, provide this information to your telephone company. • Ringer equivalence number (REN): 0.
LL2522.book Page 82 Wednesday, February 18, 2004 11:53 AM Users should not attempt to make such connections themselves, but should contact the appropriate electric inspection authority or electrician. • Load number: 0.1 The load number (LN) assigned to each terminal device denotes the percentage of the total load to be connected to the telephone loop that is used by the device, to prevent overloading.
LL2522.book Page 83 Wednesday, February 18, 2004 11:53 AM Information You Need in Australia All telecommunications devices are required to be labelled as complying to the Australian telecommunications standards, ensuring the health and safety of the operator and the integrity of the Australian telecommunications network.
LL2522.
LL2522.
LL2522.
LL2522.
LL2522.