
Getting Started Owner's manual


136 Chapter 10 Sharing Your Movie
Making a Videotape
You can export your Final Cut Express HD movie back to mini-DV and share it with
others that way. The Print to Video command allows you to include elements in your
program such as color bars and tone, a countdown, a slate, and a black trailer. These
elements are then created and recorded to video, along with your sequence or clip,
without being included in the Timeline. You can also loop your footage as many times
as you want, if you want to output your program multiple times on the same tape.
To print to videotape:
1 Make sure your video equipment is properly connected to your computer, turned on,
and set to VCR (sometimes labeled VTR) mode.
Important: Final Cut Express HD cannot record to your camcorder when it is set to
Camera mode.
2 Cue the videotape to the point where you want to start recording.
3 Select the appropriate sequence or clip in the Browser, or open your sequence and
make the Canvas or Timeline active.
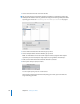
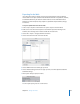
4 Choose File > Print to Video.
5 Select elements you want to include along with your sequence or clip.
All selected elements are sent to tape in the order listed. Make sure elements you don’t
need are not selected. For a complete description of the selections in the Print to Video
dialog, see Final Cut Express Help, Chapter 36, “Recording to Videotape.”