
Manual


Chapter 14 Capturing Your Footage to Disk 175
IV
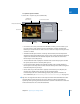
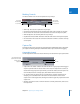
Marking Controls
Use these controls to set In and Out points for a clip on tape.
 Mark In (I): This sets the In point for a clip on tape.
 Clip In Point Timecode field: Shows the timecode value of the currently set In point.
 Go to In Point: This causes the connected VTR to cue to the currently set In point.
 Mark Out (O): This sets the Out point for a clip on tape.
 Clip Out Point Timecode field: Shows the timecode value of the currently set Out point.
 Go to Out Point: This causes the connected camcorder or VTR to cue to the currently
set Out point.
Capture Tab
The Capture tab is where you enter all of the descriptive information about a clip before
you capture it. Entering descriptive information about a clip is also known as logging.
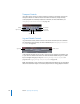
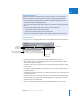
Capture Bin Controls
Use the Capture Bin controls to choose where clips are stored when you capture them.
 Capture Bin: This button contains the name of the bin in your project where logged
clips for captured media are stored. There can be only one capture bin at a time, no
matter how many projects are open. When you click this button, the bin opens in its
own window; if the bin is already open, that window moves to the front.
 Up: Click to move the capture bin up a level from the currently selected bin. For
example, you could switch from a bin to the bin that contains it. If the current
capture bin is at the highest level, clicking this button assigns the project itself as the
capture bin.
 New Bin: Click this to create a new bin inside the currently selected bin, and set it as
the capture bin.
Mark In
Clip Out Point
Timecode field
Go to Out Point
Go to In Point
Mark Out
Clip In Point
Timecode field
New Bin
Up
The Capture Bin button
contains the name of the
currently selected
capture bin.