
Manual

Chapter 14 Capturing Your Footage to Disk 185
IV
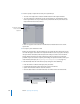
14 Select the checkboxes next to the fields you want to include in the name of the clip—
Description, Scene, Shot/Take, and Angle.
15 If you wish, you can select the Prompt checkbox to confirm the clip name after you
click the Capture Clip button.
This gives you one last chance to verify the clip and media filename and allows you to
name it something unrelated to the Description, Scene, Shot/Take, and Angle fields.
16 Click the Capture Clip button.
Final Cut Express HD rewinds the tape, captures the media file, and creates a
corresponding clip in the current capture bin.
Using Capture Now
This method is popular because hard disk space is no longer prohibitively expensive.
Instead of meticulously setting In and Out points for each clip you want to capture, you
can simply play your tape and click the Capture Now button. You can also use Capture
Now to capture entire tapes to disk. After you capture, you can then virtually break the
media file into smaller, more manageable pieces called subclips.
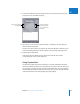
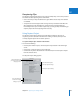
Fields that contribute to
the Name field
Select the checkboxes
for the fields that you
want to include in the
Name field.