
Manual


Chapter 55 Keying, Mattes, and Masks 813
IX
Working With the Chroma Keyer Filter
Despite its name, the Chroma Keyer actually uses a combination of chroma and luma
keying to achieve a good key. Using the Chroma Keyer, you can create a key using any
range of color you want, including (but not limited to) the usual blue and green. You
can also fine-tune your composite by adjusting the color value, saturation, and
luminance ranges used to define your key, together or separately. For example, if you
only want to perform a luma key, you can disable color and saturation. Even when
performing a color key, you’ll get superior results by manipulating the Color Range and
Saturation controls separately.
The Chroma Keyer filter is available in the Key bin, within the Video Filters bin in the
Effects tab of the Browser. When you add this filter to a clip, a Chroma Keyer tab
appears in the Viewer.
Specifying the Type of Controls to Use for the Chroma Keyer Filter
The Chroma Keyer has a set of visual controls, as well as standard numeric interface
controls. The visual controls are those you’ll probably use most often, but you can
toggle between the two.
To use the visual controls:
m In the Filters tab, click the Visual button next to the Chroma Keyer filter.
The visual controls appear in the Chroma Keyer tab.
To use the standard numeric controls, do one of the following:
m In the Chroma Keyer tab, click the Numeric button.
m Click the Filters tab.
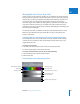
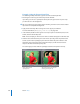
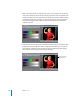
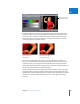
Visual Controls in the Chroma Keyer Filter
View Final/Matte/Source button
Color Range control
Enable/Disable checkbox
Reset button
Saturation control
Luminance control
Sliders for further adjustments
Select Color button
Invert Selection button