
Manual

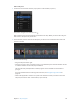


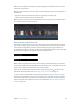


Table Of Contents
- Contents
- Chapter 1: What’s new in Final Cut Pro?
- Chapter 2: Final Cut Pro basics
- Chapter 3: Import media
- Chapter 4: Analyze media
- Chapter 5: Organize your library
- Chapter 6: Play back and skim media
- Chapter 7: Edit your project
- Editing overview
- Create and manage projects
- Select clips and ranges
- Add and remove clips
- Adding clips overview
- Drag clips to the Timeline
- Append clips to your project
- Insert clips in your project
- Connect clips to add cutaway shots, titles, and synchronized sound effects
- Overwrite parts of your project
- Replace a clip in your project with another clip
- Add and edit still images
- Create freeze frames
- Add clips using video-only or audio-only mode
- Remove clips from your project
- Solo, disable, and enable clips
- Find a Timeline clip’s source clip
- Arrange clips in the Timeline
- Cut and trim clips
- View and navigate
- Work with markers
- Correct excessive shake and rolling shutter issues
- Chapter 8: Edit audio
- Chapter 9: Add transitions, titles, effects, and generators
- Transitions, titles, effects, and generators overview
- Add and adjust transitions
- Transitions overview
- How transitions are created
- Set transition defaults
- Add transitions to your project
- Delete transitions from your project
- Adjust transitions in the Timeline
- Adjust transitions in the Transition inspector and Viewer
- Adjust transitions with multiple images
- Create specialized versions of transitions in Motion
- Add and adjust titles
- Adjust built-in effects
- Add and adjust clip effects
- Add generators
- About themes
- Use onscreen controls
- Use the Video Animation Editor
- Chapter 10: Advanced editing
- Group clips with compound clips
- Add storylines
- Fine-tune edits with the Precision Editor
- Create split edits
- Make three-point edits
- Try out clips using auditions
- Retime clips to create speed effects
- Conform frame sizes and frame rates
- Use roles to manage clips
- Use XML to transfer projects and events
- Edit with multicam clips
- Multicam editing overview
- Multicam editing workflow
- Import media for a multicam edit
- Assign camera names and multicam angles
- Create multicam clips in the Browser
- Cut and switch angles in the Angle Viewer
- Sync and adjust angles and clips in the Angle Editor
- Edit multicam clips in the Timeline and the Inspector
- Multicam editing tips and tricks
- Chapter 11: Keying and compositing
- Chapter 12: Color correction
- Chapter 13: Share your project
- Chapter 14: Manage media, libraries, and archives
- Chapter 15: Preferences and metadata
- Chapter 16: Keyboard shortcuts and gestures
- Glossary

Chapter 7 Edityourproject 133
The edit point is rolled to the new location. The combined duration of the two clips stays
the same.
If you can’t roll the edit point any farther and one side of the edit point appears red, you’ve
reached the end of the media for one of the two clips.
Make slip edits with the Trim tool
Performing a slip edit doesn’t change a clip’s position or duration in the Timeline, but instead
changes what portion of the clip’s media appears in the Timeline. A slip edit allows you to
change a clip’s start and end points simultaneously.
Whenever you arrange clips in the Timeline so that edit points line up with musical beats or
other xed sync points in a movie, you want to keep your clips in position to maintain the
alignment. These situations leave you with very little room to adjust a clip because you cannot
change its duration or move it elsewhere in the Timeline. All you can do is move both the start
and end points of the clip simultaneously, keeping the clip’s position and duration xed.
The portion of the clip seen in the project changes, but its position in the Timeline stays the
same. Surrounding clips are not aected, and the overall duration of your project doesn’t change.
00:00:30:0000:00:10:00
A B C
Before edit
00:00:37:0000:00:17:00
After edit
A B C
In the example above, the slip edit changes the start and end points of clip B, but not its duration
or position in the Timeline. When the project plays back, a dierent portion of clip B’s media
is shown.
Note: To slip a clip, it must have media handles on both sides, meaning that there must be
additional media available on both the head and the tail of the clip. If you’re having trouble
slipping a clip, check that the clip has media handles on both sides. You can double-click any edit
point to view or adjust its media handles in the Precision Editor.
67% resize factor