
Manual


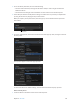


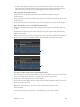
Table Of Contents
- Contents
- Chapter 1: What’s new in Final Cut Pro?
- Chapter 2: Final Cut Pro basics
- Chapter 3: Import media
- Chapter 4: Analyze media
- Chapter 5: Organize your library
- Chapter 6: Play back and skim media
- Chapter 7: Edit your project
- Editing overview
- Create and manage projects
- Select clips and ranges
- Add and remove clips
- Adding clips overview
- Drag clips to the Timeline
- Append clips to your project
- Insert clips in your project
- Connect clips to add cutaway shots, titles, and synchronized sound effects
- Overwrite parts of your project
- Replace a clip in your project with another clip
- Add and edit still images
- Create freeze frames
- Add clips using video-only or audio-only mode
- Remove clips from your project
- Solo, disable, and enable clips
- Find a Timeline clip’s source clip
- Arrange clips in the Timeline
- Cut and trim clips
- View and navigate
- Work with markers
- Correct excessive shake and rolling shutter issues
- Chapter 8: Edit audio
- Chapter 9: Add transitions, titles, effects, and generators
- Transitions, titles, effects, and generators overview
- Add and adjust transitions
- Transitions overview
- How transitions are created
- Set transition defaults
- Add transitions to your project
- Delete transitions from your project
- Adjust transitions in the Timeline
- Adjust transitions in the Transition inspector and Viewer
- Adjust transitions with multiple images
- Create specialized versions of transitions in Motion
- Add and adjust titles
- Adjust built-in effects
- Add and adjust clip effects
- Add generators
- About themes
- Use onscreen controls
- Use the Video Animation Editor
- Chapter 10: Advanced editing
- Group clips with compound clips
- Add storylines
- Fine-tune edits with the Precision Editor
- Create split edits
- Make three-point edits
- Try out clips using auditions
- Retime clips to create speed effects
- Conform frame sizes and frame rates
- Use roles to manage clips
- Use XML to transfer projects and events
- Edit with multicam clips
- Multicam editing overview
- Multicam editing workflow
- Import media for a multicam edit
- Assign camera names and multicam angles
- Create multicam clips in the Browser
- Cut and switch angles in the Angle Viewer
- Sync and adjust angles and clips in the Angle Editor
- Edit multicam clips in the Timeline and the Inspector
- Multicam editing tips and tricks
- Chapter 11: Keying and compositing
- Chapter 12: Color correction
- Chapter 13: Share your project
- Chapter 14: Manage media, libraries, and archives
- Chapter 15: Preferences and metadata
- Chapter 16: Keyboard shortcuts and gestures
- Glossary

Chapter 8 Editaudio 193
3 To see an eect’s parameters, do one of the following:
•
Click the Controls button (to the right of the eect’s name) to show a larger window with
advanced controls.
•
Click the disclosure triangle next to Parameters to show controls in the Audio inspector.
Tip: You can adjust eects over time using keyframes in the Audio inspector or in the Audio
Animation Editor.
4 Select eect parameters and adjust their settings as needed. You can preview your adjustments
by using the skimmer or playing the clip in the Timeline.
To return the eect’s values to their default settings, click the eect’s Reset button .
Use eect presets
Many Audio Units and Logic eects include built-in presets that are tailored for specic settings
or environments, such as reverb presets that simulate the acoustics of a small room or a large
cathedral. Presets make it easy to preview and apply eects quickly.
1 Locate the eect in the Eects section of the Audio inspector.
2 Choose a preset from the Preset pop-up menu.
You can preview your presets by using the skimmer or playing the clip in the Timeline.
To return the eect to its default settings, choose Default from the Preset pop-up menu.
Edit and save custom presets
You can edit preset parameters by adjusting the eect’s controls. If you want to keep your
changes, you can save them as as a custom preset.
1 Locate the eect in the Eects section of the Audio inspector.
2 Choose a preset from the Preset pop-up menu.
67% resize factor