
Manual

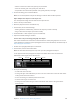


Table Of Contents
- Contents
- Chapter 1: What’s new in Final Cut Pro?
- Chapter 2: Final Cut Pro basics
- Chapter 3: Import media
- Chapter 4: Analyze media
- Chapter 5: Organize your library
- Chapter 6: Play back and skim media
- Chapter 7: Edit your project
- Editing overview
- Create and manage projects
- Select clips and ranges
- Add and remove clips
- Adding clips overview
- Drag clips to the Timeline
- Append clips to your project
- Insert clips in your project
- Connect clips to add cutaway shots, titles, and synchronized sound effects
- Overwrite parts of your project
- Replace a clip in your project with another clip
- Add and edit still images
- Create freeze frames
- Add clips using video-only or audio-only mode
- Remove clips from your project
- Solo, disable, and enable clips
- Find a Timeline clip’s source clip
- Arrange clips in the Timeline
- Cut and trim clips
- View and navigate
- Work with markers
- Correct excessive shake and rolling shutter issues
- Chapter 8: Edit audio
- Chapter 9: Add transitions, titles, effects, and generators
- Transitions, titles, effects, and generators overview
- Add and adjust transitions
- Transitions overview
- How transitions are created
- Set transition defaults
- Add transitions to your project
- Delete transitions from your project
- Adjust transitions in the Timeline
- Adjust transitions in the Transition inspector and Viewer
- Adjust transitions with multiple images
- Create specialized versions of transitions in Motion
- Add and adjust titles
- Adjust built-in effects
- Add and adjust clip effects
- Add generators
- About themes
- Use onscreen controls
- Use the Video Animation Editor
- Chapter 10: Advanced editing
- Group clips with compound clips
- Add storylines
- Fine-tune edits with the Precision Editor
- Create split edits
- Make three-point edits
- Try out clips using auditions
- Retime clips to create speed effects
- Conform frame sizes and frame rates
- Use roles to manage clips
- Use XML to transfer projects and events
- Edit with multicam clips
- Multicam editing overview
- Multicam editing workflow
- Import media for a multicam edit
- Assign camera names and multicam angles
- Create multicam clips in the Browser
- Cut and switch angles in the Angle Viewer
- Sync and adjust angles and clips in the Angle Editor
- Edit multicam clips in the Timeline and the Inspector
- Multicam editing tips and tricks
- Chapter 11: Keying and compositing
- Chapter 12: Color correction
- Chapter 13: Share your project
- Chapter 14: Manage media, libraries, and archives
- Chapter 15: Preferences and metadata
- Chapter 16: Keyboard shortcuts and gestures
- Glossary
Chapter 9 Addtransitions,titles,eects,andgenerators 228
5 Do any of the following:
•
To match how letters are capitalized in your search string: Select the “Match case” checkbox.
•
To locate whole words rather than a group of letters within words: Select the “Whole words”
checkbox.
•
To have the search start over from the beginning of the searched item once it’s reached the end:
Select the “Loop search” checkbox.
6 Do one of the following:
•
To replace all instances of the text at once: Click the Replace All button.
•
To replace this single instance of the text only: Click the Replace button.
•
To replace this instance of the text and locate the next place the text appears: Click the Replace &
Find button.
•
To cycle forward and backward through each instance of the text you’re looking for: Click the
Previous and Next buttons.
Adjustbuilt-ineects
Built-in eects overview
Final Cut Pro includes several video eects that are part of each Timeline clip and directly
accessible from the Viewer—all you need to do is select them and start making adjustments. You
can use these to:
•
Create a composited image from several clips
•
Reposition or reframe a clip by zooming in on it
•
Crop a clip to remove unwanted items, such as microphones or lighting equipment, that
accidentally appear in the video
•
Congure a Ken Burns eect to add life to your still images (and video clips as well)
You can use more than one of the built-in eects at the same time. For example, you can use
Transform to reduce the image’s size and position, Trim to remove a portion of the video, and
Distort to give the video a skewed look.
You can animate any of these eects so that they change as the clip plays. For example, you can
have an image shrink and move oscreen. To congure an animation, you change settings at
two or more points in the clip. When you play the clip, Final Cut Pro creates smooth animated
transitions between the points.
Resize, move, and rotate clips
The Transform built-in eect allows you to resize, move, and rotate an image. This eect is
commonly used on a clip placed over a primary storyline clip, which becomes the background
of the resized clip. It is also often used to zoom in on a clip, allowing you to reframe a shot
if needed.
Adjust the Transform eect
Controls in the Viewer and Video inspector allow you to adjust this eect. However, some
controls are found in only one or the other.
1 Select a clip in the Timeline.
67% resize factor