
Manual
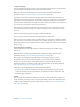
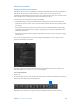
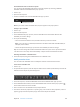

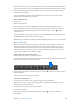
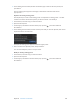
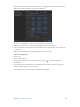
Table Of Contents
- Contents
- Chapter 1: What’s new in Final Cut Pro?
- Chapter 2: Final Cut Pro basics
- Chapter 3: Import media
- Chapter 4: Analyze media
- Chapter 5: Organize your library
- Chapter 6: Play back and skim media
- Chapter 7: Edit your project
- Editing overview
- Create and manage projects
- Select clips and ranges
- Add and remove clips
- Adding clips overview
- Drag clips to the Timeline
- Append clips to your project
- Insert clips in your project
- Connect clips to add cutaway shots, titles, and synchronized sound effects
- Overwrite parts of your project
- Replace a clip in your project with another clip
- Add and edit still images
- Create freeze frames
- Add clips using video-only or audio-only mode
- Remove clips from your project
- Solo, disable, and enable clips
- Find a Timeline clip’s source clip
- Arrange clips in the Timeline
- Cut and trim clips
- View and navigate
- Work with markers
- Correct excessive shake and rolling shutter issues
- Chapter 8: Edit audio
- Chapter 9: Add transitions, titles, effects, and generators
- Transitions, titles, effects, and generators overview
- Add and adjust transitions
- Transitions overview
- How transitions are created
- Set transition defaults
- Add transitions to your project
- Delete transitions from your project
- Adjust transitions in the Timeline
- Adjust transitions in the Transition inspector and Viewer
- Adjust transitions with multiple images
- Create specialized versions of transitions in Motion
- Add and adjust titles
- Adjust built-in effects
- Add and adjust clip effects
- Add generators
- About themes
- Use onscreen controls
- Use the Video Animation Editor
- Chapter 10: Advanced editing
- Group clips with compound clips
- Add storylines
- Fine-tune edits with the Precision Editor
- Create split edits
- Make three-point edits
- Try out clips using auditions
- Retime clips to create speed effects
- Conform frame sizes and frame rates
- Use roles to manage clips
- Use XML to transfer projects and events
- Edit with multicam clips
- Multicam editing overview
- Multicam editing workflow
- Import media for a multicam edit
- Assign camera names and multicam angles
- Create multicam clips in the Browser
- Cut and switch angles in the Angle Viewer
- Sync and adjust angles and clips in the Angle Editor
- Edit multicam clips in the Timeline and the Inspector
- Multicam editing tips and tricks
- Chapter 11: Keying and compositing
- Chapter 12: Color correction
- Chapter 13: Share your project
- Chapter 14: Manage media, libraries, and archives
- Chapter 15: Preferences and metadata
- Chapter 16: Keyboard shortcuts and gestures
- Glossary

Chapter 15 Preferences and metadata 453
Switch metadata views in the Info inspector
You can change the metadata elds shown in the Info inspector by choosing a dierent
metadata view from the Metadata View pop-up menu.
1 Select a clip.
2 Open the Info inspector.
3 Choose a metadata view from the Metadata View pop-up menu.
Metadata View pop-up menu
Note: If you create custom metadata views, they also appear in the pop-up menu.
Change a clip’s metadata
1 Select a clip.
2 Open the Info inspector.
3 In the Metadata View pop-up menu, choose a metadata view that contains elds for the
metadata you want to change.
4 Do any of the following:
•
Click in a text eld to make it active, and enter the text you want to include.
Note: If you can’t click in a text eld, the eld can’t be edited. Some EXIF metadata elds, for
example, can’t be edited.
•
Choose an option from the pop-up menu for the metadata you want to change.
Tip: You can also change the Content Created date and time of your source clips in the Browser.
Just select one or more clips and choose Modify > Adjust Content Created Date and Time.
Rearrange the elds in a metadata view
m In the Info inspector, drag the metadata labels into a dierent order.
Modify metadata views
You can create new metadata views or modify the ones that come with Final Cut Pro.
Create a new metadata view
1 Select a clip.
2 To open the Info inspector, click the Inspector button in the toolbar (shown below), and click the
Info button at the top of the pane that appears.
3 In the Info inspector, choose Edit Metadata View from the Metadata View pop-up menu.
4 In the Metadata Views window, choose New Metadata View from the Action pop-up menu
at the bottom-left corner of the window.
5 Enter a name for the new metadata view, and press Return.
6 To limit the number of properties to a specic group, such as EXIF or video properties, choose a
property group from the Properties pop-up menu at the top of the window.
67% resize factor