
User`s guide


Chapter 3 Installing Your Server in a Rack 55
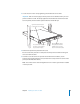
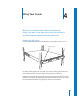
6 When all cables are in place, connect each one to its intended device.
Important: When connecting peripheral devices, be sure to allow adequate space at
the front and back of the server for proper airflow and access to the rack for servicing.
7 After all connections are complete, plug the power cord into a power source.
With the server in the rack and the cables in place, you can prepare to set up the
Mac OS X Server software.
Disconnecting Cables From the Server’s Back Panel
The compact size of the Xserve G5 system may make it difficult to disconnect a cable,
such as an Ethernet network connection or a fibre channel cable, from the back panel.
If you have difficulty compressing the plastic tab on the cable’s connector, use a small
tool such as a tiny flat screwdriver to compress the tab as you pull the connector from
its socket.
Warning: This equipment is intended to be electrically grounded. Your server is
equipped with a three-wire grounding plug—a plug that has a third (grounding)
pin. This plug fits only a grounded AC outlet. This is a safety feature. If you are
unable to insert the plug into the outlet because the outlet is not grounded,
contact a licensed electrician to replace the outlet with a properly grounded
outlet. Do not defeat the purpose of the grounding plug!
Because you are installing the server in a rack with other equipment, be certain
that the power outlet and any other equipment, such as a power strip, used with
the rack is designed to carry the electrical load of multiple devices. Check the
documentation for your rack for any special instructions.