
Owner's manual


4 Lesson 3: Working with Software Instruments
2
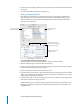
Select an instrument category from the list on the left, then select a track instrument from the list
on the right.
The output of a Software Instrument is always stereo.
Adding and Adjusting Effects
Each Software Instrument has a set of effects, which include a compressor, an equalizer (EQ),
echo, and reverb. You can adjust a track's effects, and add up to two additional effects, in the
Track Info window. You can also change the instrument preset, which includes default effects
settings for each instrument.
To add and adjust Software Instrument effects:
1
Select the track, then click the Track Info button to open the Track Info window.
2
Click the Details triangle to reveal the track's effects settings.
3
Choose a new instrument generator from the Generator pop-up menu, then choose a generator
preset from the Preset pop-up menu to the right.
4
Click the checkbox for an effect to turn the effect on or off.
5
Drag the sliders for the Compressor, Echo, and Reverb effects to adjust the amount of each effect.
Choose a new setting from the Equalizer pop-up menu to adjust the equalization. If your song is
playing, you hear the changes in real time.
6
Choose an effect from one of the two Effect pop-up menus, then choose an effect setting for the
effect from the adjacent Preset pop-up menu.
Additional effects you can add include treble reduction, bass reduction, amp simulation, chorus,
flanging, phase shifting, and tremolo. For information about specific effects, see the Glossary in
GarageBand Help.
Select an instrument
from this list.
Use these controls to add
and adjust effects.
Choose a new instrument
module and instrument preset
from these pop-up menus.
Select an instrument
category from this list.