
User`s manual


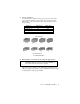

Fill the memory blocks in numerical order. Refer to the
illustrations below.
1) Remove the card from your computer if it is
currently Installed.
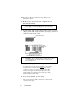
2) Position the chip so that the notch (or dot, on some
chips) points UP, away from the gold edge-connector
on the bottom of the card.
GS-RAM III Configuration
3) Align each leg (pin) of the chip with its socket hole.
You may have to bend the pins slightly to align them
with the holes. Do this by holding the chip on edge
so that one of the rows of feet are against the tables
surface. Now apply downward pressure to the chip
while rolling it toward the bottom of the pins. This
will bend the pins uniformly.
4) Press down firmly on each chip.
This ensures that it is fully seated in its socket. Check
closely for bent pins.
10 GS-RAM Ill
+ Warning! Static electricity can ruin chips. Touch the
power supply before handling the board or the chips.
+ Warning: If you install a chip upside down it could
possibly damage the chip Be sure to double check
the orientation dot
Orientation Notch
Notch
Toward
Top