User Manual V1.
CONTENTS Introduction ..................................................................... 1 Features ................................................................................................1 System Requirements .............................................................................1 About the Remote Control................................................. 2 Parts and Functions .......................................................... 4 Quick Start .........................................
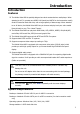
Introduction Introduction Features The Mobile Video HDD is specially designed as a dual-use stand-alone media player. When attached to a PC, it operates as a USB 2.0 Hi-Speed (and eSATA for dual connection model) Serial ATA external hard disk drive, with a large capacity of data storage.
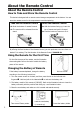
About the Remote Control About the Remote Control How to Take and Store the Remote Control This device is designed with a remote control storage compartment at the bottom. You can store the remote control in the compartment to avoid misplacing. Take out the Remote Control Store the Remote Control n: Push the bottom of remote forward. p: With the buttons facing up, insert the o: The remote will be released from the top of remote and push it forward. q: Push the bottom of remote to fix it. stand.
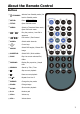
About the Remote Control Buttons 1 ○ STANDBY: Activate from Standby mode / Go back to Standby mode.
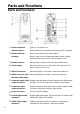
Parts and Functions Parts and Functions c Power and access indicator (Blue) : d Remote indicator (orange) : Lights up: The power is on. Blinking: Booting up/ Accessing the data through PC connection. Blinks 1 time: Received the remote signal. Blinks 3 times: Cannot initiate media player function. Please check and make sure the unit is not connected to a PC. e Remote receiver : When using the remote, point the remote towards here. f Power switch : Press this button to turn on this device.
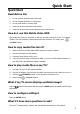
Quick Start Quick Start Read Before Use 1. Do not operate electronics with wet hands. 2. Do not operate this device in a bathroom. 3. Do not bend cables in a sharp angle. 4. Keep this device unreachable from children. 5. Keep this device and its accessories away from heat sources. How do I use this Mobile Video HDD Copy media files from your computer to this unit, and then connect it to your TV or Home Theater. The User Interface is somewhat intuitive like a Browser.
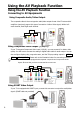
Using the AV Playback Function Using the AV Playback Function Connecting to AV Equipments Using Composite Audio/Video Output The composite video is the most popular audio/video output format. Most TV sets and AV amplifiers (receivers) support this type of connection. Yellow: Video signal; White: Left audio channel; Red: Right audio channel. White Yellow Red Using Component Video Output (Y/Pb/Pr) If your TV supports Component Video input (Y/Pb/Pr), you can connect it for better video quality.
Using the AV Playback Function Using Coaxial Output Digital Audio To output the digital audio signal, connect this connector to an AV amplifier (receiver) which equips a digital audio decoder. You will also get multi-channel sound effect if the audio source carries it. Power Connection 1. Connect the DC jack of the AC adapter to the connector marked “DC IN”, plug the other end into an electrical outlet. 2.
Using the AV Playback Function Activating the Mobile Video HDD for AV Playback 1. Turn on your TV and AV amplifier (receiver), and switch to the correct input channel. 2. Press the Power switch to turn on the unit, and then press (STANDBY) button on the remote control to activate it. The activation takes about 5-7 seconds, and the LED will blink brightly at the same time. 3. After the LED stops blinking and turns steadily bright, you can use the remote to operate this unit for playback. 4.
Using the AV Playback Function Operations of “Detail View” Browsing folders and media files for playback Selection y Press y You can press 0~9 buttons to select the number of the target file. If button to select an item, or for previous or next page. The highlighted area indicates the selected item. the selected file is recognizable, the unit will start playback. y You CANNOT perform selection by pressing 0~9 button under the “ROOT” folder. It is only reserved for private folder password purpose.
Using the AV Playback Function Icon Descriptions : A folder : The parental folder : : : : 10 The IFO file of a DVD movie. To play back the entire DVD movie with DVD menu, this is the file to play. A MPEG1 (VCD) file. The filename extension can be dat, mpg, mpe, or mpeg. A DivX /Xvid movie file. The filename extension can be avi, divx, or xvid. A DivX /Xvid subtitle file. The filename extension can be srt, sub/idx, ssa, ass, psb, sub, or smi. : A MPEG2 file.
Using the AV Playback Function Private Folder “Private folder” function allows users to keep their private files secret. Users may install the Utility program (in the Utility CD) on their PC to setup this function. The Main Locked Folder will be invisible on screen until the correct password is entered. Input Password Displaying Locked Folders 1. In “Detail View” mode, press the TITLE button to go back to the “ROOT” folder. 2. Use 0~9 buttons to enter the 4 digit password.
Using the AV Playback Function Introduction and Playback of the Media Files Folder Play Folder1 .. Ö Ö A folder The parental folder The Mobile Video HDD introduces a convenient feature named “Folder Play”. You can play all media files contained in one folder by simply pressing the PLAY button on that folder icon. A maximum of 2048 files/folders can be categorized into one single folder. By selecting the parental folder icon ( ..) or pressing the button, you can come up a level in its directory tree.
Using the AV Playback Function This kind of media files includes DivX and Xvid files. Most of them are available as separate video files (the filename extensions include avi, divx, and xvid) and subtitle files. To play these media files, select the video file or the folder that contains these files, and then press the PLAY button. The subtitle has to be named exactly the same filename as the movie file in order to display automatically.
Using the AV Playback Function Photo and Graphic Files Photo1 Ö A JPEG graphic file This kind of media files includes files that meet the JPEG format (the filename extensions include jpg, jpe, jpeg). Most digital cameras store photo images in this format. To play back these graphic files, select a file or a folder that contains these files, and then press the PLAY button. The Mobile Video HDD will play all graphic files in one folder sequentially with a fixed interval (slide-show mode).
Using the AV Playback Function Operations while Playback While playing back, you can enable the following operations: [The icons on top of table indicate the media files associated with each function] DVD Folder Plays the complete DVD movie with DVD menu. DVD Menu DVD Title Menu Change subtitle Press MENU button will open the DVD Main Menu. Press TITLE button will open the DVD Title Menu Press SUBTITLE button. Change audio Press AUDIO button.
Using the AV Playback Function Rotate Pause Slideshow first, and then press ANGLE button to rotate the photo image counterclockwise. Zoom in Pause Slideshow first, and then press ZOOM button to enlarge the image in a recurring sequence. If the image is larger than the screen, press y y to move it. The "ZOOM” function will be disabled under 720p video output mode. You can refer to “Thumbnail View and Slideshow” chapter for more information.
Using the AV Playback Function only one language channel is available. y The languages and the audio channel encodings of each audio track in a DVD/ DivX movie may very from one another, depending on the information carried by the source itself. y You can set audio output as one of the following three: MONO LEFT , MONO RIGHT , OR STEREO . Stop Playback Stops the ongoing playback and goes back to “Detail View” Stop Pressing button will stop the playback and will go back to “Detail View”.
Using the AV Playback Function Volume down Press VOL- button. Play the Previous / Next Play the previous title / chapter or file. Play the next title/ chapter or file. Previous Press button. Next Press button. Fast Forward / Rewind Fast forward: quickly plays a file forward (the speed is adjustable). Rewind: quickly plays a file backward (the speed is adjustable). Fast forward Press button to adjust speed. Rewind Press button to adjust speed. Resume Press PLAY button to restore normal speed.
Using the AV Playback Function : Adjust speed in sequence: [1/2X Ö 1/4X Ö 1/8X Ö 1/2X Rewind Ö 1/4X Rewind Ö 1/8X Rewind Ö Normal] y During the slow motion playback, the sound may become mute. Step Playback Plays a movie in a frame-by-frame wise. Step playback Press button to pause the playback. Press SLOW button to play one single frame at a time. Resume Press or PLAY button to restore normal playback. Skip Playback Skip forward or backward a segment, and then play. Skip forward Press button.
Using the AV Playback Function Normal Play Press AÆB button again to cancel this repeat operation. Chapter Searching Plays the movie from the chapter indicated. Display Press SEARCH, and the screen will display “TITLE: _ _ / _ _ CHAPTER: _ _ / _ _”. Input Play y Press 0~9 buttons to select a chapter. Press PLAY, the movie will be played from the indicated title or chapter. The entered value must not exceed the total number of titles or chapters, or the will appear to indicate this error.
Using the AV Playback Function Thumbnail View and Slideshow After activating this unit, press the MENU button on the remote control to browse photo images. This mode is called “Thumbnail View”. Total items and the item number Folder name Selected item Items displayed as large icons.
Using the AV Playback Function MENU > PREFERENCES > S.S INTERVAL . This setup is only available at Detail View mode. You need to press MENU key to switch to Detail View mode, and then press SETUP key to open Slideshow Pause y Press SETUP MENU . button will pause the slideshow play. In the pause state, press ZOOM button to enlarge the photo image in a recurring sequence; press ANGLE button to rotate the photo image counterclockwise.
Setup Menu Setup Menu Function Setup Press SETUP to display the SETUP MENU . See the following to set up the functions: Operation of 1. Press SETUP MENU to select the sub-menu. 2. Press PLAY to enter the sub-menu. 3. Select EXIT SETUP and press PLAY to exit. 4. You can also press SETUP to exit directly. Operation of the Sub-menu 1.Press to select the function. 2.Press to move to “Options”. 3.Press to select the setting. 4.Press PLAY to confirm. 5.Press 6.Select to move to “Functions”.
Setup Menu DVD MENU Select the language for the default menu when playing a DVD movie. AUDIO SETUP This sub-menu can only be set when the unit stops playback. DOWNMIX Set this function when output audio signal via the Composite connectors: LT/RT : Outputs the left or right channel to both channels. Stereo : Outputs stereo audio. SPDIF OUTPUT Outputs the digital audio signal via the Coaxial connector. After enabling this function, the Composite connector will not output the audio signal.
Setup Menu LPCM 48K : The sampling rate of the digital audio output will be limited at 48KHz. LPCM 96K : The sampling rate of the digital audio output will be limited at 96KHz. VIDEO SETUP This sub-menu can only be set when the unit stops playback. TV STANDARD NTSC : Outputs NTSC signal to TV. PAL : Outputs PAL signal to TV. TV DISPLAY 4:3 PS : Displays the 16:9 images in “Pan and Scan” with a 4:3 ratio TV connected. 4:3 LB : Displays the 16:9 images in “Letter Box” with a 4:3 ratio TV connected.
Setup Menu Note: Holding and then pressing MENU on the remote control will change the video output format in the following sequence: 720p Ö SD PROGRESSIVE Ö SD INTERLACE Ö NTSC / PAL (toggle) and so on. If you find the display incorrect, try this method to get back to standard NTSC or PAL video output, and then configure the video setup correct. You’ll have to exit the SETUP MENU for the settings to take place. PREFERENCES SETUP S.S. INTERVAL This option stands for “Slide Show Interval.
PC Operation PC Operation Introduction The installation CD contains the device driver, Utility program and the user’s manual. The Utility programs feature “Private Folder” and “Playlist” functions. The Private Folder Manager utility allows you to set the folders in Mobile Video HDD as “Locked” or “Public”. Unless the correct password was entered, the Locked Folders cannot be seen during PC or TV operation, therefore your data are safely protected against unauthorized access.
PC Operation Software Installation 1. Do not connect the Mobile Video HDD to computer yet. 2. Insert the utility CD into computer’s optical drive, and then the installation window should automatically appear on the screen. If the installation window doesn’t show up, go to “My Computer” and browse the CD. By executing the “autorun.exe” file, the installation window will appear. 3. Click on “Install Driver and Utility”, and then follow the on screen instructions for installation. 4.
PC Operation 3. Press the Power switch and the blue LED will light up. 4. The computer will detect the Mobile Video HDD and you can start accessing the drive. o p n Disconnecting from PC When you are ready to disconnect Mobile Video HDD from PC, follow these steps: 1. Close all the programs that are accessing the Mobile Video HDD. 2. Close all Explorer windows which display the content of the Mobile Video HDD. 3.
PC Operation About the File System of Hard Disk Drive The Mobile Video HDD is pre-formatted as a FAT32 disk. You can directly access this drive after it is connected to PC. If you want to re-partition the disk, please note: Although your operating system may support several different file systems, FAT32 or NTFS partitions are strongly recommended. When using the Mobile Video HDD as a media player, it can only read NTFS or FAT32 partition.
PC Operation Media Files for Playback When using the Mobile Video HDD as a media player, it can only browse and play back some specific media file formats. Please read the following before using it as a media player. When using the Mobile Video HDD as a media player, it can only browse and play back media files located in the first “Primary” partition.
PC Operation To convert the DV file already stored in the computer, you can use a convert program such as CyberLink PowerDirector, Ulead Media Studio Pro, and Ulead VideoStudio to manage this job done. The Other Media Files The other media files, such as WMV, ASF or MOV files, can’t be played back on Mobile Video HDD. Please use a convert program, such as Ulead Video ToolBox or WinAVI Videoconverter, to convert these files into MPEG1, MPEG2, or DivX format.
PC Operation Using the Utility Programs The utility programs contain “Playlist Manager” and “Private Folder Manager”. The Playlist Manager creates a collection of media files which can be played contiguously; while the Private Folder Manager allows you to set specific folders in the Mobile Video HDD as “Locked Folders”, which will not be displayed on TV or PC operation until a correct password is entered. You can use this program to protect your precious data from unauthorized accesses.
PC Operation 4. Remove files from your Playlist: Browse and select the files that you would like to remove from your Playlist from the lower column, and then press the button. 5. Adjusting the Playlist sequence: Select the files that you want to manage and use or button to move them a step forward or backward in the Playlist. 6. Selecting the play mode: There are five modes available. i. Normal: Play from the first of the list down to the end of the list. ii. Repeat One: Play the first file repeatedly.
PC Operation Set the Folders as “Locked Folders” You can create “Locked Folders” which will not be displayed on TV when using this unit as a media player, and will not be displayed during PC operation either. 1. Choose the drive if necessary. 2. Use cursor to select the folders for following operation. 3. Click “Mark as Locked” button. It will add a lock icon next to the folder name. These operations will take place immediately after the button is pressed. 4.
PC Operation 5. After finishing above settings, click “Exit” button to exit this utility. If you forget your password 1. Open the “Template folders” folder in the Mobile Video HDD 2. Open the text file “copyright.txt” with any text editing program. 3. Find the “FORGOT USER PASSWORD” section, and then follow the description there to recover your password. Do not try to delete the “Template folders” folder and the “MPlay.
PC Operation About the Partitioning of the Hard Disk Drive Partitioning the Hard Disk Drive under Windows Vista/XP/2000 The Mobile Video HDD will not function when initialized as a “Dynamic” disk type. Always use it with the “Basic” disk type. 1. Click “Start” Ö “Settings” Ö “Control Panel” Ö “Administrative Tools” Ö “Computer Management”. This will open the Computer Management Window. 2. Click on “Disk Management”, all disk drives currently connected to the system will be listed on the right side.
PC Operation 9. Click “Next” to confirm settings. 10. Click “Finish” to close the wizard and to start the partitioning and formatting process. Partitioning the Hard Disk Drive under Windows Me/98SE FDISK is a program to create partitions on the hard disk drive. (Data can only be written to a drive after it is partitioned and formatted). To partition the Mobile Video HDD, you must execute FDISK under the MS-DOS mode. Please follow these steps: 1.
Appendix Appendix Specifications STORAGE HDD File System INTERFACE USB2.0 3.5” SATA I/II FAT32 or NTFS USB type B Connector x 1 eSATA reserved AUDIO/VIDEO INTERFACE Audio/Video Composite Video + Audio R/L (3.5mm phone jack x 1) Component Video: Y, Pb, Pr (3.
Appendix Troubleshooting Problem TV screen does not display normally Possible Cause ◎Video setting is not correct. Solution ◎Press and hold then press MENU until screen displays correctly. ◎Reboot the TV set and connect the composite cable instead of the component cable No power (All LEDs are off) ◎The power plug is not properly ◎Check the power connection and plug it again. connected. ◎The unit has not been turned on. ◎Press Power switch to turn it on.
Appendix Problem Possible Cause Solution Can’t change audio or ◎This movie comes with only one ◎Check the contents. subtitle language of a language. movie No audio output ◎Audio cable is not connected. ◎Check audio connection. ◎Volume is too low. ◎Increase volume. ◎Playing in fast forward, in ◎Resume normal playback speed by rewinding or in slow motion. pressing PLAY button. ◎Incorrect TV audio input channel. ◎Some TV sets equip with separate composite and component audio inputs.
Appendix Distorted booting ◎The video output is set to SD ◎Set the video output to SD PROGRESSIVE while using the image or incorrect color while playback DVD menu behaves incorrectly, such as INTERLACE. composite video output. ◎The DVD Folder lacks some files ◎Press STOP button to stop playing, for this function. and then select the VIDEO_TS file. blank screen or Press the AÆB button to play the repeated segments. Main Title directly.
7451139-50