Tutorial iMovie at a Glance “iMovie at a Glance” introduces you to the controls in the iMovie window. You use these controls to create your own movies. Take a look at these pages even if you don’t plan to do the tutorial, because you’ll need to know the names of the iMovie controls to follow instructions in iMovie Help. The pages that follow introduce you to the main iMovie window, the timeline and clip viewers, and the different panes you use to add professional polish to your movie.
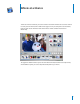
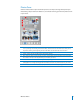
iMovie Window A B C D E F G 2 H A iMovie monitor: Watch your clips play in this window. You can play clips that are in the Clips pane or the clip viewer. B Scrubber bar: Drag the playhead along the scrubber bar to move through a clip frame by frame. The number near the playhead indicates how far (minutes:seconds:frames) the selected frame is into the movie. C Mode switch: Click to switch between camera mode and edit mode.
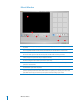
Clip Viewer Use the clip viewer, shown below, to add clips to your movie and arrange them in the order you want them to appear in your movie. When you create titles and transitions, or add photographs from your iPhoto library, drag them to the clip viewer. A C B A B C Clip viewer button: Click the clip viewer button to switch from the timeline viewer. Clip: Each section of video footage and any still images you import are called clips.
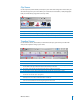
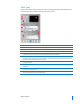
Clips Pane Click the Clips button to open the Clips pane. The video footage and still images you import into iMovie are stored here. A B 4 A Clip name: Each clip is assigned a unique filename. Double-click the name to change it to something more meaningful to you. You can drag a clip from the Clips pane to the clip viewer to add it to your movie. B Duration: The length of a video or audio clip is read as minutes:seconds:frames.
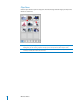
Photos Pane Click the Photos button to open the Photos pane. You can import an image directly from your iPhoto library, add pan and zoom effects to it, and choose how long you want the photo to show in your movie. A G B C D E F A Ken Burns Effect: Use these controls to set up pan and zoom effects for your photographs. Turn the effect off or on by selecting or deselecting the Ken Burns Effect checkbox. Click Start and Finish to set which part of the photo is showing at the beginning and end of the effect.
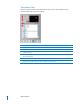
Audio Pane Click the Audio button to open the Audio pane. You can add sound effects, record a voiceover, or import music from a CD or your iTunes music library. A C B D E F 6 A Audio pop-up menu: Choose the source from which you want to import music or audio. You can choose a track from your iTunes library or a music CD, or an iMovie sound effect. You can drag a sound effect or iTunes track from the list to the timeline viewer to add it to your movie.
Titles Pane Click the Titles button to open the Titles pane. You can add opening titles, rolling commentary, or end credits. You can also choose a title style, font, and text color. A D B C E F G H I J A B C D E Preview: Click to see how the title will look. F Titles list: Select a title style for the text you want to add to your movie. Click the arrow next to a title to see more titles in that category.
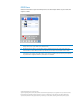
Transitions Pane Click the Transitions button to open the Transitions pane. You can add transitions to move smoothly between the scenes in your movie. A B F C D E G 8 A B C D Preview: Click to see how the transition will look in the iMovie monitor. E Timing controls: Move the sliders to set the speed of the transition and make other adjustments, depending on the transition style. F G Preview monitor: View a selected video clip and transition here.
Effects Pane Click the Effects button to open the Effects pane, where you can add special effects to change the look of your movie clips. For example, you can change color video to black and white, adjust the image brightness and contrast, or add playful effects like fairy dust or rain. A D B C E F A B C D E F Preview: Click to see how the effect will appear in the selected clip. Apply: Click to apply the effect to the selected clip in your movie.
iDVD Pane Click the iDVD button to open the iDVD pane. You can add chapter markers to your movie and export it to iDVD. A B C A Chapter titles: A new chapter appears in the list each time you add a marker. Type a name for each chapter that you want to use in your iDVD scene selection menu. B Add Chapter/Remove Chapter: Click to add or remove a chapter marker in your movie. If you export your movie to iDVD to create a DVD, the markers you add are used to create scene selection menus in iDVD.