GO!NotifyLink ActiveSync Solution for iOS Devices User Guide GO!NotifyLink ActiveSync Solution for iOS Devices: iPhone, iPod touch, iPad, iPad mini What’s in this document This document: Lists software requirements Gives an overview of iPhone, iPod touch, iPad, and iPad mini functionality using the GO!NotifyLink ActiveSync solution Provides instructions for creating the required Microsoft Exchange® mail account on the device Provides some information for getting started using your iOS devic
Table of Contents Requirements 3 iOS Device Functionality Overview 4 FAQs 5 Account Setup Instructions 8 Account Maintenance 11 Settings 12 Push Settings .............................................................................................................. 12 Settings on the GO!NotifyLink Client Web .................................................................. 13 Email and PIM Settings ...............................................................................................
Requirements Server / Device Verify with your IT Administrator, that you have been added to the server with an ActiveSync license key. Use iTunes on your Mac or PC to update iOS software. Upgrade Instructions The following devices and operating system versions are supported with GO!NotifyLink 4.7 Patch 3 or greater: iPad Air 2 OS 8.1 – 8.1.3, 8.2.0, 8.3.0 iPad Air OS 7.1 - 7.1.2, 8.0, 8.0.2, 8.1 - 8.1.3, 8.2.0, 8.3.0 iPad mini 3 OS 8.1 – 8.1.3, 8.2.0, 8.3.
iOS Device Functionality Overview GO!NotifyLink Enterprise Server allows iPhone, iPod touch, iPad, and iPad mini to synchronize email, calendar, contacts, and tasks using the native software contained on the device. There is no application software to install. This section overviews GO!NotifyLink functionality based on the parameters of the native iOS software.
Ability to remotely clear devices that have been lost or stolen Require password access on the device (Enabled via the GO!NotifyLink Admin Web) Inactivity Timeout (Enabled via the GO!NotifyLink Admin Web) Minimum password length requires passwords to be at least 8 characters. Maximum number of failed password unlock attempts resets device settings to their defaults and removes all information and media stored on the device. Require an alphanumeric value for the password.
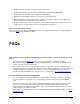
The reload icon is the circular arrow located at the left end of a folder screen’s footer. Can I send attachments from the my iOS device? Attachment functionality has some limits. You can receive/view attachments and you can forward emails with attachments from the device. Though document file attachments are downloaded when you open them, you cannot save them on the device. You can, however, save image files to the device’s Camera Roll album (see Attachments).
How does Remote Lookup work on my iOS device? An LDAP server must first be defined on the GO!NotifyLink server. This will give you access to enterprise directories. Then, in the device’s Contacts application, tap Groups and type a name into the search field. The iOS device shows you matching names from the enterprise directory. See Using Remote Lookup. What if I have other email accounts on my iOS device? Set the account that synchronizes via GO!NotifyLink as the default account.
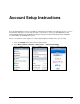
Account Setup Instructions Since the GO!NotifyLink server has the ability to communicate via the Microsoft ActiveSync protocol, you use the Exchange ActiveSync account setup procedure on the device to create your GO!NotifyLink account. Though field descriptions may be labeled “Exchange,” keep in mind that you will always enter credentials associated with your GO!NotifyLink account. Please note that the account setup process may vary depending on the iOS version you are using. 1.
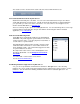
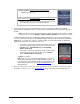
3. Enter the registration credentials. Email – Email address of your mail account on the groupware server Password – Authentication Password as it appears on the GO!NotifyLink server Tap Next. If you see the error message, “Cannot Verify Server Identity,” tap Continue to bypass the error and proceed. 4. In the Server field, enter the external address (IP or domain name) of the GO!NotifyLink server and tap Next.
If the device displays: Unable to verify account information Tap OK to bypass the error. If the device displays: This account may not be able to send or receive emails. Are you sure you want to continue? Tap Save to bypass the error. The registration will complete and the device will connect and begin to load mail and PIM items. 5. If your device had contact and calendar data on it prior to registration, Contact and Calendar synchronizations will default to OFF.
Account Maintenance If you are moving your GO!NotifyLink account to a different device, you will need to. Clear Registration on the GO!NotifyLink Client Web Remove your GO!NotifyLink account form the old device and recreate it on the new device Clear Registration Before Reregistering Your Account on a New Device If you are reregistering your account because you changed devices, you must Clear Registration via the GO!NotifyLink Client Web. See instructions for accessing the GO!NotifyLink Client Web.
Settings Push Settings Push Your mail account, synchronizing via GO!NotifyLink, is a “push” account. When new messages, contacts, calendar events, or tasks are available, the information is automatically delivered (pushed) to your iPhone/ iPod touch/ iPad. This is the equivalent of the GO!NotifyLink “Direct Push” mode. Push Synchronization with Wi-Fi Connections.
Change Your Push Setting Push mode is the default setting on your device. You may, however, wish to temporarily suspend Push service if you are outside a service area or wish to conserve battery life. When Push is turned OFF, data can still be fetched at periodic intervals or manually. Battery Life. Though Push mode offers more up-to-the-minute message delivery, for some users, increased battery consumption may be the tradeoff.
Email and PIM Settings This chart summarizes the settings that control how the email and PIM (calendar events, contacts, and tasks) are synchronized to the device. Some settings are configurable on the device. Others are configurable through the GO!NotifyLink Client Web. Instructions for accessing the Client Web Below is a list of the settings and where they can be configured.
Calendar Sync Set the calendar synchronization range how far back and ahead to sync your calendar events on the device. Look-back is set from the device. Default is 1 month. Choose from 2 weeks, 1, 3, 6 months or All Events. (If All Events is chosen, Look-back is set to 52 weeks.) Look-ahead is set from the client web. Default is 26 weeks. Choose from 1 to 52 weeks.
Security Settings Please note that iOS 4 supports multiple Exchange ActiveSync accounts on a single device. This introduces the possibility of a device dealing with conflicting sets of IT/Security policies issued from multiple Exchange ActiveSync servers. In these cases, the device will always enforce the highest security requirements of all conflicting policies. SSL Encryption SSL is an encryption protocol for data-in-motion between the device and GO!NotifyLink server.
2. Enter a passcode, then re-enter it to confirm. Passcode Requirements: Although the entry instructions read, “Enter 1 or more numbers,” the keypad displays allowing you to enter letters, numbers, or non-alphanumeric characters. If server security rules are enforced, there may be a minimum password length requirement or you may be required to use a certain number of complex characters (non-alphanumeric) in the password.
Changing Your Passcode If you want to change your passcode: 1. Tap Settings > General > Passcode Lock 2. Tap Change Passcode. 3. Enter your current passcode. 4. Enter your new passcode, then re-enter it to confirm.
Turning the Passcode Off If the passcode requirement is lifted* and you wish to operate without a passcode, you will have to disable the passcode on your device after the requirement is lifted. Note: Once the requirement has been disabled on the server, you may need to turn the device off, then on again before adjusting this setting. See Knowledge Base article for more information. 1. Tap Settings > General > Passcode Lock 2. Tap Turn Passcode Off. 3. Enter your current passcode.
Using Your Device iPhone/ iPod touch/ iPad/ iPad mini use the native email client to send, receive, reply to and forward emails via GO!NotifyLink. The native Calendar, Contacts, and Reminders (Tasks) applications are also used to synchronize contacts calendar events, and tasks via GO!NotifyLink. Mail Set the Default Mail Account Set the Exchange ActiveSync account associated with your GO!NotifyLink user account as the default.
Sending Email 1. Select the Mail icon from the Home screen, then tap 2. Type a name or email address in the To field or tap to add a name from your contacts. As you type, matching email addresses from your contacts appear. Tap to choose one. Tap return or access the contact list again to add more names. Note: If you have access to an enterprise directory, matching addresses from your contacts appear first, then matching enterprise directory addresses appear. 3.
Share a contact in a message In the device’s Contacts application, choose a contact and tap Share Contact at the bottom of the Info screen. The .vcf contact file is sent using the default email account. Reply to a Message 1. Open a message and tap . 2. Tap Reply or Reply All. 3. Type your message. 4. Tap Send. Forward a Message 1. Open a message and tap . 2. Tap Forward. 3. Add one or more email addresses and your message. 4. Tap Send.
Reading Email The Mail icon on the Home screen shows the number of unread messages in your Inboxes. Note: If you have more than one mail account on the device this number includes unread messages from all Inboxes. Email Folders GO!NotifyLink can synchronize email from multiple folders on the mail server to the device Inbox and to multiple folders that mirror those on the server. If you have access to the GO!NotifyLink Client Web, you can select the folders you wish to synchronize to the device.
The Message List Messages with a blue dot next to them are unread. Tap a message to read it. Within a message, tap ▲ or ▼ to see the previous or next message. Attachments iPhone/ iPod touch/ iPad/ iPad mini allow you to view picture and document attachments and can play many audio attachments using applications native to the device. You can forward a message with attachments. You can save a picture attachment you have received to the device’s Camera Roll album.
Supported attachment formats for viewing If a file type is not supported by iPhone/ iPod touch/ iPad/ iPad mini, you will see the filename, but you won’t be able to open it. Document formats .doc Microsoft Word .docx Microsoft Word (XML) .htm webpage .html webpage .key Keynote .numbers Numbers .pages Pages .pdf Preview, Adobe Acrobat .ppt Microsoft PowerPoint .pptx Microsoft PowerPoint (XML) .rtf Rich Text Format .txt text .vcf contact information .xls Microsoft Excel .
Calendar Set the Default Calendar If you have multiple Mail/PIM accounts on your device, you will need to set the Default Calendar. Set the Exchange ActiveSync account associated with your GO!NotifyLink user account as the default. This calendar must be the default in order for events added while viewing All Calendars to synchronize through the GO!NotifyLink ActiveSync component. It is also necessary if you wish to create meeting requests on the device.
2. Tap Calendars in the Calendar title bar, then select a calendar to view or All Calendars. Add, Edit or Delete Calendar Events Tap the Calendar icon on the device’s Home screen. A number in the upper right corner of the icon indicates the number of new meeting invitations in your calendar. Tap List, Day, or Month to change the calendar view. To select a calendar file to view, tap Calendars in the title bar.
Set the Calendar Time Zone The Calendar’s time zone can be set independently of the device’s general time zone setting. If the Calendar Time Zone Support setting is ON (default), the Calendar will always show event dates and times in the time zone selected for Calendars. If the setting is OFF, events display according to the time zone of your current location as determined by the network time, which changes automatically based on the user’s geographic location.
The icon in the lower-right corner of the Calendar screen indicates the number of new invitations you have, as does the Calendar icon on the Home screen. Things to know about Meeting Requests on iOS Devices Since meeting invitations are sent as emails, mail synchronization must be enabled in order to receive invitations. If disabled, the invitation will not appear in either the Mail or Calendar application.
Open and respond to a meeting invitation in an email message: Tap the invitation. You can manage and respond to the invitation here as well. Create and Send a Meeting Invitation 1. Select the Calendar application and make sure you are viewing All Calendars or the calendar file associated with your Exchange account. 2. Tap + to create an event with invitees. 3. Enter the event specifics, then tap Invitees and select contacts from your contact list or enter email addresses. 4.
Contacts Set the Default Contact Account If you have multiple Mail/PIM accounts on your device, you will need to set the Default Contact Account. Set the Exchange ActiveSync account associated with your GO!NotifyLink user account as the default contact group. This contact group must be the default in order for contacts added while viewing All Contacts to synchronize through the GO!NotifyLink ActiveSync component.
To delete a contact: Choose a contact, tap Edit, then scroll to the bottom and tap Delete Contact To search for a contact: Tap Contacts and tap the search box. As you type, matching names from the contact list appear. Address Books GO!NotifyLink can synchronize contacts from multiple address books or contact categories on the Mail/PIM server into different categories on the device.
Using Remote Lookup If an LDAP server is defined in GO!NotifyLink and your GO!NotifyLink user account is set up to access it, you can use the Contacts application to search your enterprise directory for contacts in your organization. Note: For devices running OS 2.x, Contacts must be set to ON in the device Settings in order to search for a contact in a remote directory. Tap Settings > Mail, Contacts, Calendars. Then tap your account and turn Contacts ON.
Tasks (Reminders) Tasks synchronization is supported on devices synchronizing with GO!NotifyLink Enterprise Server, version 4.8.0 or greater. Set the Default List If you have multiple Mail/PIM accounts on your device, you will need to select a default task list. Set the Exchange ActiveSync account associated with your GO!NotifyLink user account as the default list. Hint: You should also set the Exchange ActiveSync mail account, calendar, and contact group defaults. 1.
Add, Edit, or Delete Tasks (Reminders) Tap the Reminders icon on the device’s Home screen. Select the list to which you will add the task. To add a task, tap the plus sign. + Enter the task name and tap Done. To edit a task, tap the task. On the Details screen you can: o edit the task name o add a time to be reminded o make the task one that is repeated daily, weekly, monthly, etc. o prioritize the task o move the task to a different list o add notes Tap Done to save your changes.
Battery Conservation Tips Two basic battery conservation tips that you should know: Keep your device out of the sun or a hot car, as heat will degrade your battery’s performance. Run the device through one charge cycle per month. Charge it to 100 percent, then let it completely run down. This will prolong the overall life of your battery. In addition, adjusting some of the Settings on the device can help you conserve day-to-day battery usage and maximize overall battery life.
Turn Auto-Lock on – Use Auto-Lock to sleep the device when you are not using it. The shorter the lock interval, the more power you save. Tap, General > Auto-Lock, then set lock interval to 1 minute. See the Apple documentation for further information on maximizing the lifespan and battery life of your device. http://www.apple.