
User guide


GO!NotifyLink iOS Device Solution Account Setup Instructions
10
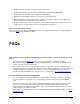
If the device displays: Unable to verify account information
Tap OK to bypass the error.
If the device displays: This account may not be able to send or receive
emails. Are you sure you want to continue?
Tap Save to bypass the error. The registration will complete and the
device will connect and begin to load mail and PIM items.
5. If your device had contact and calendar data on it prior to registration, Contact and Calendar
synchronizations will default to OFF. You can turn on contact and calendar synchronization at the
prompt.
Note: You can also change the synchronization settings at any time from the device settings.
From the Home screen, tap Settings > Mail, Contacts, Calendars. Then tap your account.
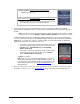
If contacts and/or calendar events exist in the device’s local files when you create your Exchange
account, you will have the option to either keep existing/local items on the iPhone/iPod touch/iPad or
delete them. Local items are stored in a separate address book/calendar labeled, On My iPhone
(iPod/ iPad), and are not synchronized to the server.
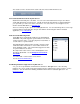
If you want to synchronize contacts and calendar events from
the server, but keep existing (local) items on the device, turn
Contacts and/or Calendars ON and tap Keep On My
iPhone (iPod/ iPad).
If you want to synchronize PIM items, but prefer that existing
(local) items be removed from the device, turn Contacts
and/or Calendars ON and tap Delete.
Tap Done to continue.
Hint: Make sure you set the Exchange ActiveSync account as
the default for Calendar, Contacts, and Reminders (Tasks). If it
is not the default, items added from alternate applications on the
device will not synchronize. See Email and PIM Settings: Set
Default Account.
6. Once you connect to the server, you may be prompted to create or change your passcode to match
the policies set on the server. See Security Settings: Required Password and Inactivity Timeout.