
User guide


GO!NotifyLink iOS Device Solution Account Setup Instructions
9
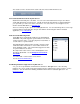
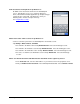
3. Enter the registration credentials.
Email – Email address of your mail account on the groupware
server
Password – Authentication Password as it appears on the
GO!NotifyLink server
Tap Next.
If you see the error message, “Cannot Verify Server Identity,” tap
Continue to bypass the error and proceed.
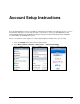
4. In the Server field, enter the external address (IP or domain name) of
the GO!NotifyLink server and tap Next.
GO!NotifyLink On Demand users enter the server address noted in
your welcome letter, tap Next, then proceed to step 5.
At this point the device may:
Connect and begin to load your mail and PIM items.
Note: If you had contact and calendar items on your device
prior to registration, proceed to step 5.
Display one or more of the error messages in the table
below. See instructions on how to proceed.
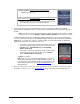
Error Messages
If the device displays: Unable to Verify Certificate
This displays when the server could not verify the SSL certificate on the
GO!NotifyLink server.
Tap Accept to bypass the error. The registration will complete and
the device will connect and begin to load mail and PIM items.
If you accidently tap Cancel at this prompt, the device will fail to make
a connection and you will not be prompted again. See Knowledge
Base article for reconnection instructions.
If the device displays: Exchange account verification failed
This displays at the top of the screen when an SSL certificate is not being
used on the GO!NotifyLink server.
Tap Next, then Save. Then go to the device Settings and turn off
SSL. See SSL Encryption for instructions. The registration will
complete and the device will connect and begin to load mail and PIM
items.