iPhoto Getting Started Get to know iPhoto and learn how to import and organize your photos, and create a photo slideshow and book.
1 2 Chapter 1 3 3 4 4 5 Chapter 2 6 6 9 10 11 12 13 14 15 16 18 19 20 Contents Welcome to iPhoto What You’ll Learn Before You Begin What You Need The iPhoto Interface Learn iPhoto Step 1: Import Your Photos Step 2: Organize and View Your Photos Using Keywords Organizing Your Photos Step 3: Create a Slideshow Setting Slideshow Options Playing a Slideshow Step 4: Create a Book Making Changes to Your Book Editing Text in Your Book Continue to Explore iPhoto Getting More Help
1 Welcome to iPhoto 1 Create lasting treasures from your digital photos. This document familiarizes you with the basic features of iPhoto and introduces you to new features in iPhoto ’08. iPhoto offers you many ways to enhance and share your digital photos, whether you have 100 images or 100,000. With iPhoto, you can quickly import and organize photos, improve or enhance them, and order or make your own prints. You can use iPhoto to create slideshows, books, calendars, and cards.
Before You Begin To make it easier to do the tasks in this tutorial, it’s a good idea to print this document before you start. In many tasks shown in this tutorial and in iPhoto Help, you need to choose menu commands, which look like this: Choose File > New Album. The first term after Choose is the name of a menu in the iPhoto menu bar at the top of your computer screen. The next term is the item you choose from that menu.
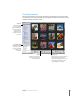
The iPhoto Interface When you open iPhoto, you’ll see the viewing area, which allows you to choose what you want to do next, such as organize or view images, edit them, or use them to create slideshows, books, calendars, or cards. Source list Access your library, where all imported photos and video clips appear, as well as the folders, albums, slideshows, books, calendars, and cards you create. Information pane Find important photo information, such as date, size, associated keywords, and star rating.
2 Learn iPhoto 2 You’ve shot some great pictures with your digital camera. Now it’s time to import them into iPhoto and organize them in ways that make it easy to share them by creating slideshows, books, and more. Step 1: Import Your Photos To edit and share your photos, you must first transfer them to your computer. This transfer process, known as importing, copies the photo files from their original source into iPhoto, where you can then work with them in a variety of ways.
4 Plug the B connector (shown above) on your USB cable into the USB port on your camera. 5 Turn on your camera. Your camera should appear below Devices in the iPhoto Source list, located on the left side of the iPhoto window. The pictures in your camera will appear in the viewing area. If nothing happens when you connect your camera, make sure it’s turned on and set to the correct mode for importing photos. For information about which mode to choose, see the instructions provided with your camera.
Before disconnecting your camera, wait until all your photos have been imported into iPhoto (or click Stop Import). If your camera has a sleep mode, make sure it’s disabled or set to a time increment long enough to allow your images to download. For more information, see the instructions that came with your camera. To view your pictures, click Last Import (in the Source list) or click Events and view your photos by Event.
Step 2: Organize and View Your Photos After you import your photos into iPhoto, it’s time to view and sort them, add keywords and view photos by keyword, and create a photo album. To find your photos: In iPhoto, all photos are stored in the iPhoto library. You can see the photos in the library by clicking Events, located at the top of the Source list on the left side of the iPhoto window.
To sort your photos: 1 Click to select Photos in the Source list. 2 Choose View > Sort Photos, and then choose an option from the submenu: Â By Date: Arranges photos by the date on which they were taken. Â By Keyword: Arranges photos alphabetically by any keywords you’ve assigned to them (see the next section, “Using Keywords”). Â By Title: Arranges photos alphabetically by their titles. Â By Rating: Arranges photos from lowest to highest rating. (You can rate your photos to identify your favorites.
To search for a photo by its keyword: 1 Click the search icon (on the left end of the search field). 2 Choose Keyword from the pop-up menu. 3 Click to select one or more keywords. Photos with those keywords appear in the viewing area. Rating Favorite Photos You can assign photos a one- to five-star rating to indicate how much you like them. These photo ratings can also make it easier to sort photos or find them later. To rate photos: 1 Click to select the photo or photos you want to rate.
You can also create Smart Albums that can be automatically updated as your library changes. To learn more about creating Smart Albums, see the topics in iPhoto Help. Making an Album from a Folder of Photos You can also create an album by dragging a folder of photos from the Finder to a folder in the Source list. iPhoto creates an album with the dragged folder’s name and imports all the photos in the folder into your photo library.
5 In the photo browser at the top of the iPhoto window, drag the slideshow photos into the order you want them to appear. Photo browser 6 To start your slideshow, click the Play button. To stop it, click anywhere on the screen. Setting Slideshow Options Before playing a slideshow, you can add your own background music, specify the display duration for each slide, choose among different transitions between slides, display slideshow controls, and set other options.
2 Click the Settings button in the bottom-right corner of the slideshow window. 3 Choose a transition from the Transition pop-up menu. The default transition for a new slideshow is the Dissolve transition. You can choose to have photos appear as if they’re on different sides of a cube, have one fade through black to the next, and so on. 4 Specify the transition duration using the speed slider.
 Press Delete to remove the photo currently being displayed from the slideshow  Press Command-R to rotate the photo currently being displayed. (The Command key has a x symbol on it.) Another Way to See Photos as a Slideshow You can view any combination of photo albums or individual photos as a temporary slideshow. Simply click to select the photos or albums you want to view, and then click the Play button in the bottom-left corner of the iPhoto window.
If you chose a hardcover book and want photos to be printed on only one side of the book’s pages, click the Settings button and deselect the “Double-sided pages” checkbox in the dialog. 8 Drag photos from the photo browser to photo frames on your book pages. A thumbnail for each photo used will remain in the photo browser, marked with a checkmark to show that photo is in use. If you have more photos than you need to fill up all your book pages, you can leave the extras in the photo browser.
To add photos to your book: 1 Click to select an Event in your library or an album in the Source list. 2 Drag photos from the library or album to your book in the Source list. 3 Click to select your book in the Source list. iPhoto switches to book view. 4 Click the Photo Browser button to view all the photos for your book, including the new ones you added. The browser is a holding area, like a waiting room, for the photos you want to place in your book.
To rearrange photos in your book: 1 Click the Page View button to display book pages in the photo browser. Page View button 2 Do one of the following: Â To swap photos that appear on the same page, click to select the page in the photo browser, and then, in the viewing area, drag one of the photos you want to swap to another photo.
When editing text, it’s a good idea to zoom in on the text area first. To do so, drag the size slider to the right. Size slider If you don’t want text where a text field exists, don’t enter any. The placeholder text, such as “Insert Title,” will not appear in the book if the text field is not changed. Viewing a Book as a Slideshow You can use an iPhoto book as the base for a more creative slideshow to share with friends and family.
 Custom keywords and quick searching: Add standard or customized keywords to your photos so you can organize them to meet your specific needs, and create shortcuts to your most commonly used keywords. Search on text, keywords, date, or ratings to find exactly the photos you’re looking for quickly and easily.
www.apple.com/ilife/iphoto © 2008 Apple Inc. All rights reserved. Apple, the Apple logo, iLife, iPhoto, iTunes, and Mac OS are trademarks of Apple Inc., registered in the U.S. and other countries. Finder and iWeb are trademarks of Apple Inc. MobileMe is a service mark of Apple Inc.