E H T NG I S S MI NUAL MA ® at h t k o o The b ave been h d l u o sh box e h t in RETS ST SEC JUICIE LE’S P OF AP T VIRTUOSO POCKE J.D.
chapter 2 The iPod Sync Connection S leek and smart as the iPod may be, it can’t do much by itself until it meets up with a computer. Once connected to a Mac or PC, however, the iPod is ready to accept whatever you want to give it—your whole music library, of course, but also everything from the complete recorded works of Tom Petty to your phone book, from news and calendar information to files too big to fit on a burned CD.
FireWire With its ability to move 400 megabits of data per second, FireWire was quickly adopted by a product that needs to get an enormous amount of information from Point A to Point B: the digital camcorder. Other hardware with a need for speed, like external CD burners and hard drives, followed the path to FireWire connectivity. FireWire’s speed makes possible one of the iPod’s best tricks: slurping in an entire CD’s worth of music from your computer in ten seconds.
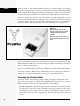
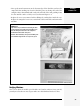
• FireWire connector, 4-pin. The FireWire cable that comes with the full-size iPod has a fattish 6-pin connector at one end. It doesn’t fit the smaller 4-pin connectors common on Windows FireWire cards. FireWire Fortunately, you also got a small white 4-pin adapter in the box. It fits over the end of the included 6-pin cable (see Figure 2-2). Just snap the adapter onto one end of the cable and plug it into the PC’s port. Then plug the other end into the iPod (or its dock, if you have one).
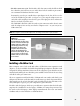
Installing a FireWire Card Before you buy a FireWire card, make sure it’s compatible with your operating system and hardware configuration. If you’re pressed for time, you can go straight to proven, Apple-approved goods by buying a Belkin PCI expansion card and a PCready CardBus FireWire 400 card from the Apple Web site. Figure 2-3: FireWire cards come in all shapes and sizes and can add two, three, or four FireWire ports to a computer. The cards snap into an empty PCI slot on the computer’s motherboard.
• Line up the metal connectors on the bottom edge of the FireWire card over the empty PCI slot, making sure that the FireWire ports are facing the back of the computer. Press down firmly and evenly on both ends of the card, pushing it into the slot until the card is securely seated, as shown in Figure 2-4. Installing a FireWire Card • Replace the screw you removed earlier, affixing the card in place inside the case. Replace the computer’s outer case, reattach the cables and cords, and turn on the machine.
Installing a FireWire Card • Windows 2000 and XP. Right-click My Computer; from the shortcut menu, choose Properties. In the System Properties box that results, click the Hardware tab, and then the Device Manager. After the Device manager window opens, look down the list of devices and doubleclick “IEEE 1394 Bus Host Controllers.” If the card is installed correctly, you should see its name in the window. To further examine the card, click the General tab.
Note: Those are megabits, not megabytes. Data transfer speeds are traditionally measured in megabits or kilobits per second; disk and file sizes are measured in megabytes (MB). USB 2.0 There are eight bits in a byte. To put USB and FireWire into more familiar terms, then, USB can transfer files at up to 1.5 MB per second. FireWire can move 50 MB of data per second, and USB 2.0 can shuttle to 60 MB per second.
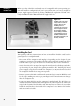
The iPod Software CD The iPod Software CD The CD that comes with the iPod contains all the software you need to get up and iPodding in no time (Figure 2-5). (There’s only one CD in the box of the latest iPod models. The iPod CD installer program is smart enough to figure out what kind of computer you’re using and show you only the Mac or Windows installer on the disc.
To install the software, insert the iPod CD into the Mac. If necessary, install the iTunes jukebox software from the CD or download the latest version from Apple’s Web site. The iPod Software CD The iPod has an operating system of its own, too (see page 246), but you don’t need to install it; it’s already on your iPod.
The iPod Software CD speed bump of 25 percent when ripping CD tracks to MP3 format and other goodies for working with CDs. Tip: If MusicMatch asks whether you want to check its Web site for an updated version, decline the favor. Newer versions may not work with the iPod unless you do some plug-in tinkering; check with the Apple or MusicMatch Web site before proceeding. When in doubt, stick with the version that came on your iPod CD, which is specifically designed to work with Windows-based iPods.
Although you might never suspect it, however, all 2003 and later iPods come out of their boxes formatted for Macintosh. When you run the setup program on a Windows PC, behind the scenes, it actually reformats your iPod’s hard drive for Windows. See Figure 2-6 for details. The iPod Software CD Your Very First Sync For most people, the goal with any new electronics purchase is to get the new toy working right away so the fun can begin. For new iPod owners, getting to The Fun can be a very short wait.
Your Very First Sync The First Sync (If You Use MusicMatch) Once all the necessary software is installed, connect the iPod to the PC as described earlier in this chapter. The Portables Plus window When you plug in your iPod for the first time, MusicMatch Jukebox opens automatically. In a few seconds, another window pops up next to the Library window: the Portables Plus window (Figure 2-8).
Variations on the Auto-Transfer Theme The beauty of the iTunes/iPod system is that whatever music you add to your Mac or PC gets added to the iPod automatically, effortlessly, quickly. You’ve always got your entire music collection with you. Just plugging in the iPod inspires iTunes (or MusicMatch) to open up and begin syncing. Variations on Auto-Transfer It’s conceivable, however, that you won’t always want complete and automatic syncing to take place whenever you connect the ’Pod.
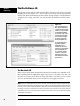
Variations on Auto-Transfer There are two ways to open the Options box that lets you change your syncing preferences, as shown in Figure 2-10. Once the Options dialog box is open, click the third tab, labeled Synchronization. Figure 2-9: Left: Click the circled button to call up the iPod Preferences dialog box. (The second button provides access to equalizer settings; the third controls screen displays. The last button dismounts the iPod from the computer.
from any computers they came across, and then copy the whole mass back up to their home computers. Variations on Auto-Transfer On the bright side, the autosync system means that you never worry about which songs are where. With the autosync option, what is in the computer’s music library is on the iPod, and that’s that. Figure 2-10: Scenes from MusicMatch. Top: When the iPod is connected and the Portables Plus window is before you, there are two ways to open the Options dialog box.
Variations on Auto-Transfer choose to update only that playlist instead of waiting around for the whole iPod to sync. (This feature is also handy if you’re a multi-iPod household. Each iPodder can maintain a separate playlist.) Once you turn on “Automatically update selected playlists only” (iTunes) or “Selected playlist synchronization” (MusicMatch Jukebox), you’re shown a list of the playlists you’ve created (see Chapters 4 and 5). Turn on the ones you want synced.
To delete songs off the iPod, click its icon in your iTunes Source list. Then, in the main song-list window, click the songs you don’t want anymore, and then press Delete. The songs will vanish, both from the iPod’s list in iTunes and from the iPod itself. Variations on Auto-Transfer Tip: The Only Update Checked Songs option in the iPod Preferences box (Figure 2-9) can be useful in this situation. It ensures that iTunes will update the iPod only with songs whose title checkmarks you’ve turned on.
Variations on Auto-Transfer Tip: You can send a freshly created playlist and its accompanying songs right to the iPod by clicking Send in the MusicMatch Jukebox Plus Playlist window. To delete songs or playlists from the iPod, right-click the item and choose Remove from the shortcut menu, or click the unwanted material and then click Remove in the Portables Plus window. (Deleting a playlist doesn’t remove its songs from your iPod.
The Hidden World of the iPod Turning the iPod into a FireWire hard drive (Chapter 11) lets you copy everyday computer files back and forth from your Mac or PC. But when it comes to your music files, you won’t even be able to find them. The iPod and its music management programs use a special database for storing and organizing the music files—and it’s invisible.
iPod-to-Computer Copying Once you install iPod Viewer, open the program with your iPod attached to the Mac; click your Poddy little pal in the list. The program’s preferences let you arrange your songs in the order you want. Then, when you click the Import From iPod button at the top of the iPod Viewer window (Figure 2-12), the program pulls in the list of everything on the iPod. OmniWeb Yes, OmniWeb is a Web browser.
Once you have installed TinkerTool on your Mac, you’ll see an icon for it in System Preferences. Click TinkerTool; in the box that pops up, turn on “Show hidden and system files,” and then click the Relaunch Finder button. Figure 2-14 shows the way. iPod-to-Computer Copying When the Finder restarts, you see all the formerly secret invisible system files right there on your screen, as though someone had spilled paint on the Invisible Man. You see a lot of .
iPod-to-Computer Copying iPod.iTunes Built for speed, iPod.iTunes keeps the Mac and iPod constantly in sync with each other, and only copies songs not found in the iTunes library. In case of a disastrous hard drive crash on the Mac side, iPod.iTunes can fully restore music files and playlists in the iPod, and can even fix those accidents where you mistakenly delete music from iTunes.
iPodRip Whether it be an operating system upgrade that inadvertently trashes your hard drive and takes your tunes with it or some other hardware calamity, iPodRip can restore both your music and your sanity. The software can excavate your playlists and other supported audio files from the iPod’s hard drive and copy them safely back to your Mac OS X 1.2 or 10.3 system. It can even rescue voice memos you’ve recorded with your iTalk or Belkin Voice Recorder microphone (page 260).
iPod-to-Computer Copying 2. On the list of drives connected to the computer, double-click the iPod. Its icon appears in the list as long as you’ve turned on the FireWire disk option described on page 213. 3. Choose Tools→Folder Options. The Folder Options dialog box pops up. 4. Click the View tab; turn on “Show hidden files and folders.” Click Apply. As though by magic, the iPod_Control folder reveals itself, as shown in Figure 2-17 at top.
5. Open the iPod_Control folder, and then open the folder within labeled Music. You see a series of folders with names that only a computer could love, like F07, F08, and so on. If your old hard drive died and took all of your MP3 files with it, copy all the folders over to the PC’s new hard drive. Songs can be jumbled and randomly scattered about, so if you just want to retrieve certain songs, click the toolbar’s Search button and type in the specific song titles you’re looking for (Figure 2-17, bottom).
iPod-to-Computer Copying Tip: At www.ephpod.com, you can even find a thorough description for making the iPod work with Linux systems. Once you launch EphPod and acquaint it with the iPod connected to your PC, it can show you the songs stored on your iPod. To copy them to your PC, see Figure 2-18. XPlay XPlay was one of the first commercial programs to let Windows fans use the original Mac-based iPods.
databases, the program has an embedded database engine (AnapodSQL) so you can search the iPod using almost any criteria you can imagine and (gasp!) even generate reports in HTML or XML. A limited trial version is available to try before you buy. iPod-to-Computer Copying Figure 2-20 Copying files back to the computer is only the tip of the iceberg with Anapod Explorer. It lets you see deep into the heart of your music player, much like you root around in your PC using Windows Explorer.