iPod mini User’s Guide
Contents 3 Quick Start 5 8 What You Need to Get Started Four Steps to Playing Music on iPod mini 12 12 18 22 32 36 42 45 Using iPod mini Using iPod mini Controls Connecting and Disconnecting iPod mini Organizing and Transferring Your Music Adjusting iPod mini Settings Using the Extra Features of Your iPod mini Charging the iPod mini Battery iPod mini Accessories 49 Tips and Troubleshooting 56 Learning More, Service, and Support 58 Safety and Cleaning 2
1 Quick Start Congratulations on purchasing your iPod mini. Read this section to get started using iPod mini quickly. iPod mini works with the iTunes music software included on the iPod CD. Use iTunes to import songs from your CD or digital music collection to your computer, or use the iTunes Music Store (available in some countries only) to purchase songs and download them to your computer. Then organize the songs and transfer them to iPod mini.
Learning to Use iPod mini Read this chapter to set up iPod mini and get started playing music quickly. To learn more about playing music on iPod mini and using some of its other features, see “Using iPod mini” on page 12. iPod Tutorial For an interactive tutorial on transferring music to and playing music on iPod (available in some countries only), go to www.apple.com/support/ipod. iPod mini Features iPod mini is a music player and much more.
What You Need to Get Started To use iPod mini with a Macintosh, you must have: • A Macintosh with: • Built-in high-power USB 2.0 • Or built in FireWire and the optional iPod Dock Connector to FireWire Cable High-power USB 2.0 port 6-pin FireWire 400 port Note: The iPod Dock Connector to FireWire Cable is available for purchase at www.ipod.com/store. • Mac OS X v10.2.8, or Mac OS X v10.3.4 or later • iTunes 4.7 or later (included on the iPod CD) To be sure you have the latest version of iTunes, go to www.
To use iPod mini with a Windows PC, you must have: • A Windows PC with: • Built-in high-power USB 2.0 (or a high-power USB 2.0 card installed) • Or built-in FireWire (or a FireWire card installed) and the optional iPod Dock Connector to FireWire Cable High-power USB 2.0 port 6-pin FireWire 400 port (IEEE 1394) For more information about compatible FireWire and USB cards, go to www.apple.com/ipod. Note: The iPod Dock Connector to FireWire Cable is available for purchase at www.ipod.com/store.
Your iPod mini includes the following components: iPod mini Apple Earphones Quick Start Belt Clip iPod Dock Connector to USB 2.
Four Steps to Playing Music on iPod mini To set up iPod mini, you install software from the iPod CD, and import songs from your music CD collection or purchase songs from the iTunes Music Store (available in some countries only). Then you transfer the songs to iPod mini as the battery charges, then start listening to music. Step 1: Install the Software Insert the iPod CD into your computer and install iTunes and the iPod mini software.
Step 3: Connect iPod mini to Charge the Battery and Transfer Music Connect iPod mini to a high-power USB 2.0 port on your computer using the included iPod Dock Connector to USB 2.0 Cable. If you are connecting to a high-power USB 2.0 port, use the iPod Dock Connector to USB 2.0 Cable. If you are connecting to a FireWire 400 port, use an iPod Dock Connector to FireWire Cable (available separately). When you connect iPod mini to your computer, iTunes opens.
Important: Be sure to connect iPod mini to a high-power USB 2.0 port directly on your computer, or to a powered USB 2.0 hub that’s connected to your computer. iPod mini won’t work if it’s connected to a low-power USB 2.0 port, such as those sometimes found on keyboards or other peripherals. If the battery icon in the upper-right corner of the iPod mini screen shows a lightning bolt, iPod mini is connected to a high-power USB 2.0 port and the battery is charging (see page 42 for more information).
Step 4: Play Music When the song transfer is complete and you’re ready to disconnect iPod mini, squeeze both sides of the Dock connector to disconnect the cable from iPod mini. Then use the Click Wheel and Select button (in the center of iPod mini) to browse for a song.
1 Using iPod mini Read this section to learn about using iPod mini controls, transferring music, charging the battery, and using the extra features of your iPod mini. Using iPod mini Controls Press any button to turn on iPod mini. The main menu appears. Use the Click Wheel and Select button to navigate through onscreen menus, play songs, change settings, and view information. Move your thumb lightly around the Click Wheel to highlight a menu item. Press the Select button to select the item.
Hold switch iPod Remote port Headphones port Menu button Select button Previous/Rewind button Next/Fast-forward button Click Wheel Play/Pause button Apple Earphones Dock connector port Using iPod mini 13
iPod mini Controls 14 Reset iPod mini (For use during troubleshooting) Toggle the Hold switch (set it to Hold, then turn it off again). Then press the Menu and Select buttons simultaneously for about 6 seconds, until the Apple logo appears. Turn on iPod mini Press any button. Turn off iPod mini Press and hold Play/Pause. Turn the backlight on or off Press and hold Menu or select Backlight from the main menu. Select a menu item Scroll to the item and press the Select button.
iPod mini Controls Play songs in random order From the main menu, select Shuffle Songs. Skip to any point in a song From the Now Playing screen, press the Select button to show the scrubber bar. Then scroll to any point in the song. Skip to the next song Press Next/Fast-forward. Start a song over Press Previous/Rewind. Play the previous song Press Previous/Rewind twice. Fast-forward Press and hold Next/Fast-forward. Rewind Press and hold Previous/Rewind.
Disabling iPod mini Buttons Using the Hold Switch n If you’re carrying iPod mini in your pocket and you don’t want to press the buttons or turn it on accidentally, you can make the buttons inactive. Set the Hold switch to Hold. Slide the switch toward the center (so you can see the orange stripe) to disable the controls.
Making Playlists on iPod mini You can set iPod mini to play the songs you want in the order you want. When you create a list of songs on your iPod mini, the songs appear in an On-The-Go playlist. To create an On-The-Go playlist: 1 Highlight a song and press and hold the Select button until the song title flashes. 2 Repeat step 1 for other songs you want to add. 3 Select Music > Playlists > On-The-Go to view your list of songs. You can also queue entire lists of songs at once.
n To transfer On-The-Go playlists to your computer: If iPod mini is set to transfer songs automatically (see page 26), and you create an On-The-Go playlist, the playlist automatically transfers to iTunes when you connect iPod mini. You see the new On-The-Go playlist in the iTunes Source list. Rating Songs You can assign a rating to a song (from 1 to 5 stars) to indicate how much you like it.
Note: If your computer doesn’t have a USB 2.0 port but has a FireWire 400 (IEEE 1394) port, you can use an iPod Dock Connector to FireWire Cable (available for purchase at www.ipod.com/store). By default, iPod mini imports songs automatically when you connect it to your computer. When this automatic transfer is done, you can disconnect iPod mini. If you connect iPod mini to a different computer and it is set to transfer songs automatically, iTunes prompts you before transferring any music.
n To eject iPod mini: Select iPod mini in the iTunes Source list and click the Eject button. Eject button If you’re using a Mac, you can also eject iPod mini by dragging the iPod mini icon on the desktop to the Trash. If you’re using a Windows PC, you can eject iPod mini by clicking the Safely Remove Hardware icon in the Windows system tray and selecting your iPod mini.
Connecting iPod mini Using the iPod mini Dock (Available Separately) The iPod mini Dock holds iPod mini upright as it charges or transfers music. Connect the Dock to your computer using the iPod Dock Connector to USB 2.0 Cable, then put iPod mini in the Dock. Using the iPod mini Dock, you can play music from iPod mini over external powered speakers or a home stereo. You need an audio cable with a standard 3.5 millimeter stereo miniplug (many external speakers have this type of cable attached).
To play music from iPod mini using the Dock: 1 Place iPod mini in the Dock. 2 Connect the speakers or stereo to the Dock Line Out port using an audio cable with a 3.5 millimeter stereo miniplug. iPod connector Line Out port 3 Use the iPod mini controls to play a song. When the Dock is connected to an external audio source, use the volume controls on the external source to change the volume.
About iTunes iTunes is the software application you use to manage the music on your computer and transfer music to iPod mini. When you connect iPod mini to your computer, iTunes opens automatically.
About the iTunes Music Store Using iTunes, you can preview, purchase, and download your favorite songs from the iTunes Music Store (available in some countries only). There are over a million available for purchase. You can use an Apple Account to purchase songs from the music store, or if you have an America Online (AOL) account, you can use that (this option is available in some countries only). To browse for and purchase music: 1 Open iTunes and click Music Store in the Source list.
A song encoded using Apple Lossless format has full CD-quality sound, but takes up only about half the amount of space as a song encoded using AIFF or WAV format. The same song encoded in AAC or MP3 format takes up even less space. When you import music from a CD using iTunes, it is converted to AAC format by default. If you are using a Windows PC, you can convert nonprotected WMA files to AAC or MP3 format. This can be useful if you have a library of music encoded in WMA format.
About Smart Playlists Using iTunes, you can automatically create customized Smart Playlists from the songs in your library. You can create a Smart Playlist that includes only certain genres of music, songs by certain artists, or songs that match particular criteria. For example, you could create a playlist that’s no more than 3 gigabytes (GB) in size and includes only songs you have rated 3 stars or higher (see “Rating Songs” on page 18).
To update iPod mini with only certain songs: 1 In iTunes, check the boxes next to songs you want to transfer (by default, all songs are checked). 2 Select iPod mini in the iTunes Source list and click the Options button. Options button 3 Select “Only update checked songs.” To set iPod mini to update only selected playlists: 1 In iTunes, select iPod mini in the Source list and click the Options button. 2 Select “Automatically update selected playlists only.
To set iPod mini to transfer songs manually: 1 In iTunes, select iPod mini in the Source list and click the Options button. Options button 2 Select “Manually manage songs and playlists.” n To transfer a song or playlist to iPod mini manually: In iTunes, drag a song or playlist to iPod mini in the Source list. Deleting Songs and Playlists From iPod mini Manually If you have set iPod mini to transfer songs manually (see above), you can delete songs and playlists from iPod mini individually.
To create a new playlist on iPod mini: 1 Select iPod mini in the iTunes Source list and click the Add (+) button. 2 Drag songs to the new playlist. n To modify a playlist on iPod mini: Drag a song to a playlist on iPod mini to add the song. Select a song in a playlist and press the Delete key on your keyboard to delete the song. Listening to Spoken Word Audio You can purchase and download spoken word audiobooks from the iTunes Music Store (available in some countries only) or from audible.
Listening to Podcasts With iTunes 4.9, iPod mini supports listening to podcasts. Podcasts are downloadable radio-style shows delivered over the Internet. You can subscribe to podcasts, download them using the iTunes Music Store, transfer them to your iPod mini, and listen to them at your convenience. Podcasts are organized by shows, episodes within shows, and chapters within episodes. If you stop listening to a podcast and go back to it later, the podcast begins playing from where you left off.
Updating Podcasts You can transfer podcasts to your iPod mini, or you can set iPod mini to automatically transfer all updated podcasts or selected podcasts. To update podcasts: 1 In iTunes, select iPod mini in the Source list and click the Options button. 2 Click Podcasts and select one of the following options: To Do This Update all podcasts automatically Select “Automatically update all podcasts.” iTunes updates the iPod podcast library to match the podcasts in your computer's podcast library.
Adjusting iPod mini Settings You can change settings directly on iPod mini in the Settings menu. Setting iPod mini to Shuffle Songs You can set iPod mini to play songs or albums in random order. n To shuffle and begin playing all your songs: Select Shuffle Songs from the iPod mini main menu. iPod mini begins playing songs from your entire music library in random order, skipping audiobooks and podcasts.
n To set iPod mini to repeat songs: Select Settings from the iPod mini main menu. • To repeat all songs in the list, set Repeat to All. • To repeat one song over and over, set Repeat to One. Setting the Click Wheel Sound When you scroll through menu items, you can hear a clicking sound through the iPod mini internal speaker to let you know the Click Wheel is working. You can set the Click Wheel sound to play through the headphones instead, or you can turn it off.
To set iTunes to adjust all songs to play at the same relative sound level: 1 In iTunes, choose iTunes > Preferences if you are using a Mac, or choose Edit > Preferences if you are using a Windows PC. 2 Click Effects and select Sound Check. n To set iPod mini to use the iTunes volume settings: Select Settings > Sound Check. If you have not activated Sound Check in iTunes, setting it on iPod mini has no effect.
Adding or Removing Items From the Main Menu You can add often-used items to the iPod mini main menu. For example, you can add a “Songs” item to the main menu, so you don’t have to select Music before you select Songs. n To add or remove items from the main menu: Select Settings > Main Menu. Setting and Viewing Date and Time n n n To set the date and time: Select Settings > Date & Time. To view the date and time: Select Extras > Clock.
Using the Extra Features of Your iPod mini Using iPod mini as an External Hard Disk You can use iPod mini as a hard disk, to store and transfer data files. To enable iPod mini as a hard disk: 1 In iTunes, select iPod mini in the Source list and click the Options button. Options button 2 Select “Enable disk use.” When you use iPod mini as a hard disk, the iPod mini disk icon appears on the desktop on the Mac, or as the next available drive letter in Windows Explorer on a Windows PC.
To prevent iTunes from opening automatically when you connect iPod mini to your computer: 1 In iTunes, select iPod mini in the Source list. 2 Click the Options button and deselect “Open iTunes when attached.” Options button Setting the Sleep Timer n You can set iPod mini to turn off automatically after a specific period of time. Select Extras > Clock > Sleep Timer and select the time you want.
Importing Addresses, Phone Numbers, Calendar Events, and To-Do Lists Your iPod mini can store contacts, calendar events, and to-do lists for viewing on the go. If you are running any version of Mac OS X earlier than 10.4, you use a Mac and iSync to update your information. Synchronizing information using iSync requires iSync 1.1 or later, and iCal 1.0.1 or later. To import all information using a Mac and iSync (using Mac OS X v10.3.9 or earlier): 1 Connect iPod mini to your computer.
To import contact or calendar information (using Mac OS X v10.4 or later): 1 Connect iPod to your computer. 2 In iTunes, select iPod in the Source list and click the Options button. Options button To update contacts, click Contacts, click “Synchronize Address Book contacts,” and select an option. To Do This Update all contacts automatically Select “Synchronize all contacts.” When you click OK, iTunes updates iPod mini with the Address Book contact information on your Mac.
To update calendars, click Calendars, click “Synchronize iCal calendars,” and select an option: To Do This Update all calendars automatically Select “Synchronize all calendars.” When you click OK, iTunes updates iPod mini with the iCal information on your Mac. Update selected calendars automatically Select “Synchronize selected calendars only” and select the checkboxes next to the calendars you want to update.
2 Drag the files to the Calendars folder on iPod mini. Note: You can only transfer to-do lists to iPod mini using iSync and iCal. n n n To view contacts on iPod mini: Select Extras > Contacts. To view calendar events: Select Extras > Calendar. To view to-do lists: Select Extras > Calendar > To Do. Storing and Reading Notes and Other Information You can store and read text notes on iPod mini. iPod mini must be enabled as a hard disk (see page 36).
Charging the iPod mini Battery iPod mini has an internal, nonremovable battery. If iPod mini isn’t used for a while, the battery may need to be charged. The iPod mini battery is 80-percent charged in about an hour, and fully charged in about four hours. If you charge iPod mini while transferring files or playing music, it may take longer. For more information about charging times under various conditions and configurations, go to www.apple.com/support/ipod.
If you can’t charge using a USB port on your computer, you can charge the battery using the optional iPod USB Power Adapter. To charge the battery using the optional iPod USB Power Adapter: 1 Connect the AC plug adapter to the power adapter (this may already be assembled). 2 Connect the iPod Dock Connector to USB 2.0 Cable to the power adapter, and plug the other end of the cable in to iPod mini. 3 Plug the power adapter in to a working electrical outlet. AC plug adapter iPod Dock Connector to USB 2.
Battery States When iPod mini is not connected to a power source, a battery icon in the top-right corner of the iPod mini screen shows about how much charge is left. Battery about halfway charged If iPod mini is connected to a power source, the battery icon animates to show that the battery is charging. Battery charging If you connect iPod mini to a power source and the battery icon does not animate, the battery is fully charged.
iPod mini Accessories iPod mini comes with some accessories, and many other accessories are available at www.ipod.com/store. iPod mini Belt Clip iPod mini comes with a handy belt clip. To use the belt clip, snap iPod mini into the casing, then attach the clip to your belt, purse strap, backpack, or a lanyard. Do not attach the clip directly to clothing. The belt clip may slip off. Snap the iPod mini into the belt clip.
iPod Remote (Available Separately) To use the iPod Remote, connect it to the iPod Remote port, then connect the Apple Earphones (or another set of headphones) to the remote. Use the buttons on the remote just as you would use the iPod mini buttons. Use the remote’s Hold switch to disable the remote’s buttons. If you see an orange bar, the remote is set to Hold. The iPod mini Hold switch and the iPod Remote Hold switch do not affect one another.
Apple Earphones iPod mini comes with a pair of high-quality earbud headphones. n To use the earbud headphones: Plug them in to the Headphones port, then place the earbud in your ear as shown. The earphones cord is adjustable. Earphone covers Warning Listening to music at high volume over extended periods of time can damage your hearing.
Available Accessories To purchase iPod mini accessories, go to www.ipod.com/store.
1 Tips and Troubleshooting Most problems with iPod mini can be solved quickly by following the advice in this chapter. Resetting iPod mini Most problems with iPod mini can be solved by resetting it. To reset iPod mini: 1 Toggle the Hold switch on and off (set it to Hold, then turn it off again). 2 Press and hold the Select and Menu buttons for at least 6 seconds, until the Apple logo appears. If iPod mini doesn’t have a charge, you must connect it to your computer, then reset it.
If You Want to Disconnect iPod mini, but the Screen Says “Do Not Disconnect” • If iPod mini is transferring music, wait for the transfer to complete. • Select iPod mini in the iTunes Source list and click the Eject button. • If iPod mini disappears from the iTunes Source list, but you still see the “Do Not Disconnect” message on the iPod mini screen, go ahead and disconnect iPod mini.
If You Connect iPod mini to Your Computer and Nothing Happens • Open iTunes manually. See if iPod mini appears in the iTunes Source list. • Make sure you have installed the software from the iPod CD. • Make sure you have the required computer and software. See “What You Need to Get Started” on page 5. • Your iPod mini may need to be reset (see page 49). • Check the cable connections. Unplug the cable at both ends and make sure no foreign objects are in the USB or FireWire ports.
If You See a Folder With an Exclamation Point on the iPod mini Display • iPod mini may need to be reset (see page 49). • If that doesn’t work, the battery may need to be recharged. Turn on your computer and connect iPod mini. If you still see the folder, reset iPod mini again. • If that doesn’t work, you may need to update or restore iPod mini with the latest software. Be sure you have installed the software from the iPod CD, or go to www.apple.com/ipod to get the latest software.
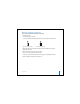
• If your iPod mini is exceptionally low on power and you connect it to a USB 2.0 port, it may charge for up to 30 minutes before you can use it. Leave iPod mini connected at least until the battery icon animates. • If you’re connecting iPod mini to a portable or laptop computer using the iPod Dock Connector to USB 2.0 Cable, connect the computer to a power outlet before connecting iPod mini. If the Screen Is Too Light or Too Dark 1 Select Settings > Contrast. 2 Use the Click Wheel to adjust the contrast.
If Your Optional iPod Remote Isn’t Working • Make sure the remote’s Hold switch is off. • Make sure the remote is plugged firmly in to iPod mini, and that the headphones are plugged firmly in to the remote. The iPod Remote can be purchased separately at www.ipod.com/store.
To update or restore iPod mini with the latest software: 1 Go to www.apple.com/support/ipod and download the latest iPod mini Update. 2 Double-click the software install file and follow the onscreen instructions to install the iPod mini Update. 3 Connect iPod mini to your computer and open iTunes. The iPod mini Update application opens. If you’re using a Windows PC and the iPod mini Update application doesn’t open automatically, you can find the updater by choosing Start > All Programs > iPod mini.
1 Learning More, Service, and Support There is more information about using iPod mini in onscreen help, and on the web. Onscreen Help for Other iPod Applications • To learn more about using iTunes, open iTunes and choose Help > iTunes and Music Store Help. • To learn more about using iSync (on Mac OS X), open iSync and choose Help > iSync Help. • To learn more about using iCal (on Mac OS X), open iCal and choose Help > iCal Help. Online Resources For the latest information on iPod mini, go to www.apple.
Obtaining Warranty Service If the product appears to be damaged or does not function properly, please follow the advice in this booklet, the onscreen help, and the online resources. If the unit still does not function, go to www.apple.com/support for instructions on how to obtain warranty service. Finding the Serial Number of Your iPod mini The serial number is printed on the back of your iPod mini. You can also find it by selecting Settings > About.
1 Safety and Cleaning Read on to learn about using iPod mini safely and cleaning iPod mini. Cleaning Follow these general rules when cleaning the outside of your iPod mini and its components: • Make sure your iPod mini is unplugged. • Use a damp, soft, lint-free cloth. Avoid getting moisture in openings. • Don’t use aerosol sprays, solvents, alcohol, or abrasives. About Handling Your iPod mini may be damaged by improper storage or handling.
Warning Electrical equipment may be hazardous if misused. Operation of this product, or similar products, must always be supervised by an adult. Do not allow children access to the interior of any electrical product and do not permit them to handle any cables. Avoid Hearing Damage Warning Permanent hearing loss may occur if earbuds or headphones are used at high volume. You can adapt over time to a higher volume of sound, which may sound normal but can be damaging to your hearing.
• Store your iPod mini in a place where the temperature is always between –20º and 45º C (–4º to 113º F). Don’t leave iPod mini in your car, since temperatures in parked cars can exceed this range. • iPod mini play time may temporarily shorten in low-temperature conditions. • When you’re using your iPod mini or charging the battery, it is normal for the bottom of the case to get warm.
Communications Regulation Information FCC Compliance Statement This device complies with part 15 of the FCC rules. Operation is subject to the following two conditions: (1) This device may not cause harmful interference, and (2) this device must accept any interference received, including interference that may cause undesired operation. See instructions if interference to radio or television reception is suspected.
Important: Changes or modifications to this product not authorized by Apple Computer, Inc. could void the EMC compliance and negate your authority to operate the product. This product was tested for EMC compliance under conditions that included the use of Apple peripheral devices and Apple shielded cables and connectors between system components.
Taiwan: Deutschland: Dieses Gerät enthält Batterien. Bitte nicht in den Hausmüll werfen. Entsorgen Sie dieses Gerätes am Ende seines Lebenszyklus entsprechend der maßgeblichen gesetzlichen Regelungen. Nederlands: Gebruikte batterijen kunnen worden ingeleverd bij de chemokar of in een speciale batterijcontainer voor klein chemisch afval (kca) worden gedeponeerd. www.apple.com/ipod www.apple.com/support/ipod 019-0497 © 2005 Apple Computer, Inc. All rights reserved.