
for iOS 6.0 software
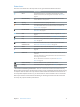
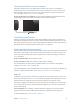


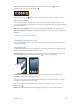
Table Of Contents
- iPod touch User Guide
- Contents
- Chapter 1: iPod touch at a Glance
- Chapter 2: Getting Started
- Chapter 3: Basics
- Chapter 4: Siri
- Chapter 5: Music
- Chapter 6: Videos
- Chapter 7: Messages
- Chapter 8: FaceTime
- Chapter 9: Camera
- Chapter 10: Photos
- Chapter 11: Game Center
- Chapter 12: Mail
- Chapter 13: Passbook
- Chapter 14: Reminders
- Chapter 15: Safari
- Chapter 16: Newsstand
- Chapter 17: Calendar
- Chapter 18: Stocks
- Chapter 19: Maps
- Chapter 20: Weather
- Chapter 21: Notes
- Chapter 22: Clock
- Chapter 23: Calculator
- Chapter 24: Voice Memos
- Chapter 25: iTunes Store
- Chapter 26: App Store
- Chapter 27: Settings
- Chapter 28: Contacts
- Chapter 29: Nike + iPod
- Chapter 30: iBooks
- Chapter 31: Podcasts
- Chapter 32: Accessibility
- Appendix A: International Keyboards
- Appendix B: Safety, Handling, & Support
- Important safety information
- Important handling information
- iPod touch Support
- Restarting and resetting iPod touch
- “Wrong Passcode” or “iPod touch is disabled” appears
- “This accessory is not supported by iPod touch” appears
- Can’t view email attachments
- Backing up iPod touch
- Updating and restoring iPod touch software
- Learning more, service, and support
- Disposal and recycling information
- Apple and the environment

Chapter 2 Getting Started 13
Connecting iPod touch to your computer
If you don’t have Wi-Fi access, you might need to connect iPod touch to your computer to
complete setup. You can also connect iPod touch to your computer to sync music, videos, and
other information with iTunes. You can also sync content with your computer wirelessly. See
iCloud on page 14 and Syncing with iTunes on page 15.
Connect iPod touch to your computer: Use the included Lightning to USB Cable (iPod touch
5th generation) or Dock Connector to USB Cable (earlier iPod touch models).
Connecting to the Internet
iPod touch connects to the Internet via Wi-Fi networks. When joined to a Wi-Fi network that is
connected to the Internet, iPod touch connects to the Internet automatically whenever you use
Mail, Safari, FaceTime, Game Center, Stocks, Maps, Weather, the App Store, or the iTunes Store. For
information about connecting to a Wi-Fi network, see Wi-Fi on page 94.
Setting up mail and other accounts
iPod touch works with iCloud, Microsoft Exchange, and many of the most popular Internet-based
mail, contacts, and calendar service providers. If you don’t already have a mail account, you can
set up a free iCloud account when you set up iPod touch, or any time in Settings > iCloud. See
iCloud on page 14.
Set up an iCloud account: Go to Settings > iCloud.
Set up some other account: Go to Settings > Mail, Contacts, Calendars.
You can add contacts using an LDAP or CardDAV account if your company or organization
supports it. See Adding contacts on page 103.
You can add calendars using a CalDAV calendar account, and you can subscribe to iCalendar (.ics)
calendars or import them from Mail. See Working with multiple calendars on page 75.
Apple ID
An Apple ID is the user name for a free account that lets you access Apple services, such as the
iTunes Store, the App Store, and iCloud. You need only one Apple ID for everything you do with
Apple. There may be charges for services and products that you use, purchase, or rent.
If you have an Apple ID, use it when you rst set up iPod touch, and whenever you need to sign
in to use an Apple service. If you don’t already have an Apple ID, you can create one whenever
you’re asked to sign in.
Create an Apple ID: Go to Settings > iTunes & App Stores and tap Sign In. (If you’re already
signed in and want to create another Apple ID, rst tap your Apple ID, then tap Sign Out.)
For more information, see support.apple.com/kb/he37.