
for iOS 6.0 software
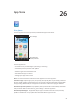

Table Of Contents
- iPod touch User Guide
- Contents
- Chapter 1: iPod touch at a Glance
- Chapter 2: Getting Started
- Chapter 3: Basics
- Chapter 4: Siri
- Chapter 5: Music
- Chapter 6: Videos
- Chapter 7: Messages
- Chapter 8: FaceTime
- Chapter 9: Camera
- Chapter 10: Photos
- Chapter 11: Game Center
- Chapter 12: Mail
- Chapter 13: Passbook
- Chapter 14: Reminders
- Chapter 15: Safari
- Chapter 16: Newsstand
- Chapter 17: Calendar
- Chapter 18: Stocks
- Chapter 19: Maps
- Chapter 20: Weather
- Chapter 21: Notes
- Chapter 22: Clock
- Chapter 23: Calculator
- Chapter 24: Voice Memos
- Chapter 25: iTunes Store
- Chapter 26: App Store
- Chapter 27: Settings
- Chapter 28: Contacts
- Chapter 29: Nike + iPod
- Chapter 30: iBooks
- Chapter 31: Podcasts
- Chapter 32: Accessibility
- Appendix A: International Keyboards
- Appendix B: Safety, Handling, & Support
- Important safety information
- Important handling information
- iPod touch Support
- Restarting and resetting iPod touch
- “Wrong Passcode” or “iPod touch is disabled” appears
- “This accessory is not supported by iPod touch” appears
- Can’t view email attachments
- Backing up iPod touch
- Updating and restoring iPod touch software
- Learning more, service, and support
- Disposal and recycling information
- Apple and the environment
Chapter 27 Settings 96
Do Not Disturb and Notications
Push notications appear in Notication Center and alert you to new information, even when the
associated app isn’t running. Notications vary by app, but may include text or sound alerts, and
a numbered badge on the app icon on the Home screen.
Turn o all notications: Go to Settings and turn o Do Not Disturb. When it’s turned on and
iPod touch is locked, all notications are silenced, but alarms will still sound. You can set the
following options in Settings > Notications > Do Not Disturb:
•
Automatically turn on Do Not Disturb: Set the starting and ending hours for when you don’t
want to be disturbed. iPod touch turns on Do Not Disturb during these hours each day.
•
Allow some FaceTime calls during Do Not Disturb: When Do Not Disturb is on, FaceTime calls are
silenced. To allow some callers to ring through, tap Allow Calls From. You can allow calls from
your Favorites list or other Contacts groups you dene. For information about Favorites, see
Chapter 28, Contacts, on page 102.
•
Allow persistant callers to ring through: Turn on Repeated Calls. If the same caller (based on
their FaceTime ID) calls you twice within three minutes, iPod touch will ring.
Turn an app’s notications on or o: Go to Settings > Notications. Tap an item in the list, then
turn notications on or o for that item. Apps that have notications turned o appear in the Not
In Notication Center list.
Change how notications appear: Go to Settings > Notications. You can:
•
Change the number of notications: Choose an item in the In Notication Center list. To set
how many notications of this type appear in Notication Center, tap Show.
•
Change the alert styles: Choose an item in the In Notication Center list. Choose an
alert style, or select None to turn o alerts and banners. Notications will still appear in
Notication Center.
•
Change the order of notications: Tap Edit. Drag the notications into the order you want. To
turn o a notication, drag it to the Not In Notication Center list.
•
Display numbered badges on apps with notications: Choose an item in the In Notication
Center list and turn on Badge App Icon.
•
Hide alerts from an app when iPod touch is locked: Choose the app in the In Notication Center
list, then turn o “View in Lock Screen.”
Some apps have additional options. For example, Messages lets you specify how many times the
alert sound repeats and whether message previews appear in the notication.
Remove Post and Tweet from Notication Center: These sharing options appear only if you
have Facebook or Twitter accounts congured. To remove these buttons, go to Settings >
Notications > Share Widget.