
for iOS 6.1 software
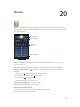

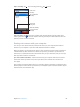
Table Of Contents
- iPod touch User Guide
- Contents
- Chapter 1: iPod touch at a Glance
- Chapter 2: Getting Started
- Chapter 3: Basics
- Chapter 4: Siri
- Chapter 5: Music
- Chapter 6: Videos
- Chapter 7: Messages
- Chapter 8: FaceTime
- Chapter 9: Camera
- Chapter 10: Photos
- Chapter 11: Game Center
- Chapter 12: Mail
- Chapter 13: Passbook
- Chapter 14: Reminders
- Chapter 15: Safari
- Chapter 16: Newsstand
- Chapter 17: Calendar
- Chapter 18: Stocks
- Chapter 19: Maps
- Chapter 20: Weather
- Chapter 21: Notes
- Chapter 22: Clock
- Chapter 23: Calculator
- Chapter 24: Voice Memos
- Chapter 25: iTunes Store
- Chapter 26: App Store
- Chapter 27: Settings
- Chapter 28: Contacts
- Chapter 29: Nike + iPod
- Chapter 30: iBooks
- Chapter 31: Podcasts
- Chapter 32: Accessibility
- Appendix A: International Keyboards
- Appendix B: Safety, Handling, & Support
- Important safety information
- Important handling information
- iPod touch Support
- Restarting and resetting iPod touch
- “Wrong Passcode” or “iPod touch is disabled” appears
- “This accessory is not supported by iPod touch” appears
- Can’t view email attachments
- Backing up iPod touch
- Updating and restoring iPod touch software
- Learning more, service, and support
- Disposal and recycling information
- Apple and the environment

21
84
Notes
Type notes on iPod touch, and iCloud makes them available on your other iOS devices and Mac
computers. You can also read and create notes in other accounts, such as Gmail or Yahoo!.
Tap the note to edit it.
Tap the note to edit it.
Delete the note.
Delete the note.
Email or print
the note.
Email or print
the note.
Add a new note.
Add a new note.
View the list of notes.
View the list of notes.
View the previous or next note.
View the previous or next note.
Use iCloud to keep your notes up to date on your iOS devices and Mac computers:
•
If you use an icloud.com, me.com, or mac.com email address for iCloud: Go to Settings > iCloud
and turn on Notes.
•
If you use a Gmail or other IMAP account for iCloud: Go to Settings > Mail, Contacts, Calendars
and turn on Notes for the account.
Choose the default account for new notes: Go to Settings > Notes.
Create a note in a specic account: Tap Accounts and select the account, then tap to create
the note. If you don’t see the Accounts button, tap the Notes button rst.
See only notes in a specic account: Tap Accounts and choose the account. If you don’t see the
Accounts button, tap Notes rst.
Delete a note while viewing the list of notes: Swipe left or right across the note in the list.
Search for notes: While viewing the list of notes, scroll to the top of the list to reveal the search
eld. Tap in the eld and type what you’re looking for. You can also search for notes from the
Home screen. See Searching on page 27.