iWeb Getting Started Get to know iWeb and learn how to create your own website.
1 2 Chapter 1 3 3 3 4 4 4 6 Chapter 2 7 7 8 8 9 10 11 14 17 19 20 21 21 23 23 24 Contents Welcome to iWeb About iWeb What You’ll Learn Before You Begin What You Need Useful Terms to Know iWeb Interface Learn iWeb Overview of Creating a Website Step 1: Plan Your Website Step 2: Create Your Website Adding Your Own Text Adding Your Own Graphics Adding Photos and Photo Albums Creating a Blog Adding Links to Other Pages Adding a Map Organizing Your Website Renaming Your Site or Page Step 3: Publish Your W
1 Welcome to iWeb 1 This document will help you quickly create a website using iWeb. If you’ve always wanted your own website but weren’t sure how to create one, iWeb is an easy and fun way to accomplish that goal. About iWeb iWeb is the easiest way to create and publish great-looking websites. You see what each webpage will look like as you work on it—you don’t have to know anything about programming or web-authoring languages such as HTML.
Before You Begin To make it easier to complete this tutorial, you might want to print it. In many tasks shown in the tutorial (and in iWeb Help), you need to choose menu commands, which look like this: Choose Edit > Copy. The first word after Choose is the name of a menu in the iWeb menu bar. The next word (or words) indicates the item to choose from that menu.
 domain name: The root (the first part, after “http” and “www”) of your site’s web address is its domain. For example, the domain of the site www.example.com/index is “example.com.”  homepage: The first page that appears when you visit a website. Sometimes called the start page or default page.  hyperlink: Text or an object you can click to initiate an action, such as going to another webpage or opening a document.
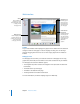
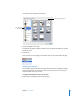
iWeb Interface Sidebar Navigation menu All the websites and webpages you create appear here. Click a page to display it in the webpage canvas. All of the pages in the site are listed here. Visitors click these links to view your webpages. Placeholder text and graphics Click the placeholder text and type your own titles and body text. Drag your own graphics files over placeholder graphics. Webpage canvas Edit the webpage here.
2 Learn iWeb 2 This tutorial takes you step by step through the process of creating a simple website. Overview of Creating a Website Plan your website. Your first step is to decide what you want on your website. Do you want to share photos? Write a travel journal? Display a portfolio of your work? Your website will consist of one or more webpages that are linked together. They can contain text, graphics, video, audio, and more.
If you’re not sure exactly what you want to put on your website, you can still go through the tutorial and learn how to use iWeb. Nothing will be visible to the public until you publish your website. Later, when you’re ready to “go live” with your website, you can publish it. Step 1: Plan Your Website iWeb provides themes and templates to help you create a beautiful site with a minimum of effort.
This tutorial uses the Modern Frame theme. Select a page template here. Select a website theme here. 3 Choose a template on the right. The Welcome template is already selected for you (the selected template has a yellow border around it). 4 Click Choose. Now you have your first webpage. The sidebar shows your site and a Welcome page. Adding Your Own Text Each template contains text boxes with placeholder text for titles, headings, and body text.
When you start typing, the highlighted placeholder text is replaced by what you type. Double-click placeholder text and type. You can move text boxes to different locations on the page or make them larger or smaller to accommodate more or less text. To move or resize a text box: 1 Click the text one time to show the selection handles around the text box. 2 Click inside the text box and drag the text box to reposition it. 3 Drag a selection handle to resize the text box.
To replace a placeholder graphic with a photo: 1 Click Media in the toolbar. 2 Click Photos. 3 Choose the album or Event that contains the photo you want. 4 Locate the photo in the thumbnails at the bottom of the Media Browser and drag it on top of the placeholder graphic on your webpage. The placeholder graphic disappears and your photo is now in place. When you click the photo, selection handles appear so that you can resize it.
 The My Albums template creates an index page for multiple photo and movie albums. Each album is represented on the page by one of the album’s photos. Movies are represented by their poster frames. Visitors click a photo or poster frame to view the album or watch the movie. When visitors move their mouse over the album, they see a mini-slideshow. Note: You can add photos and movies to any page (not just pages created with the Photos or My Albums templates) by simply dragging them to the page.
When you click a photo, a Photo Grid window appears. Use the settings in this window to change the style of the frame for all the photos on the page, change the number of columns, turn captions on or off, and more. For more information about using these settings, see “Changing the layout of photos on a Photos template” in iWeb Help. Change the layout of photos on the photo grid. Choose a frame style. While working in iWeb, select to view page numbers on paginated Photos pages, or view one scrolling page.
Adding Multiple Photo Albums to a Page If you have several photo or movie albums, you can create a My Albums page to provide a single index page for all of your albums. Instead of seeing many albums in your website navigation menu, visitors can click the single link for your My Albums page and instantly have access to all your albums. When visitors to your My Albums page move their mouse over albums, they can view a slideshow within the album frame without leaving the page.
iWeb provides two kinds of blog templates: Blog and Podcast. A podcast is an audio or video file that is like an Internet radio or TV show. You can produce your own podcasts and let visitors download them one by one, or they can download new episodes automatically through a subscription. You can add audio and video to both Blog and Podcast templates. For this tutorial, you’ll add a blog to your website and learn how to add new entries to it.
 Entries is where you create and manage your blog entries. Your website visitors won’t see this page, but if they click an excerpt on the main blog page, they’ll see the full entry.  Archive contains all your entries, including those that don’t appear on the main page. The blog templates include a link to the archive on the main blog page. This page is the one your website visitors see. It displays excerpts of your most recent blog entries and a link to the archive.
To edit existing blog entries: m Select the entry in the Title list and make your changes in the entry below the list. Letting Visitors Add Comments to Your Website If you publish your site to MobileMe, you can allow website visitors to add comments to your blog or photos. These comments are visible to anyone who visits your website. On blog pages, you can also allow visitors to attach files—which other visitors can download—to their comments.
To make links active in iWeb: 1 Click the Inspector button in the toolbar (if you don’t see it, click the right arrow in the toolbar and select Inspector). 2 Click the Link Inspector button, and then click Hyperlink. 3 Select the “Make hyperlinks active” checkbox. Important: This setting doesn’t affect links on your published website; it only turns links on or off in iWeb so you can edit and test them.
Turn Anything into a Hyperlink In addition to creating text hyperlinks, you can make any image, photo, or shape initiate one of the actions available in the Link To pop-up menu in the Link Inspector. For example, you could insert an arrow shape and then make it a link that visitors can click to go to the next page. For information about creating these kinds of hyperlinks, see “Creating a hyperlink” in iWeb Help.
Organizing Your Website iWeb automatically creates a navigation menu—a table of contents that appears on every page of your website. Users click a page title in the navigation menu to go to that page. When you add a new page to a site, iWeb automatically adds a link for it to the navigation menu. You determine the order of items in the navigation menu by rearranging pages in the sidebar. The navigation menu is automatically updated to reflect the new organization.
Renaming Your Site or Page When you add a new website or webpage, iWeb gives it a default name. The site name appears in your website’s URL: http://web.me.com/YourMemberName/SiteName The page name appears at the top of the visitor’s browser window: The page name appears in the website’s URL and at the top of the browser window. The site name you use here is part of your website’s URL. You might want to rename your site or any of your pages to reflect their content.
To use your own domain name for a site published to MobileMe: 1 Choose File > Set Up Personal Domain. 2 On the MobileMe website, follow the onscreen instructions. Anyone who has access to the Internet can visit your site. People who know the URL can go directly to your website, or your website might appear as a search result. If you don’t want your website to be visible to everyone on the Internet, you can set up your website so that only people who know the user name and password can visit it.
Some of the features in iWeb can’t be used with any hosting service other than MobileMe. If you publish your website to another hosting service, see “Publishing to a server or hosting service other than MobileMe” in iWeb Help. If You Already Have HomePage Content on Your MobileMe Site If you have previously published webpages using HomePage, they are still available at: http://homepage.mac.com/YourMemberName Websites you create in iWeb and publish to MobileMe are available at: http://web.me.
Getting More Help There are several resources you can consult for additional help with iWeb: Â Onscreen help: iWeb comes with a built-in help system. When iWeb is open, choose Help > iWeb Help. When the help opens, type a word or phrase in the search field at the top, or click a topic to get detailed instructions for completing specific tasks. Â Video tutorials: These short videos demonstrate how to do common tasks in iWeb.
www.apple.com/iweb © 2008 Apple Inc. All rights reserved. Apple, the Apple logo, iLife, iPhoto, iTunes, and Mac OS are trademarks of Apple Inc., registered in the U.S. and other countries. iWeb and Safari are trademarks of Apple Inc. iTunes Store is a service mark of Apple Inc., registered in the U.S. and other countries. MobileMe is a service mark of Apple Inc. Other product and company names mentioned herein may be trademarks of their respective companies.