iWeb Getting Started Get to know iWeb and learn how to create your own website
1 Preface 4 4 5 5 6 7 Welcome to iWeb About This Document About iWeb iWeb Highlights Useful Words to Know For More Information Chapter 1 8 8 8 9 10 13 14 16 18 20 21 23 Creating a Website With iWeb What You’ll Learn Before You Begin Overview of Creating a Website Create a Website Add Your Own Text and Graphics Add a Photo Page Add a Blog Organize Your Website Add Links Publish Your Website on the Internet Next Steps Chapter 2 24 Inspectors and Other Windows at a Glance The Inspector Window The Site
5 36 Audio Pane The Adjust Image Window Contents 3
This document will help you quickly create a website using iWeb. If you’ve always wanted your own website but weren’t sure how to create one, iWeb is an easy and fun way to accomplish that goal. If you already have a website but you want a new look for it, or an easier way to update it, you can use iWeb to re-create a professional-looking, easy-to-manage website.
About iWeb iWeb is the easiest way to create and publish great-looking websites. You see what each webpage will look like as you work on it—you don’t have to know anything about programming or web-authoring languages such as HTML. iWeb Highlights  Apple-designed templates. The collection of templates that comes with iWeb provides an elegant starting point for any website. Templates have been specially designed for photo pages, blogs, and more.
Useful Words to Know Here are brief definitions of some of the terms you’ll see as you work with iWeb. Â Blog: A web-based journal that can contain text, photos, and other media. For more information, see “What Is a Blog?” on page 16. Â Browser: An application you use to visit websites. (Mac OS X comes with a browser called Safari.) Â Hyperlink: Text or an object you can click to initiate an action, such as going to another webpage or opening a document.
 Website: A collection of information—usually including graphics and hyperlinks to other parts of the website or to other websites—made available on the Internet. A website, or site, consists of one or more webpages that are linked together.  Webpage: Most websites are organized into webpages, or pages, that are linked together. For More Information To get the most out of iWeb, consult these resources:  Onscreen help: iWeb Help provides detailed instructions for accomplishing tasks in iWeb.
1 Creating a Website With iWeb 1 This tutorial takes you step by step through the process of creating a simple website. What You’ll Learn In this tutorial, you’ll learn to do the following: Â Create a website that has three different webpages—a welcome page, a photo page, and a blog (a web journal—see “What Is a Blog?” on page 16). Â Add a link to another website. Â Add an Email Me button, so that your visitors can contact you.
Overview of Creating a Website Step 1: Plan your website. A website consists of one or more webpages, which can contain text, graphics, video, audio, and more. The number of webpages in your website depends on what you are going to use the website for. Do you want to share photos? Write a travel journal? Display a portfolio of your work? With iWeb, it’s easy to modify, add, or remove webpages at any time, so you don’t have to decide every detail before you begin.
Create a Website To get started, you’ll create a website that consists of one page (a welcome page). To create a website: 1 If iWeb isn’t open, double-click the iWeb application icon in your Applications folder. If iWeb is already open, and you don’t see the template chooser shown below, click the Add Page (+) button at the bottom of the iWeb window (or choose File > New Page). In the template chooser that appears, click Freestyle on the left.
Now you have your first webpage. The iWeb window looks like this: The navigation menu All of the pages in the site are listed here. Visitors click these links to view your webpages. The site organizer All the websites (globes) and webpages (rectangles) you create with iWeb appear here. Click a page to display it in the webpage canvas. The webpage canvas This area shows what the webpage looks like.
The iWeb Toolbar The toolbar at the bottom of the iWeb window gives you one-click access to many of the actions you’ll perform as you create webpages. Add text and predrawn shapes that you can modify. Open windows to add photos, songs, or movies; adjust images; perform tasks; change colors and fonts. Add Page button Add a new webpage to a website. Publish your site to .Mac to make your website available on the web. Visit published websites. Move objects up or down in a stack.
Add Your Own Text and Graphics Each template contains text boxes, with placeholder text, for different elements on the page. If you click the text, the entire text box is selected and selection handles appear. You can drag the text box to reposition it, and you can resize it by dragging a handle. Drag one of these handles to resize the text box. Experiment with adding your own text. To replace placeholder text with your own text: m Click the placeholder text and start typing.
Add a Photo Page Now you’ll add more pages to your website. You can add pages in any order; it’s easy to rearrange them at any time by dragging them in the site organizer (see “Organize Your Website” on page 18). iWeb provides special templates for pages that contain mainly photos instead of text. The Photos templates include a photo grid that automatically sizes and positions each photo as you add it, and provides a placeholder caption for each photo.
If you have used iPhoto to store photos, you can access them using the Media Browser. Click this button in the toolbar to open the Media Browser. Click Photos. Drag a photo from the Media Browser to your webpage. To add photos using the Media Browser: 1 If the Media Browser isn’t open, click Media in the toolbar (or choose View > Show Media Browser). 2 In the Media Browser, click Photos. 3 Drag a photo from the Media Browser to any image on the photos page.
To add a caption to a photo: m Click the placeholder text below a photo and type a caption. Add a Blog iWeb provides two kinds of blog templates: Blog and Podcast. You can add multimedia content (podcast, audio, video) to both. What Is a Blog? A blog is a journal that’s posted on the web for others to read. (The word blog is short for web log.) New entries are added periodically; the previous entries (the archive) are always available as well.
The first blog entry appears, with the current date. Double-click the placeholder text to create your own title and body text. All of your entries are listed here. Click an entry to display it below. Drag an image, audio file, or movie to this media placeholder. Type your entry title here. Create your current blog entry here, or edit a previous entry. This page is the one your website visitors see. It displays excerpts of your most recent blog entries and a link to the archive.
To add a blog entry: 1 In the site organizer, click Entries. 2 Click the Add Blog Entry button. The date appears automatically above each blog entry. You can give each blog entry its own title. To change the title of a blog entry, do one of the following: Â Double-click the placeholder title text and type the title. Â Double-click the entry in the Title list and type the title. To edit a blog entry: m On the Entries page, click an entry in the Title list.
When you add a new webpage to a site, iWeb automatically adds a link for it to the navigation menu. You can prevent a page from appearing in the navigation menu using the Page Inspector. For more information, see “Setting up the navigation menu (table of contents)” in iWeb Help. Deleting Webpages and Websites You can delete a webpage or website at any time by selecting it in the site organizer and pressing Delete. (The content is permanently deleted unless you choose Edit > Undo Delete immediately.
For website and webpage names, avoid non-Roman characters, spaces, tabs, and returns. Other characters—including backward slash (\), brackets ([ ]), exclamation point (!), “at” sign (@), number sign (#), dollar sign ($), ampersand (&), asterisk (*), and colon (:)—are not recommended. Using these characters may result in names with strange numbers in them. For more information, see the topics “Renaming a website” and “Renaming a webpage” in iWeb Help.
Publish Your Website on the Internet In this section of the tutorial, you’ll publish your website to .Mac so that others can visit your site. To publish your site to .Mac, you must have at least a free trial .Mac membership. You (and others) can access your iWeb website until the trial period expires; as soon as you become a .Mac member, you can publish your site site again. To get a free or full .Mac membership, visit www.mac.com. To publish your website to .
Important: Don’t enter your .Mac user name and password; create a name and password that would be hard to guess (they don’t have to be real words, but could be a combination of letters and numbers). 5 Publish your website by clicking the Publish button. When you click Announce, the email message includes the user name and password you specified. If you belong to a .Mac group, you can also publish a site so that only group members can see it. For instructions, see “Publishing a site to a .
Next Steps Congratulations! You’ve completed the tutorial. You will probably want to further customize your website content, add more photos and other graphics, and include special elements such as an automatic visitor counter. As you get more comfortable with iWeb, you might want to include other templates on your website. If you have questions as you explore the other features of iWeb, choose Help > iWeb Help.
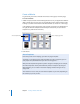
2 Inspectors and Other Windows at a Glance 2 This chapter describes the controls you’ll use in iWeb. You can use this chapter to get familiar with the iWeb interface and learn the names of the iWeb controls. Use this chapter as a reference while you work and as you follow the instructions in the tutorial (Chapter 1, “Creating a Website With iWeb,” on page 8) and in iWeb Help. The Inspector Window The Inspector window puts formatting tools and other commands at your fingertips.
The Site Inspector Use the Site Inspector to change settings that apply to the selected website. E A B F G C D A Site Name field: If you have more than one website, you can name them so that you’ll know which one is which while working in iWeb. The site name you specify here is part of your website’s URL. Some characters are not recommended for use in website names. For more information, see “Renaming a website” in iWeb Help. B “Publish to a group” checkbox and pop-up menu: If you are a member of a .
The Page Inspector Use the Page Inspector to change settings that apply to the selected webpage. A B C D E 26 A Page Name field: The name you specify here appears in the title bar of the browser window when someone visits your website. Some characters are not recommended for use in webpage names. For more information, see “Renaming a webpage” in iWeb Help.
The Blog & Podcast Inspector Use the Blog & Podcast Inspector to change blog and podcast settings. A C B D E F G A “Number of excerpts to show” field: Change the number of entries displayed on your blog. B Excerpt Length slider: Drag the slider to make blog excerpts shorter or longer. C Series Artist field: Set the artist name for this podcast series.
The Text Inspector Use the Text Inspector to adjust text properties such as color, alignment, and spacing. B C A D E F G 28 A Color well: Click to change the color of selected text. B Horizontal alignment buttons: Click to align selected text left, right, center, or to the left and right (justified). C Vertical alignment buttons: Click to align text to the top, center, or bottom of a text box or shape. D Background Fill checkbox: Select the checkbox to put a color behind text in a text box.
The Wrap Pane (Text Inspector) Use the Wrap pane to adjust the way text wraps around an inline object, such as a shape or photo. A C B A “Object causes wrap” checkbox: Select to make text wrap around the selected object. Note: Only inline objects can have text wrapped around them. B Text wrap alignment buttons: Click to select how you want the text to wrap around the object. The first button wraps text to the right of the object. The second button wraps text around the left side of the object.
The Graphic Inspector Use the Graphic Inspector to change object properties such as fill, stroke (line width), shadow, and opacity. A B B H C D E F G 30 A Fill pop-up menu: Fill an object with a solid color, a color gradient, an image, or a tinted image (an image with a wash of color over it). B Color wells and gradient controls: If you choose Gradient Fill from the Fill pop-up menu, click each color well to choose a color. Click the double-headed arrow to invert the gradient.
G Opacity slider and field: Drag the slider (or enter a value in the field) to make the selected object more or less transparent. H Image Fill settings: To change the image, drag a file to the image well or click Choose. Choose a scaling option from the pop-up menu. Â Scale to Fit resizes the image to fit the object’s dimensions as well as possible. If the object’s shape is different from that of the original image, parts of the image may not appear; blank space may also appear around the image.
The Link Inspector Use the Link Inspector to create hyperlinks users can click to open a webpage, file, or email message. A B C 32 A “Enable as a hyperlink” checkbox: Select to make the selected text or object a hyperlink. B Link To pop-up menu: Choose what you want the link to open. Â One of My Pages: Choose one of your websites or webpages from the Page pop-up menu (the Page pop-up menu appears when you choose “One of My Pages” from the Link To pop-up menu).
The Media Browser The Media Browser gives you easy access to all the photos in your iPhoto library, as well as all the music in your iTunes library and the movies stored in your Movies folder. Photos Pane All the photos in your iPhoto library appear here. A B A iPhoto albums list: Photo albums you’ve created in iPhoto appear here. You can drag an album to the webpage canvas in the iWeb window to add all the photos in the album to the webpage.
Movies Pane Movies stored in the Movies folder on your hard disk appear here. A B D C 34 A Movie folders list: Folders in your Movies folder, iPhoto library, and iTunes library appear here. Click a folder to see the movies it contains. B Movie thumbnails: Drag a movie from here to a webpage. C Play button: Click to play the selected thumbnail movie. Click again to stop playing. D Search field: Type a movie name here to locate the movie.
Audio Pane Here you can see all the music in your iTunes library, as well as podcasts you create in GarageBand. A B A Source list: Choose to display podcasts you’ve created in GarageBand, all the songs in your iTunes library, or playlists you created in iTunes. B Songs list: Drag a podcast, song, or playlist from here to a webpage for visitors to listen to. Note: Songs purchased from the iTunes Music Store must be authorized to play on the visitor’s computer.
The Adjust Image Window Click the Adjust button in the toolbar for advanced controls that adjust image properties such as brightness, saturation, and sharpness. A B C D E F 36 G A Brightness and Contrast controls: Â Brightness: Make the overall image lighter or darker. Â Contrast: Make different parts of the image stand out. You can make shadows darker, sharpen the edges of objects, and make colors stand out more. If you increase the contrast of a photo a lot, it looks more like an illustration.
www.apple.com/iweb © 2006 Apple Computer, Inc. All rights reserved. Apple, the Apple logo, iLife, iMovie, iPhoto, iTunes, Mac, the Mac logo, and Mac OS are trademarks of Apple Computer, Inc., registered in the U.S. and other countries. Finder, GarageBand, iWeb, and Safari are trademarks of Apple Computer, Inc. iTunes is a service mark of Apple Computer, Inc., registered in the U.S. and other countries. .Mac is a service mark of Apple Computer, Inc.