
User`s guide


Slide Transitions and Object Builds 75
Slide transitions that you select in the Slide Inspector are applied only to the selected slide.
To apply a transition to another slide, you must first select it and then repeat steps 1 through
5.
Creating Object Builds
To add visual interest to your slide presentation, you can create object builds on each slide.
Object builds allow you to animate the elements on a single slide one at a time or in groups
in any order you like. For instance, you might have an image move in from the left side of the
screen and then, line by line, display the bulleted text that goes alongside it. To build two
objects at the same time, you must group them. (To read about grouping objects, see
“Grouping and Locking Objects” on page 41.) Keynote makes it easy to create a variety of
object builds.
Follow these steps to create an object build.
Step 1: Set “Build In” styles and sequence
1
Choose View > Show Inspector (or click the Inspector button in the toolbar) to open the
Inspector window.
2 In the Inspector window, click Build to open the Build Inspector.
3 Click the Build In tab.
4 Select an item on the slide and then choose an animation from the Build Style pop-up menu.
You can select graphic objects; bulleted text, labels, or other text objects; and sound objects
(represented with an audio icon).
5 Choose the direction from which you want the object to move onto the slide from the
Direction pop-up menu.
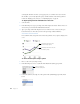
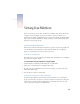
Set the animation style, direction,
order, and speed for each object.
Select this to make the object
build start when you click the
mouse during your presentation.
Use Build In
animations to move
slide elements on the
screen, and Build Out
animations to move
elements offscreen.
Preview the build styles.