
Technical information


Using the driver to print to a PostScript file
Using the driver to print to a PostScript file is a three-step process. First
change your printer setup, then use your program to create the file, and finally
reset your printer setup for normal printing.
Step 1: Changing your printer setup to print to a PostScript file
1From the Program Manager, open the Control Panel and double-click the Printers icon.
The Printers dialog box appears.
2If it is not already selected, select the name of the PostScript printer that you are using
from the Installed Printers list.
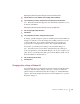
3Select Connect.
The Connect dialog box appears.
4Select FILE from the Ports list box.
You may have to scroll through the list to find this selection.
5Choose OK to close the Connect dialog box and return to the Printers dialog box.
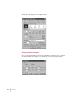
6Choose Setup.
The driver Setup dialog box appears.
7After changing (or confirming) your printer settings, choose OK to close the dialog box.
Note: Choose settings in the PostScript Options dialog box that will produce
a file that prints correctly on the destination printer. For example, select the
“Use PostScript Level 2 Features” option if you are sure that you will be
printing the file only on Level 2 printers. If you plan to use a printer that does
not support binary communication, disable the “Send Data in Binary” option.
The “Optimize for Portability” option creates PostScript files that print
successfully from different programs on a wide variety of printers and
imaging devices; it is recommended that you enable this option.
8Choose Close to close the Printers dialog box.
9Choose Exit from the Settings menu to close the Control Panel.
Your computer is now set up to create PostScript files when you choose the
Print command from a Windows program.
163
Windows 3.1 and DOS Users