Contents I. Welcome 4 PART ONE : INSTALLATION & SETTINGS 5 II. Installing Dexter Software II 1. On the Mac II 2. On the PC 6 6 6 III. Hooking Dexter up 7 IV. Setting up your Digital Audio Workstation IV 1. Logic Pro 7.2 (Mac) IV 2. Cubase 4 (Mac and PC) and Nuendo 3 (PC) IV 3. Sonar (PC) 8 8 10 11 V. Getting them to talk 12 PART TWO : OPERATING DEXTER 13 VI. Touching techniques 14 VII. Workspace overview VII 1. Navigation Bar VII 2. Name Strip VII 3. Mixer VII 4.
User Manual I. Welcome Thank you for choosing Dexter as your Digital Audio Workstation controller ! The first part of this guide will get you and your Dexter all prepared and ready to get in control. Part two will then walk you through Dexter’s user interface and workflow.
PART ONE : INSTALLATION & SETTINGS
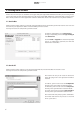
User Manual II. Installing Dexter Software Dexter relies on several pieces of software to integrate with your Digital Audio Workstation. Before you start using Dexter, you need to install specially developped plug-ins at the heart of your DAW. Additionally, support for Apple Logic Pro on the Mac is made possible via an extra application called the JazzDaemon. Read on to install the necessary Dexter software ! II 1. On the Mac Double click the Dexter Installer icon located on the bundled CD.
INSTALLATION & SETTINGS III. Hooking Dexter up Dexter uses standard Ethernet to connect with your computer. You can connect it directly to your computer with a single, crossover Ethernet cable, or place it on a local area network via a hub or switch. You may want to use a local area network if any of the following are true: - You are using your computer’s Ethernet port to connect to the internet, and you want to keep the connection while working with Dexter.
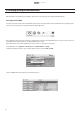
User Manual IV. Setting up your Digital Audio Workstation Now that Dexter can talk with your computer, we'll move on to setting up your Digital Audio Workstation. IV 1. Logic Pro 7.2 (Mac) First of all, you need to make sure the JazzDaemon application is running. Double click the JazzDaemon in your Applications folder. Its icon should appear in the right hand side of your Menubar. The JazzDaemon will convert all data that's coming frm the Lemur into standard MIDI data.
INSTALLATION & SETTINGS Select any virtual MIDI port as the Input port for the newly added surface. We'll choose Daemon Input 0, a virtual MIDI port that was created by the JazzDaemon. You'll probably not care for the rest of those virtual MIDI ports, unless you also use a Lemur with the JazzDaemon. Logic has a whole bunch of control surface preferences, all of which are documented in its User Manual.
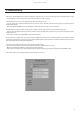
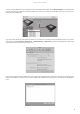
User Manual Double-tap it or press the small arrow on the left. You are now presented with all the MIDI ports attached to this computer. Select the virtual MIDI port you chose in Logic preferences, and hit Connect. You've setup everything that's specific to Logic, move on to the next section for the last words on conversing with a DAW! IV 2. Cubase 4 (Mac and PC) and Nuendo 3 (PC) In the Devices menu, select Device Setup. Click the Plus sign to add a control surface.
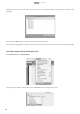
INSTALLATION & SETTINGS You can now see JazzMutant Dexter instantiated in the Remote Devices section of the Setup window. You've setup everything that's specific to Cubase/Nuendo, move on to the next section for the last words on DAW conversation ! IV 3. Sonar (PC) Choose Options->Controllers/Surfaces. Click the yellow star to add a new control surface. Select JazzMutant Dexter in the Controller/Surface list.
User Manual V. Getting them to talk Your DAW is ready to speak with Dexter. If you're using Logic, you've also learnt how to setup the JazzDaemon as an intermediary for the conversation between the two. All you need to do is associate Dexter with the DAW you want to control. This can be done automatically or manually, from Dexter itself. Have a look at the DAW section in Dexter's settings page.
PART TWO : OPERATING DEXTER
User Manual VI. Touching techniques The multitouch technology featured on Dexter combines high resolution with high sensitivity. Though you'll find caressing Dexter a very natural thing to do, the following guidelines will make its manipulation even more comfortable. You don't have to use excessive force to control the widgets on the screen. Extremely light touch, on the other hand, won't work either.
OPERATING DEXTER VII 3. Mixer The Mixer view puts all the main parameters such as volume, pan, mute, solo and arm right at your fingertips, and allows easy access to the other views. Kik Snare Level -11.48 Bass Level -11.06 Guitar left Level -10.42 Guitar right Chorus Skank Gu... Distorted Guitar Distorted Guitar 2 Level -2.76 Level -3.50 Level -3.49 Level -2.54 Level -13.23 Master VII 4.
User Manual VII 5. Equalizer The EQ View allows ergonomic adjustments to the EQ for the currently selected track. Kik Snare 20 50 Bass 100 Guitar left 200 Chorus Skank Gu... Guitar right 500 1k Distorted Guitar 2k Distorted Guitar 2 5k 10k 20k 0 2 3 1 VII 6. Insert View The Plugin View lets you access all parameters for inserted plugins. Kik Snare Compressor Amp Model Lead 2 Bass Guitar left AmpSimulator Guitar right AutoPan No Effect Drive Bass Mid Treble Presence 7.
OPERATING DEXTER VII 7. Surround View The Surround View provides a simple interface to perform surround panning across multiple tracks.
e User Manual VIII. Using the Mixer The Mixer View is the main hub of your mix sessions, as it provides direct access not only to the master fader, but also to all banks of channel strips. VIII 1. Using the navigation bar The transport controls, located at the center of the Navigation Bar, put the most commonly used transport functions at Chorus Distorted playbackDistorted theBass forefront.
OPERATING DEXTER VIII 2. Channel strips Each Channel is equipped with a volume fader with built-in graphical metering, a level readout, mute, solo and record arm track status buttons, and Automation Read/Write buttons. At the top of each Channel strip you have direct access buttons to get to the EQ View, Insert View or the Channel Edit view. This section also provides the Track Pan Flip button.
User Manual VIII 3. Master Fader section The Master Fader Section to the right of the Mixer View contains the all-important master volume fader, as well as a selection of tools to help you treat the individual tracks in groups. The Zoom Section of the Mixer View provides a novel twist on the concept of the volume fader: for the first time ever it is now possible for the faders to zoom in on a specific amount of gain and increase the resolution to achieve changes as small as 0.
OPERATING DEXTER 3.1 Zoom section The Zoom section is comprised of three Zoom presets and the Variable Zoom slider. They all control the resolution of channel strips and master faders. While the Zoom presets are selected by simply tapping them with a finger, the Variable Zoom Sliders takes the guise of a button but is actually a slider : touch the Zoom Slider and move your finger upwards or downwards to adjut the zoom level of all faders. ass Guitar left Guitar right Chorus Skank Gu...
User Manual IX. Equalizer view The Dark Art of Eqing is difficult to master. The EQ View allows ergonomic adjustments to the EQ for the currently selected track, while giving you a good view of what is going on EQ-wise in your track. This view is dominated by a large window showing the EQ curve for the currently selected track. It also has a row of EQ band Activators and X/Y Locking Buttons along its top, as well as the friendly Zoom buttons to the right.
Distorted Guitar Distorted Guitar 2 OPERATING DEXTER To the right of the EQ curve you will find the Q Mode Switch. This changes the functionality of the EQ Band Handles so that moving them up and down no longer changes the gain, but rather tightens or widens the band’s quality factor, while still Distortedproviding the Distorted ability to change the frequency of the band.
User Manual Kik Snare X. Insert View Compressor Bass Guitar left AmpSimulator Guitar right AutoPan No Effect Chorus Skank Gu... Distorted Guitar No Effect Distorted Guitar 2 Level 1.18 No Effect Speaker The provides an of the insert plugins Presence loaded onto a track, and lets you manipulate the parameters Amp Insert Model View Drive BassoverviewMid Treble Volume Ty associated with them. Lead 2 7.4 5.0 5.0 9.3 5.0 5.
rus Gu... OPERATING DEXTER To the right of the plugin parameter faders and Zoom section you will see an enlarged version of the channel strip from the Mixer View. The volume fader is now full throw with an amazing range, and you also gain access to the sends for that particular track. Here Dexter will show up to eight sends, the destination of which is shown just next to each send knob.
User Manual Guitar Guitar left right ft Chorus Distorted Skank Gu... Guitar Chorus Guitar Skankright Gu... Dist Gu Guit XI. Channel Edit View The Channel Edit View, accessed via the button marked with an "E", serves as a hub for controlling all what’s going on the currently selected track.
Kik Snare Bass Guitar left Guitar right OPERATING DEXTER Chorus Skank Gu... Distorted Guitar 20 Effects View 50 100 200 500 Insert View. 1k It is coloured 2k 5k like its10k At the bottom of the Channel is a condensed view box for the green just bigger brother, but unlike the full-screen Insert View it provides a touchpad-like X/Y controller field, in which two parameters from the currently selected plugin can be tweaked.
User Manual XII. Surround View The Surround View provides a revolutionary way of controlling surround soundscape across several channels, through detailed panorama management tools. The View consists of a main Panning Circle to the left and rows of panorama management tools to the right. The Panning Circle will show up to eight tracks at a time as different coloured balls. Track names are displayed above each ball for Hi easy identification.
OPERATING DEXTER As mentioned earlier, the Name Strip above the Panning Circle displays the tracks that can be manipulated. A track can be added or left out from the view by pressing its name in the Strip. Tracks that can’t be adjusted in Surround view appear in gray. Synth1 Synth2 Drums Guitar Synth2 Synth3 Bass Voice2 Voice The panorama management tools provided in the Surround View consist of individual controls for each of the eight shown tracks.