EUCON™ Application Setup Guide EuControl v2.
Legal Notices This guide is copyrighted ©2011 by Avid Technology, Inc., (hereafter “Avid”), with all rights reserved. Under copyright laws, this guide may not be duplicated in whole or in part without the written consent of Avid.
Contents Chapter 1. Introduction . . . . . . . . . . . . . . . . . . . . . . . . . . . . . . . . . . . . . . . . . . . . . . . . . . . . . . . . . . . . . . . . . . . . . . . . . . . 1 System Requirements and Compatibility . . . . . . . . . . . . . . . . . . . . . . . . . . . . . . . . . . . . . . . . . . . . . . . . . . . . . . . . . . . . . 1 Conventions Used in This Guide . . . . . . . . . . . . . . . . . . . . . . . . . . . . . . . . . . . . . . . . . . . . . . . . . . . . . . . . . . . . . . . . . . .
Chapter 13. Additional Applications . . . . . . . . . . . . . . . . . . . . . . . . . . . . . . . . . . . . . . . . . . . . . . . . . . . . . . . . . . . . . . . . 43 The Foundry Storm . . . . . . . . . . . . . . . . . . . . . . . . . . . . . . . . . . . . . . . . . . . . . . . . . . . . . . . . . . . . . . . . . . . . . . . . . . . . 43 Pomfort Silverstack SET . . . . . . . . . . . . . . . . . . . . . . . . . . . . . . . . . . . . . . . . . . . . . . . . . . . . . . . . . . . . . . . . . . . . . . . .
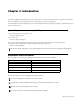
Chapter 1: Introduction The EUCON Application Setup guide helps you set up EuControl to work with several audio and video applications. EuControl must be installed before proceeding to the section in this Guide for your specific application. See the Installation section in the Quick Setup or User Guides included with your Artist Series controller to install EuControl if you have not already done so. System Requirements and Compatibility For downloads and Artist Series support, visit: www.avid.
Hardware Keys on Artist Series Units The names of keys on Artist Series hardware are in bold (such as SEL). The SHIFT key on Artist Series hardware is indicated by bold text, in all-caps (SHIFT). SHIFT and SHIFT Lock The SHIFT key on Artist Series units is used in conjunction with other keys to access secondary functions that are labeled in blue above the primary function. Two SHIFT keys are located at the bottom-left and -right on both MC Control and MC Mix.
Chapter 2: Pro Tools Pro Tools™ and Pro Tools|HD 9.0 and higher are fully EUCON-aware. This chapter explains how to configure and enable EUCON™ in Pro Tools, and shows you some common tasks to get you up and running. For more examples and workflows for Pro Tools 9.0 and higher, see the Artist Series Pro Tools guide. If you are using Pro Tools 8.x or lower, see Appendix B, “Pro Tools (HUI).” Software Configuration Before you proceed, make sure you have completed the following: • Installed Pro Tools 9.
4 Click to select Enable EUCON. Enabling EUCON in Peripherals > Ethernet Controllers 5 Click OK. You do not need to configure any other Ethernet Controllers settings. These settings do not apply to EUCON. Using Artist Series controllers with Pro Tools 8.x or lower utilized the HUI (MIDI Controller) protocol. With Pro Tools 9.0 or higher, this is no longer necessary. Pro Tools scans your system until it identifies attached EUCON-compatible hardware.
Tips and Shortcuts Assigning Plug-ins To assign a plug-in: 1 Select a track. 2 Press the INSERTS key (Artist Mix) or the INSERTS encoder (Artist Control). 3 Press both PAGE keys (< PAGE and PAGE >) simultaneously. Insert slots are displayed in the Touchscreen (a, b, c, and so on), and both PAGE keys flash. 4 Press the encoder next to the desired insert slot. The Soft Encoders show the next level of choices: no insert, multichannel, multi-mono, or I/O (for hardware inserts, when available).
To access and edit a plug-in on Artist Control: 1 Bank to and select track that already has a plug-in inserted. 2 Press the INSERTS encoder. HOME SOFT KEYS END Soft Encoder for Inserts If no plug-in is inserted in the current slot, the slot letter appears in lower-case (a, b, c, and so on). If any plug-ins are already assigned in the current slot, the name of the plug-in is shown. Plug-in names are abbreviated as necessary.
Assigning Sends To assign sends with Artist Control: 1 Select one or more tracks. 2 Press the SENDS Soft Knob. HOME SOFT KEYS END Soft Encoder for Sends 3 If desired, press the lit PAGE > key to go to sends f–j. 4 Press both PAGE keys (< PAGE and PAGE >) simultaneously, to enter Send Assign mode. 5 Press the encoder for the send slot (a–j) you want to assign. The next choices for Send assignment appear above each Soft Encoder.
Surround Panning Artist Mix Artist Mix lets you use the encoders to control multichannel pan parameters. To pan in surround: 1 Press a track SEL key to select a track assigned to a multichannel output path (such as a 5.1 or 7.1 output path). 2 Press the PAN key. 3 Press the CHAN key. Multichannel pan parameters such as Front Left/Right, Front/Rear, divergence, pan, and center percentage appear in the Soft Encoders.
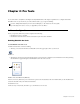
Chapter 3: Media Composer The Controller Settings dialog lets you configure your Avid editing application to communicate with Artist Series controllers. To configure your Avid editing application for an Artist Series controller: 1 Double-click Controller Settings in the Settings list of the Project window. The Controller Settings dialog appears. 2 Select Controller > EUCON Controller. 3 Click OK.
EuControl Settings application opens. The All Surfaces list displays all available Artist Series controllers. 4 Click the Automatically add: menu and do one of the following: • To add all controllers listed in the All Surfaces list — which lists all devices available on your subnet — select All Surfaces. This setting is useful when you are the only person running EuControl on your network. • To add only those controllers listed in the My Surfaces, select My Surfaces Only.
Common Tasks Moving Through Footage with Artist Series Controllers You can use your Artist Series controller to control how you move through footage. Depending on the functions available on your controller and the default and customizable controls, you can use the following methods: • The Jog wheel allows for frame-by-frame positioning, depending on how fast you turn the wheel right (clockwise) or left (counterclockwise). Use the Jog wheel when you want to locate a specific frame by slowly viewing footage.
Recording Automation Gain and Pan with Artist Series Controllers If you record your automation in unlatched mode, releasing the fader returns the gain or pan values to the original values of the audio in your sequence. For information on enabling latch mode, see your Media Composer documentation. To record automation gain and pan information using an Artist Series controller: 1 Select Tools > Audio Mixer. The Audio Mixer tool opens.
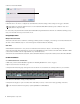
Chapter 4: Final Cut Pro Configuring Apple Final Cut Pro to operate with the Artist media controllers is simple. Always check with the manufacturer of your specific application for the most recent software, requirements, and instructions. To enable EuControl in Final Cut Pro: 1 In Final Cut Pro, choose Tools > Control Surfaces. The Control Surface Configuration dialog opens. Control Surface Configuration Dialog 2 Select Euphonix from the Use pop-up menu. 3 Click OK.
Final Cut Pro Tips and Shortcuts Keyframe Audio (MC Control) Using faders to keyframe automation in Final Cut Pro lets you balance the level of multiple tracks simultaneously, smoothly and quickly ramp sounds up or down, and adjust levels without using the pen tool. To keyframe multiple audio tracks simultaneously: 1 Touch Softkeys on the Touchscreen to display the Softkeys view. 2 Touch Timeline on the Touchscreen to display the Timeline. 3 Touch Audio Mixer on the Touchscreen.
Create Macro for a Favorite Effect (MC Control) Because MC Control allows creating your own custom macros, and Final Cut Pro lets you create Favorite Effects that are assigned key commands, you can create a button that marks, selects, and adds a favorite. To create a macro for a Favorite Effect with MC Control: 1 Create an effect favorite in Final Cut Pro. 2 Open the Soft key Editor in EuControl. 3 Select a Softkey. 4 Create a Key command “x” to mark clip.
16 EUCON Application Setup Guide
Chapter 5: Logic Pro Logic Pro from Apple works with your Artist media controller with very little additional setup. Make sure the EuControl software is running. Launch Logic Pro and click in a Logic window so it is the front-most application. Your surface now controls Logic Pro. Always check with the manufacturer of your specific application for the most recent software, requirements, and instructions.
8 Press both PAGE keys simultaneously to exit Config mode. 9 Push the Knob Top to open the plug-in. 10 Control plug-in parameters; press the PAGE keys to access more. 11 Press the BACK key to close plug-in. This same basic technique to assign and control plug-ins also works for sends, input, output, and groups. Flip to Faders (MC Mix) Flipping the plug-in's parameters from knobs to faders allows changing eight parameters simultaneously.
Create and Control Surround Panner Use knobs and faders without looking at the screen to control the balance of your surround mix and be more a part of your sonic environment. To pan in surround: 1 Select a track. 2 Press the MIX key (MC Mix), or the OUTPUT Knob Top (MC Control) to enter the Mix knob set. 3 Press the SURROUND Knob Top to create a Surround panner. 4 Press the BACK key to exit. 5 Press the PAN knob set selector (MC Mix) or the PAN Knob Top (MC Control).
20 EUCON Application Setup Guide
Chapter 6: Soundtrack Pro Configuring Apple’s Soundtrack Pro to operate with the Artist media controllers is simple. Always check with the manufacturer of your specific application for the most recent software, requirements, and instructions. To enable Artist Series controllers in Soundtrack Pro: 1 In Soundtrack Pro, choose Soundtrack Pro > Preferences. 2 Click the Control Surfaces tab. The Control Surfaces window opens. Control Surfaces dialog 3 Select Euphonix from the Use pop-up menu.
22 EUCON Application Setup Guide
Chapter 7: Sonar X1 Producer You can use Artist Series controllers with Sonar X1 Producer. Always check with the manufacturer of your specific application for the most recent software, requirements, and instructions. To enable Artist Series controllers in Sonar X1 Producer: 1 Download the EUCON Control Surface plug-in found here: http://www.cakewalk.com/support/kb/Reader.aspx?ID=20080104 2 Follow the on-screen instructions to install the EUCON Control Surface plug-in.
24 EUCON Application Setup Guide
Chapter 8: Sequoia You can use Artist Series controllers with Sequoia (version 11.02 or higher) from Magix. Always check with the manufacturer of your specific application for the most recent software, requirements, and instructions. To setup and configure EUCON for Sequoia: 1 Open or create a new project. 2 Choose Options > System/Audio... 3 Under System Options, click Hardware Controller. 4 In the EUCON section, click to enable Activate EuCon.
26 EUCON Application Setup Guide
Chapter 9: Pyramix You can use Artist Series controllers with Pyramix (version 7.0.9 SP1 or higher) from Merging Technologies. Demo versions of Pyramix (any version) do not support EUCON. To enable Pyramix to work with Artist media controllers: 1 Be sure you have the required version of Pyramix software. Always check with the manufacturer of your specific application for the most recent software, requirements, and instructions. 2 Choose Settings > All Settings.
28 EUCON Application Setup Guide
Chapter 10: Digital Performer You can use Artist Series controllers with Digital Performer (version 6.0.1 and higher) from MOTU. Download the latest version of Digital Performer from MOTU’s web site. Digital Performer must be installed prior to installing EuControl. Always check with the manufacturer for the most recent software, requirements, and instructions. For Digital Performer to communicate with Artist media controllers, the EUCON driver must be added in the Control Surface dialog.
Tips and Shortcuts Instantiate and Control Any Plug-In Placing plug-ins on a track and controlling them from the Artist media controller can speed up your workflow. Controlling a plug-in with knobs instead of a mouse not only provides more intuitive, higher resolution control, but can also control multiple parameters simultaneously. You can dial in settings or automate plug-in control without mousing around or drawing lines in the arrange window.
Create and use Markers (MC Control) Using markers in your project makes navigating your project much faster. To work with markers: 1 Touch Softkeys on the Touchscreen to enter Soft keys view. 2 Touch Sequence on the Touchscreen to display the Sequence page. 3 Use the transport controls or Jog wheel to navigate the timeline. 4 Touch Drop Marker in the Soft keys section. 5 Repeat steps 1–4 for additional markers. 6 Touch Marker on the Touchscreen to enter Marker view.
32 EUCON Application Setup Guide
Chapter 11: Nuendo Nuendo is a powerful DAW that can handle as many tracks and effects as your workstation’s CPU can support. It offers multitrack recording, editing, and monitoring. Steinberg’s EUCON adapter enables fully integrated control of all of Nuendo’s functions from the Artist media controller. The adapter works with Nuendo version 4.1.2 and later. Always check with the manufacturer of your application for the most recent software, requirements, and instructions.
EuCon Device Setup This section describes the EuCon Device Setup dialog, which lets you edit track assignment and transport control parameters. To open EuCon Device Setup: In Nuendo choose Devices > Device Setup, then select EuCon from the Remote Devices folder in the Devices section. EuCon Device Setup EuConized Channel Types The EuConized channel types section contains checkboxes that determine which channel types appear on your control surface.
Fast Forward/Rewind The FF/RW buttons function as EuCon Momentary/Latch-Switches. If the button is pressed and released quickly, the switches do NOT latch but behave momentarily, resembling the way these buttons work in the Nuendo GUI. If the Artist media controller’s FF/RW buttons are held down longer than the latch time set in the Preferences-Setup page, they latch. Number of Knob Sets to Cache Nuendo creates knob sets for EQ, Dynamic, Inserts, Aux sends and other functions.
Flip to Faders (MC Mix) Flipping plug-in parameters from knobs to faders allows changing eight parameters simultaneously. Flipping bus sends to faders makes it easier to send multiple signals to an effect and better controls effects textures in your mix. To flip to faders: 1 Select a track on the Artist media controller. 2 Press the INSERTS knob set selector (MC Mix) or the INSERTS knob top (MC Control). 3 Press a Knob Top to open a plug-in. 4 Press the FLIP key to flip the knobs to the faders.
Quick Controls (Nuendo 5 Only) Quick Controls for the selected track are now accessible from the surface. To use Quick Controls with MC Control: 1 From top level knob set, press PAGE >. 2 Press the QC knob top. Each of the selected track’s eight Quick Controls are displayed and can be adjusted with the encoders. To use Quick Controls with MC Mix Press and hold the EQ knob set selector until it blinks and then release.
38 EUCON Application Setup Guide
Chapter 12: Cubase Steinberg’s EuCon adapter enables fully integrated control of all Cubase functions from Artist media controllers. Cubase version 4.1.2 and higher is required. Always check with the manufacturer of your application for the most recent software, requirements, and instructions. To enable Cubase to work with your Artist media controller, you must obtain an activation code: 1 Create a user account in the MySteinberg area of the Steinberg web site if you have not already done so.
EuCon Device Setup This section discusses the EuCon Device Setup dialog which allows editing track assignment and transport control parameters. If the EuCon Device setup dialog is not open, do the following: In Cubase choose Devices > Device Setup, then select EuCon from the Remote Devices folder in the Devices section. Eucon Device Setup EuConized Channel Types The EuConized channel types section contains checkboxes that determine which channel types appear on your control surface.
Fast Forward/Rewind The FF/RW buttons function as EuCon Momentary/Latch-Switches. If the button is pressed and released quickly, the switches do not latch but behave momentarily, resembling the way these buttons work in the Cubase user interface. If the Artist media controller’s FF/RW buttons are held down longer than the latch time set in the Preferences > Setup page, they latch. Number of Knob Sets to Cache Cubase creates knob sets for EQ, Dynamic, Inserts, Aux sends and other functions.
Flip to Faders (MC Mix) Flipping plug-in parameters from knobs to faders let you change eight parameters simultaneously. Flipping bus sends to faders makes it easier to send multiple signals to an effect and better controls effects textures in your mix. To flip to faders: 1 Select a track on the Artist media controller. 2 Press the INSERTS knob set selector (MC Mix) or the INSERTS Knob Top (MC Control). 3 Press a Knob Top to open a plug-in. 4 Press the FLIP key to flip the knobs to the faders.
Chapter 13: Additional Applications The Foundry Storm To connect an Artist Series unit for Foundry Storm: 1 Using a standard Ethernet cable, connect the Avid Artist Series media controller directly to the computer currently running Storm. 2 Ensure that the unit is enabled in Workspace Preferences. 3 Drag a clip to the Viewer. 4 Go to Storm > Effect and drag the Lift Gamma Gain effect to the Viewer. 5 By default, the Artist Series unit focuses on the RED Look effect in the Effects Stack.
44 EUCON Application Setup Guide
Appendix A: Mackie Control (Live and Reason) Mackie Control Universal is a widely used MIDI-based protocol that controls application parameters and supports metering in many DAW applications. The extent to which Mackie Control can be used depends on the specific application’s implementation. Artist Series media controllers use EUCON-to-Mackie Control conversion software along with a special EuCon MIDI Driver. These use internal MIDI ports to easily control these programs without external MIDI cables.
3 Locate the application you want to control in the Finder. This is found in your Applications folder or in the program’s own folder at the top level of the hard drive. 4 Drag the Application icon into the middle of the Preference pane and release the mouse button. Its name and location appears in the Application and Path columns, respectively. 5 Click in the Protocol column and select Mackie Control.
Ableton Live Before proceeding, you must already have completed the steps described in “Setting Up EUCON for Mackie Control” on page 45. To finish the configuration: 1 Choose Live > Preferences. 2 In the Preferences dialog, click the MIDI / Sync tab on the left. 3 Select Mackie Control or Mackie Control Classic from the Control Surface column. We recommend Mackie Control. Live MIDI Preferences dialog 4 Select the desired MIDI emulation ports from the Input and Output columns for the Mackie Control Surface.
Reason Before proceeding, you must already have completed the steps described in “Setting Up EUCON for Mackie Control” on page 45. To finish the configuration: 1 Choose Reason > Preferences. 2 Choose Keyboards and Control Surfaces from the dialog box at the top. 3 Press the Auto-Detect Surfaces button. Reason scans to find the Mackie-enabled Euphonix MIDI ports from the Euphonix Preferences pane.
Appendix B: Pro Tools (HUI) HUI is a control protocol developed by Mackie that works with Pro Tools 8.x and lower. For Pro Tools 9.0 and higher, see Chapter 2, “Pro Tools.” The Artist Series media controllers use HUI commands and extensive Pro Tools key commands to control Pro Tools operations. It has the additional advantage of being able to control multiple workstations from one surface in a studio with multiple Pro Tools systems.
2 Double-click the EUCON icon in the Other section at the bottom of the window. The EUCON Preference pane opens. EUCON preference pane 3 Locate the Application you want to control in the Finder. This is found in your Applications folder or in the program’s own folder at the top level of the hard drive. 4 Drag the Application icon into the middle of the EUCON preference pane and release the mouse button. Its name and location appears Application and Path columns, respectively.
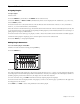
Setting up Pro Tools to Use HUI To set up Pro Tools: 1 Launch Pro Tools. 2 Choose Setup > Peripherals. The Peripherals dialog opens. 3 Click the MIDI Controllers tab. Pro Tools Peripherals dialog 4 Configure a HUI controller for each Artist media controller in your network (up to four). 5 Select HUI from the Type pop-up menu for each controller to configure.
Your Artist media controller should now be controlling Pro Tools. If not, try the following: • Make sure Pro Tools is the front-most application (receiving keystrokes and mouse clicks). The Artist media controllers control only the front-most application. • Check that all steps in “Setting up EUCON to Control Pro Tools” on page 49 and in this section have been performed correctly, and reboot your computer.
Create and Use Wheel Nudge Scroll your Artist Series media controllers through the Pro Tools tracks in the session you wish to control with the Jog Wheel. This is much like moving a chair into the proper position in front of a large console. To create and use wheel nudge: 1 Open the Softkey editor. 2 Select a Softkey in the editor. 3 Press the Command button. 4 Add a EUCON command 5 Click the drop down list and select the WHEEL command.
Avid Technical Support (USA) Product Information 2001 Junipero Serra Boulevard Daly City, CA 94014-3886 USA Visit the Online Support Center at www.avid.com/support For company and product information, visit us on the web at www.avid.