Installing Mac OS 7.6 With Mac OS 7.6, your computer will perform better and more reliably. You can also take advantage of new features that enhance your computer’s networking, multimedia, printing, and other capabilities. Follow the instructions in this chapter to install Mac OS 7.6. System requirements The following computers can install Mac OS 7.6: m computers with PowerPC™ microprocessors m computers with 68040 microprocessors m computers with “32-bit clean” 68030 microprocessors.
To install the recommended software, you need about 70 MB of free space on your hard disk. To install all the optional components, you may need up to 120 MB of disk space; if you install just the minimum set of system software, you may only need 40 MB. The exact amount of space needed varies for different computer models and hard disk sizes. To check the amount of hard disk space you have, open your hard disk icon.
Start up from the Mac OS 7.6 disks You should start up your computer using the system software on the CD-ROM disc or floppy disks you received in the Mac OS 7.6 package. That way, you can repair any problems on your hard disk and update the disk driver before you install the software. To start up your computer with the provided disks, follow these steps: 1 Shut down your computer. 2 Insert the Mac OS 7.6 CD-ROM disc into the CD-ROM drive. If you’re installing from floppy disks: Insert the Mac OS 7.
m If you are using an earlier version of system software, or don’t have the Extensions Manager, drag any non-Apple extensions out of your Extensions folder in the System Folder, then restart the computer. (If you don’t know where a particular extension came from, select its icon. Then choose Get Info from the File menu. Apple extensions all have “© Apple Computer, Inc” in the Version section of the Get Info box.
Next, a screen appears describing the four steps in the upgrade process. Step 1: Read important information Click the first button to read about the upgrade process, as well as compatibility and troubleshooting information. Click here. Read the onscreen document that appears. Since the onscreen document was written later than this book, it may contain additional information. When you’re finished reading the document, choose Quit from the File menu to return to the Install Mac OS screen.
Step 2: Update your hard disk driver Hard disks with old drivers might cause problems after installing Mac OS 7.6. Your computer might not start up, or you might not see the hard disk icons on the desktop. To avoid these problems, it’s a good idea to update your drivers. The disk utilities that Apple provides won’t update some disks. You can skip step 2 if one of the following is true: m You don’t have an Apple hard disk or you don’t have an Apple computer.
Click the second button in the main Install Mac OS screen to update your disk drivers. Click here. After you click the second button, you first see a dialog box asking you to confirm that you can use the provided utilities. Click Continue. What you see next depends on the type of computer you have. If you’re installing from floppy disks, you may be asked to insert other disks as needed. Installing Mac OS 7.
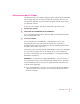
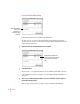
If you see the Drive Setup window Read the messages in this box for instructions and information about your disks. Follow these instructions to update your disk drivers: (If what you see on your screen doesn’t match the preceding picture, skip ahead to the next section, “If You See the Apple HD SC Setup Window,” and follow those instructions.) 1 Select the name of a hard disk attached to your computer. CD-ROM drives appear in the list, but you don’t need to update drivers for CDs, just for hard disks.
If you see the Apple HD SC Setup window Follow these steps to update your disk drivers: 1 Click Drive until the “volume name” is the name of a hard disk attached to your computer. If a disk name doesn’t appear when you click Drive: See “Problems During Installation” in Chapter 3. 2 Click Update and follow the instructions on the screen. Repeat steps 1–2 to update the drivers on any additional hard disks you have. 3 When you finish updating the drivers on all your hard disks, click Quit.
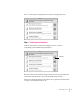
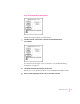
Step 3: Choose a disk for installation Click the third button to select the disk on which you want to install Mac OS 7.6. Click here. In the dialog box that appears, choose the disk on which you’re going to install Mac OS 7.6. Then click Select. Choose the destination disk from this pop-up menu. You see a message if you don’t have 70 MB (the amount necessary for the standard installation) of available space on the disk you choose.
Step 4: Install the software Click the fourth button to install Mac OS 7.6 and additional software. Click here. WARNING PowerTalk is not compatible with Mac OS 7.6. Installing Mac OS 7.6 disables PowerTalk. If you use PowerTalk, see “Installing Over PowerTalk” in Chapter 3 before continuing with the upgrade process. Installing Mac OS 7.
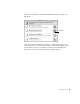
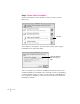
1 In the dialog box that appears, select the software you want to install. Note: Your screen may look slightly different from the picture below. Remember to check the information presented in the first step on the main Install Mac OS screen for late-breaking information. If you’re installing from floppy disks, you won’t see all the choices available on the CD. Click to put an X in the box for each software product you want to install. Recommended choices are preselected.
For more information about any of these features, see Chapter 2, “What’s New in Mac OS 7.6.” Installing a customized system: The Install Mac OS program installs the software recommended for your model of computer. You can use the Customize option to be more specific about which software to install. For instructions, see “Installing a Customized System,” below. 2 Click Start to install the software you selected.
You can also use the Customize option to add additional software or to install a System Folder that can be used on any computer model. m You can be more specific about what software packages you install. You can also specify which components to install from the packages you choose. m After installing a product, you can add extra components. For example, you can install additional printer drivers. m You can create a “universal” system that works on all computers that can use Mac OS 7.6.
3 Click Customize. The following screen appears. Note: Your screen may look slightly different from the picture below. Remember to check the information presented in the first step on the main Install Mac OS screen for late-breaking information. If you’re installing from floppy disks, you won’t see all the choices available on the CD. Click to put an X in the box for each software product you want to install. Recommended choices are preselected. To use the easy installation process, click this button.
The Install Mac OS program will automatically check your destination disk for any problems and repair it, if necessary. If you don’t want your disk to be checked, click the Options button. In the dialog box that appears, click the Verify Destination Disk checkbox to remove the X. To skip checking your disk, click this box to remove the X. 5 Click Start. If your disk has problems that can’t be repaired: See “Problems During Installation” in Chapter 3.
If you choose the Easy Install option, you can skip ahead to step 10. If you want to be more specific about which components to install, follow steps 7–10 below. 7 Open the pop-up menu and choose Custom Install. The Custom Install dialog box appears, listing all available components for the first software product. 8 Scroll through the list of components and click the checkbox next to each component you want to install.
9 Click Install. If you have problems while installing: See “Problems During Installation” in Chapter 3. 10 Follow the instructions that appear on the screen. 11 Repeat steps 6–10 for all the software you selected. The Install Mac OS application automatically opens the Installer for the next selected software package on the list. 12 After all the installations are completed, restart your computer to use your new software. If you can’t restart the computer: See “Problems Using Mac OS 7.
2 What’s New in Mac OS 7.6 In addition to greater stability and performance, Mac OS 7.6 includes new features that make it easier to connect to the Internet, enhance multimedia capabilities, increase your productivity, and more. Read this chapter to get an overview of the new features. OpenDoc Mac OS 7.6 includes OpenDoc, a new way to use software. You can add new features to your applications with OpenDoc software “parts.
Networking software Mac OS 7.6 includes new networking software to stabilize and improve performance, as well as software to connect to remote networks and the Internet using a modem. Open Transport Open Transport is the modern, industry-standard networking and communications software for the Mac OS.
If you use the Apple Internet Connection Kit, it will install a different version of PPP from the one included with Mac OS 7.6. The version included in the Connection Kit has a control panel called “MacPPP.” The version included with Mac OS 7.6 has a control panel called “PPP.” The Apple Internet Connection Kit Dialer program enters network-setting information for you in the MacPPP control panel. You can use either version of PPP at any time.
Internet software The Internet is a global network of interconnected computer networks. When you connect to the Internet, you have access to a wide variety of services and information. Some of the most widely used Internet services include electronic mail (e-mail), which you use to send messages to other Internet users, and the World Wide Web, which you use to browse text and pictures from all over the world. To connect to the Internet from home, you need a modem and an Internet service provider.
Cyberdog Once you’ve obtained access through an Internet service provider, Cyberdog provides a simple, unified way to use the most popular Internet services. With Cyberdog, you can m send and receive electronic mail m browse text and graphics using the World Wide Web m discuss diverse topics in global newsgroups m use the FTP and Gopher protocols to transfer files from computers all over the world m connect to remote computers with Telnet software m store Internet addresses as icons.
Multimedia software Mac OS 7.6 includes several features to enhance both multimedia viewing and authoring. New version of QuickTime QuickTime is a system extension that gives your computer the ability to work with video and animation. You don’t interact with QuickTime directly; it works behind the scenes to provide multimedia functionality to your application programs. With QuickTime 2.5, you might notice these enhancements in applications that use them: m You can import a wider variety of file formats.
3D capability has been integrated into the Scrapbook and SimpleText applications included in Mac OS 7.6. You can view and manipulate 3D images by opening them in either application. To get help manipulating 3D images in SimpleText, see the SimpleText Guide, available in the Guide menu when SimpleText is active. The 3D viewing controls you see in SimpleText and the Scrapbook also have Balloon Help. To see descriptions of the controls, choose Show Balloons from the Guide menu and point to the controls.
Printing software Mac OS 7.6 includes enhancements that make it easier to print and improve print quality. Desktop printing When you install Mac OS 7.6, a desktop printer icon is created for the printer selected in the Chooser. Desktop printer icons look like this: Whenever you select a different printer in the Chooser, another desktop printer icon is created for that printer. You can quickly print documents from the Finder by dragging the document icon to a desktop printer icon.
Desktop printer icons behave like other types of icons: you can move them off the desktop, put them in folders, make aliases of them, and throw them away. To learn more about desktop printing, see the document called About Desktop Printing, in the Mac OS 7.6 Information folder on the Mac OS 7.6 CD-ROM disc. New printing dialog box The new LaserWriter 8.4 driver offers a streamlined interface when you use a LaserWriter printer.
To save the settings you choose so that they appear when you next print, click Save Settings. The new LaserWriter driver and Print dialog box are only available for computers with PowerPC microprocessors. Computers with 68030 and 68040 microprocessors use an older version of printing software. Color-matching software Your computer uses ColorSync software to ensure that the colors in a document remain consistent across a wide variety of color monitors, scanners, and color printers.
You can add additional capabilities by installing the QuickDraw GX utilities. m LaserWriter Utility is used for downloading fonts to a LaserWriter printer, resetting a printer, printing PostScript files, and setting other printer options. m Paper Type Editor allows you to create and edit the paper type for Apple printers. m QuickDraw GX Helper is a system extension that allows you to temporarily turn off QuickDraw GX printing for an application program.
Enabling Type 1 PostScript fonts To enable Type 1 PostScript fonts for use with QuickDraw GX, follow the steps below. 1 Open the Type 1 Enabler utility by double-clicking its icon. A window appears in which you locate the fonts you want to modify. 2 Choose a font or a folder containing the fonts you want to enable. 3 Click Select. A message tells you when the fonts have been enabled. 4 Choose Quit from the File menu. You can now use your Type 1 fonts with QuickDraw GX.
Utility and desktop management software With Mac OS 7.6, you can customize the way your computer works, get easy access to application programs and control panels, and view a detailed profile of the hardware and software you’re using. New version of the Extensions Manager You can improve system performance by turning off parts of your system software you’re not using. For example, if you’re at home and not connected to a network, you can turn off networking-related software.
For help using the Extensions Manager to choose which parts of system software you want to use, see Mac OS Guide, available in the Guide menu when the Finder is the active program. Or click the Guide button in the Extensions Manager itself. Apple System Profiler The Apple System Profiler application, available in the Apple (K) menu, provides detailed information about your current hardware and software configuration.
Easy customization of the Launcher You use the Launcher to quickly find applications and documents, and then open them with a single click. Now you can add items to the Launcher simply by dragging them into it. You can also change the size of the Launcher buttons. To do so, position the pointer over the Launcher window. Then hold down the x (Command) key while pressing the mouse button. Pick a size in the pop-up menu that appears, then release the button.
Other mobile computing features Your computer has other features to make mobile computing with your portable computer easier and faster. You can m Set documents to print automatically the next time you connect your portable computer to a printer. m Send electronic mail automatically the next time you connect your portable computer to a network. m Put your portable computer to sleep by holding down the Shift, x (Command), and 0 (zero) keys at the same time.
The Monitors & Sound control panel, installed on PCI desktop computers with PowerPC microprocessors, is a combined control panel that replaces the separate Sound and Monitors control panels. (It also replaces the Sound & Displays control panel.) You can use this control panel to specify information about monitors attached to your computer (for example, monitor resolution, monitor bit depth, monitor arrangement, and so on).
Better performance when using virtual memory With virtual memory, you can use available hard disk space as if it were random-access memory (RAM). In Mac OS 7.6, virtual memory is significantly faster than in previous versions.
3 Troubleshooting This chapter helps you solve some of the common problems you may encounter when upgrading to Mac OS 7.6. Problems during installation This section helps you solve problems you may encounter while installing your software. You can’t start up the computer using the Mac OS 7.6 CD-ROM disc or the Mac OS 7.6 Install Disk 1 floppy disk. Cause: Your computer located the system software on your hard disk before it located the system software on the CD or floppy disk.
The Install Mac OS program cannot repair your hard disk. Cause: Install Mac OS is unable to repair your problem. Solution 1: If you see a message that the disk can’t be fixed because a file is open, quit all programs. If file sharing is on, turn it off. Then try installing again. Solution 2: Use a third-party disk repair utility to see if it can repair the disk. If you don’t have a third-party utility, or if that utility can’t repair the disk either, you may need to reinitialize the hard disk.
Cause 2: You’ve previously updated your hard disk with a non-Apple disk utility. Solution 2: Non-Apple disk utilities sometimes update disks with non-Apple drivers. You need to use the utility you used previously to update the driver again. To ensure a successful update, obtain the latest version of the utility. Cause 3: Some IDE hard disks must be reinitialized before you can update the driver.
Cause 3: Your disk cache or RAM Disk setting is set too high in the Memory control panel. Solution 3: Open the Memory control panel, set your disk cache to the lowest possible setting, reduce or turn off your RAM disk, and turn on virtual memory. Then restart the computer. You see a message that your computer doesn’t have enough memory to use the software. Cause: Your computer has less RAM than is required to use Mac OS 7.6. Solution: For memory guidelines, see “System Requirements” in Chapter 1.
You see a message that the System file cannot be modified. Cause 1: You have installed virus-protection software that guards against modification of the System file. Solution 1: Start up your computer from the Mac OS 7.6 CD-ROM disc or the Install Mac OS 7.6 Disk 1 floppy disk, as described in “Start Up From the Mac OS 7.6 Disks” in Chapter 1. Solution 2: Drag any virus-protection software out of the System Folder and restart your computer. You can put the virus-protection software back after installation.
Problems using Mac OS 7.6 This section helps with problems you may encounter using the computer after you have installed Mac OS 7.6. You can’t start up or restart the computer. Problem: When you turn on your computer, you see a “bomb” message. Cause 1: You probably have an incompatible item in the System Folder. Solution 1: Follow the instructions in “Testing for Compatibility,” later in this chapter. Cause 2: Your system software may have been damaged.
Cause 2: There is a conflict between your network number and another network number. Solution 2: If your network number or node number has been set to “User Defined,” turn off the User Defined setting in the AppleTalk control panel. Then close and reopen the control panel. For complete AppleTalk setup instructions, see Mac OS Guide, available in the Guide menu when the Finder is active. You can’t connect to devices outside your local network.
Problems using QuickDraw GX This section helps with problems you may encounter using the computer after you have installed QuickDraw GX. Your non-Apple printer is no longer available in the Chooser. Cause: To print on a non-Apple printer with QuickDraw GX installed, you need a QuickDraw GX driver for that printer. QuickDraw GX installation provides drivers for Apple printers only. Solution 1: If you are using a non-Apple PostScript printer, try using the Apple LaserWriter GX driver.
You have trouble printing in a particular application program. Cause: The program may be incompatible with the QuickDraw GX printer driver. Solution 1: Install the QuickDraw GX utilities and use the QuickDraw GX Helper utility to turn off QuickDraw GX printing capabilities for the program. For instructions on how to install the QuickDraw GX utilities, see the section “QuickDraw GX” in “Printing Software” in Chapter 2. After you install, open the program, then open the Apple (K) menu.
1 Start up your computer while holding down the Space bar. Holding down the Space bar opens the Extensions Manager control panel during startup. 2 Release the Space bar when the Extensions Manager control panel opens. 3 Open the Selected Set menu and choose Mac OS 7.6 Base System. This turns off all extensions and control panels except those installed with Mac OS 7.6. 4 Close the Extensions Manager to continue startup. 5 When the computer is ready, try the same actions that caused the problem.
Step 2: Test individual extensions and control panels To test an individual extension or control panel for compatibility, follow the steps below. 1 Start up your computer while holding down the Space bar. Holding down the Space bar opens the Extensions Manager control panel during startup. 2 Release the Space bar when the Extensions Manager control panel opens. 3 Turn on the item you want to test by clicking its name to put an X beside it. 4 Close the Extensions Manager to continue startup.
Follow these steps to begin your clean installation. 1 Start up your computer from the Mac OS 7.6 CD-ROM disc or from the Mac OS 7.6 Install Disk 1 disk, as described in “Start Up From the Mac OS 7.6 Disks” in Chapter 1. 2 Open the Install Mac OS application and follow the instructions in the first three sections of “Installing the Software” in Chapter 1. You should have completed the first three steps indicated in the main Install Mac OS screen.
4 Click Options. 5 In the screen that appears, click the checkbox next to “Create additional System Folder,” then click OK. Click to put an X in this box, then click OK. 6 Click Start. A new System Folder is installed on your hard disk. (The old System Folder is renamed Previous System Folder.) Reinstall extensions, control panels, and other startup items not installed with Mac OS 7.6 from their original disks, if possible.
After you install Mac OS 7.6, you no longer see your mailbox and keychain icons. You see your personal catalogs, but you won’t be able to open them. Additionally, you can only access AppleMail messages that were saved as text files and moved out of your PowerTalk mailbox before you installed Mac OS 7.6. To save your messages as text files, follow these steps: 1 Open a PowerTalk mail message. 2 Open the File menu and choose Save As Text. 3 In the dialog box that appears, choose a name for the message.
Index A, B Acrobat Reader 25 America Online 23 Apple HD SC Setup.
E easy installation process 16 enabling Type 1 PostScript fonts 29–30 extensions reinstalling in System Folder 49 testing compatibility of 47 turning off 46 Extensions Manager enhancements to 31–32 starting the computer and 3, 4 turning off extensions and control panels with 46 LaserWriter printer drivers 27–28 Launcher 33 M file synchronization 33–34 floppy disk installation 3–18 fonts 29–30 Mac OS 7.
O R onscreen documents 5 OpenDoc 19 Open Transport networking software 20 optional software 12–13 RAM requirements 1 reading information 5 repairing hard disks 37–38 restarting the computer after installation 18 problems 42 P performance improvements 35–36 performing clean installations 47–49 PlainTalk 25 portable computers. See also PowerBook computers additional features for 34 file synchronization for 33–34 PowerBook computers.
Index T U text-to-speech capability 25 3D capability 24–25 troubleshooting 37–50 compatibility testing and 45–47 installing over PowerTalk 49–50 performing clean installations 47–49 problems during installation 37–41 problems using Mac OS 7.
Mac OS 7.