Congratulations, you and your MacBook were made for each other.
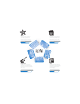
Built-in iSight camera Video chat with up to three friends anywhere in the world at the same time. www.apple.com/macbook Mac Help isight Finder Browse the contents of your computer using Cover Flow. Time Machine Automatically back up your files to an external hard drive. www.apple.com/macosx www.apple.
iMovie Collect all your video in one library. Create and share movies in minutes. iPhoto Organize all your photos with Events. Publish to a Web Gallery with a click. www.apple.com/ilife/imovie www.apple.com/ilife/iphoto iMovie Help iPhoto Help movie GarageBand Create music by adding musicians to a virtual stage. Enhance your song to sound like a pro. www.apple.
Contents Chapter 1: Ready, Set Up, Go 9 What’s in the Box 9 Setting Up Your MacBook 15 Putting Your MacBook to Sleep or Shutting It Down Chapter 2: Life with Your MacBook 18 20 22 24 25 27 Basic Features of Your MacBook Keyboard Features of Your MacBook Ports on Your MacBook Using the Trackpad and Keyboard Using the MacBook Battery Getting Answers Chapter 3: Boost Your Memory 33 Installing Additional Memory 40 Making Sure Your MacBook Recognizes the New Memory Chapter 4: Problem, Meet Solution 42 Proble
47 50 50 51 52 54 Problems with Your Internet Connection Problems with AirPort Extreme Wireless Communication Keeping Your Software Up to Date Reinstalling the Software That Came with Your MacBook Learning More, Service, and Support Locating Your Product Serial Number Chapter 5: Last, but Not Least 56 59 61 63 65 Important Safety Information Important Handling Information Understanding Ergonomics Apple and the Environment Regulatory Compliance Information Looking for Something? 72 Index 6 Contents
1 1 Ready, Set Up, Go www.apple.
Your MacBook is designed so that you can set it up quickly and start using it right away. If you have never used a MacBook or are new to Macintosh computers, read this chapter for help getting started. Important: Read all the installation instructions (and the safety information starting on page 55) carefully before you first use your computer. If you are an experienced user, you may already know enough to get started.
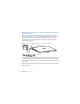
What’s in the Box AC plug AC power cord 60W MagSafe Power Adapter Setting Up Your MacBook Your MacBook is designed so that you can set it up quickly and start using it right away.
Step 1: Plug in the 60W MagSafe Power Adapter to provide power to the MacBook and charge the battery. Make sure the AC plug is fully inserted into the power adapter and the electrical prongs on your AC plug are in their completely extended position. Insert the AC plug of your power adapter into a power outlet and the MagSafe connector into the MagSafe power port. As the MagSafe connector gets close to the port, you’ll feel a magnetic pull drawing it in.
Note: When you first connect the power adapter to your MacBook, an indicator light on the MagSafe connector starts to glow. An amber light indicates that the battery is charging. A green light indicates that the battery is fully charged or is not installed. If you don’t see a light, make sure the connector is seated properly. Step 2: To access the Internet or a network, connect one end of an Ethernet cable to your MacBook and the other end to a cable modem, DSL modem, or network.
Note: Your MacBook also comes with AirPort Extreme technology for wireless networking. For information about setting up a wireless connection, in the menu bar, choose Help > Mac Help, and then search for “AirPort.” See “Getting Answers” on page 27. Step 3: Press the power (®) button briefly to turn on your MacBook. You hear a tone when you turn on the computer. ® Power button Trackpad Trackpad button It takes the computer a few moments to start up.
Step 4: Configure your MacBook with Setup Assistant. The first time you turn on your MacBook, Setup Assistant starts. Setup Assistant helps you enter your Internet and email information and set up a user account on your MacBook. If you already have a Mac, Setup Assistant can help you automatically transfer files, applications, and other information from your previous Mac.
Step 5: Customize the Mac OS X desktop and set preferences.
You can quickly make the desktop look the way you want using System Preferences. Choose Apple () > System Preferences from the menu bar. As you get to know your computer, explore System Preferences, your command center for most settings on your MacBook. For more information, open Mac Help and search for “System Preferences” or for the specific preference you want to change. Putting Your MacBook to Sleep or Shutting It Down When you finish working with your MacBook, you can put it to sleep or shut it down.
To wake your MacBook: Â If the display is closed, simply open it to wake your MacBook. Â If the display is already open, press the power (®) button or any key on the keyboard. When your MacBook wakes from sleep, your applications, documents, and computer settings are exactly as you left them. Shutting Down Your MacBook If you aren’t going to use your MacBook for a day or two, it’s best to shut it down. The sleep indicator light goes on briefly during the shutdown process.
2 2 Life with Your MacBook www.apple.
Basic Features of Your MacBook Microphone iSight camera Camera indicator light Stereo speakers ®? Battery (underneath) Trackpad Sleep indicator light Trackpad button 18 Chapter 2 Life with Your MacBook Infrared (IR) receiver Slot-loading optical drive ® Power button
Built-in microphone Capture sounds with the microphone (located to the left of the iSight camera) or talk with friends live over broadband using the included iChat AV application. Built-in iSight camera and camera indicator light Videoconference with others using iChat AV, take pictures with Photo Booth, or capture video with iMovie ‘08. The indicator light glows when the iSight camera is operating. Built-in stereo speakers Listen to music, movies, games, and multimedia files.
Keyboard Features of Your MacBook Function (fn) key esc F1 F2 Brightness controls 20 F3 F4 F5 F6 Standard function keys Chapter 2 Life with Your MacBook C Media Media controls Dashboard Exposé F7 F8 Eject key F9 — Mute control F10 F11 F12 - Volume controls
Function (fn) key Hold down this key to activate customized actions assigned to the function keys (F1 to F12). To learn how to customize function keys, choose Help > Mac Help from the menu bar and search for “function keys.” Brightness controls (F1, F2) Increase ( ) or decrease ( ) the brightness of the screen. Exposé All Windows key (F3) Open Exposé for quick access to all your open windows. Dashboard key (F4) Open Dashboard to access your widgets.
Ports on Your MacBook G Gigabit Ethernet , Audio in/ optical digital audio in port port (10/100/ 1000Base-T) 22 ¯ MagSafe £ Mini-DVI power port port H FireWire Chapter 2 Life with Your MacBook 400 port Security slot d USB 2.
¯ MagSafe power port Plug in the included 60W MagSafe Power Adapter to recharge the MacBook battery. G Gigabit Ethernet port (10/100/1000Base-T) Connect to a high-speed Ethernet network, a DSL or cable modem, or another computer. The Ethernet port automatically detects Ethernet devices and doesn’t require an Ethernet crossover cable. £ Mini-DVI (video out) port Connect to an external display, projection device, or TV that uses a DVI, VGA, composite, or S-video connector.
Using the Trackpad and Keyboard Use the trackpad to move the pointer and to scroll, tap, double-tap, and drag. How far the pointer moves onscreen is affected by how quickly you move your finger across the trackpad. To move the pointer a short distance, move your finger slowly across the trackpad; the faster you move your finger, the farther the pointer moves. To fine-tune the tracking speed in System Preferences, choose Apple () > System Preferences, click Keyboard & Mouse, and then click Trackpad.
Using the MacBook Battery When the MagSafe power adapter is not connected, your MacBook draws power from its battery. The length of time that you can run your MacBook varies, depending on the applications you use and the external devices connected to your MacBook. Turning off features such as AirPort Extreme or Bluetooth® wireless technology can help conserve battery charge. If the battery runs low while you are working, attach your power adapter and let the battery recharge.
Á ¥ Button Indicator lights Battery The amount of battery charge left can also be checked by viewing the Battery ( ) status icon in the menu bar. The battery charge level displayed is based on the amount of power left in the battery with the applications, peripheral devices, and system settings you are currently using. To conserve battery power, close applications and disconnect peripheral devices not in use, and adjust your Energy Saver settings.
Getting Answers Much more information about using your MacBook is available in Mac Help and on the Internet at www.apple.com/support/macbook. To get Mac Help: 1 Click the Finder icon in the Dock (the bar of icons along the edge of the screen). 2 Choose Help > Mac Help (click the Help menu in the menu bar and choose Mac Help). 3 Click in the search field, type a question, and press Return on the keyboard.
More Information For more information about using your MacBook, see the following: To learn about 28 See Installing memory Chapter 3, “Boost Your Memory,” on page 31. Troubleshooting your MacBook if you have a problem Chapter 4, “Problem, Meet Solution,” on page 41. Finding service and support for your MacBook “Learning More, Service, and Support” on page 52. Or see the Apple Support website at www.apple.com/support/macbook. Using Mac OS X The Mac OS X website at www.apple.com/macosx.
To learn about See Using Bluetooth wireless technology The Bluetooth Support page at www.apple.com/support/ bluetooth. Or open the Bluetooth File Exchange application, located in the Utilities folder within the Applications folder, and choose Help > Bluetooth Help. Caring for the battery Search for “battery” in Mac Help. Connecting a printer Search for “printing” in Mac Help. FireWire and USB connections Search for “FireWire” or “USB” in Mac Help.
3 3 Boost Your Memory www.apple.
This chapter provides information and instructions for installing additional memory and for removing and replacing the battery in your MacBook. Your computer has two memory slots that you access by removing the computer’s battery. Your MacBook comes with a minimum of 1 gigabyte (GB) of 667 MHz Double Data Rate (DDR2) Synchronous Dynamic Random-Access Memory (SDRAM) installed.
Installing Additional Memory Installing memory involves removing and replacing the battery. The following procedure includes instructions for removing the battery, adding memory, and replacing the battery. Step 1: Remove the battery. 1 Shut down your MacBook. Disconnect the power adapter, Ethernet cable, and any other cords connected to the MacBook to prevent damaging the computer. WARNING: Use care when handling the battery. See the battery safety information on page 58.
2 Turn over the MacBook and locate the battery latch. Use a coin to turn the latch a quarter turn clockwise to unlock the battery, and gently remove it. Á ¥ Á ¥ WARNING: The internal components of your MacBook can be warm. If you have been using your MacBook, wait 10 minutes after shutting down to let the internal components cool before continuing.
Step 2: Install memory. 1 Loosen the three captive screws that secure the L-bracket, pull out the long end first to remove the bracket, and place it to the side. Levers on the memory slots spring out when you remove the bracket. Loosen the 3 screws Á ¥ Pull this side out 2 Touch a metal surface inside the computer to discharge any static electricity from your body.
3 To remove a memory module installed in a slot, move the lever all the way to the left in one swift motion until the edge of the memory module pops out. Pull out the memory module. Repeat to remove the other memory module.
4 Insert the new memory modules in the slots: a Insert the gold edge first, with the notch on the left side. b Use two fingers with firm, even pressure to push in the memory modules. You should hear a click when the memory is inserted correctly. Note: The new memory module may have some residue on it from a lubricant that makes the memory easier to install. The residue is normal and should not be wiped off. c If the levers don’t return to the closed position, move them to the right to close them.
5 Replace the L-bracket by inserting the short end first and tightening the screws.
Step 3: Replace the battery. 1 Place the right side of the battery into the battery compartment. Gently press the left side of the battery down. Use a coin to turn the latch a quarter turn counterclockwise to lock the battery into place. Á ¥ Á ¥ 2 Reconnect the power adapter and any other cables that were attached.
Making Sure Your MacBook Recognizes the New Memory After installing additional memory in your MacBook, check whether the computer recognizes the new memory. To check the computer’s memory: 1 Start up your MacBook. 2 When you see the Mac OS X desktop, choose Apple () > About This Mac. For a detailed breakdown of the memory installed in your computer, open System Profiler by clicking More Info and then Memory.
4 4 Problem, Meet Solution www.apple.
Occasionally you may have problems while working with your MacBook. Read on to find some solutions to try when you have a problem. You can also find more troubleshooting information in Mac Help and on the MacBook Support website at www.apple.com/support/macbook. If you experience a problem with your MacBook, there is usually a simple and quick solution. Think about the conditions that led up to the problem.
2 Click Force Quit. The application quits, leaving all other applications open. If you need to, you can also restart the Finder from this dialog. Next, save your work in any open applications and restart the computer to make sure the problem is entirely cleared up. If you are unable to force the application to quit, hold down the power (®) button for a few seconds to shut down the computer. Wait 10 seconds and then turn on the computer.
 Wait a few seconds. If the computer doesn’t soon start up, shut it down by holding down the power (®) button for about 8 to 10 seconds. Disconnect all external peripherals and try restarting by pressing the power (®) button while holding down the Option key. When your computer starts up, click the hard disk icon, and then click the right arrow. After the computer starts up, open System Preferences and click Startup Disk. Select a local Mac OS X System folder.
 If the problem persists, return the computer to its factory settings by disconnecting the power adapter, removing the battery, and holding down the power (®) button for at least 5 seconds.  If you recently installed additional memory, make sure that it is correctly installed and that it is compatible with your computer. See whether removing it and reinstalling the old memory allows the computer to start up (see page 35).
If you forget your password You can reset your administrator password and passwords for all other accounts. 1 Insert the Mac OS X Install Disc 1. Then restart your computer and hold down the C key as it starts up. 2 Choose Utilities > Reset Password from the menu bar. Follow the onscreen instructions. If you have trouble ejecting a disc  Quit any applications that might be using the disc and try again.  If this doesn’t work, restart the computer while holding down the trackpad button.
6 If Apple Hardware Test detects a problem, it displays an error code. Make a note of the error code before pursuing support options. If Apple Hardware Test doesn’t detect a hardware failure, the problem may be software related. For more information about Apple Hardware Test, see the Apple Hardware Test Read Me file on the Mac OS X Install Disc 1. Problems with Your Internet Connection Your MacBook has the Setup Assistant application to help walk you through setting up an Internet connection.
Cable Modem, DSL, and LAN Internet Connections Make sure all modem cables are fully plugged in. Check the modem power cord, the cable from the modem to the computer, and the cable from the modem to the wall jack. Also check the cables and power supplies for Ethernet hubs and routers. Turn the modem off and on to reset the modem hardware Turn off your DSL or cable modem for a few minutes, and then turn it back on. Some ISPs recommend that you unplug the modem’s power cord.
4 Choose an interface for the PPPoE service from the Ethernet pop-up menu. Choose Ethernet if you are connecting to a wired network, or AirPort if you are connecting to a wireless network. 5 Enter the information you received from your service provider, such as the account name, password, and PPPoE service name (if your service provider requires it). 6 Click Apply to make the settings active. Network Connections Make sure the Ethernet cable is plugged into your MacBook and into the network.
Problems with AirPort Extreme Wireless Communication If you have trouble using AirPort Extreme wireless communication: Â Make sure the computer or network you are trying to connect to is running and has a wireless access point. Â Make sure you have properly configured the software according to the instructions that came with your base station or access point. Â Make sure you are within antenna range of the other computer or the network’s access point.
To check for updated software: 1 Open System Preferences. 2 Click the Software Update icon and follow the onscreen instructions. Â For more information, search for “Software Update” in Mac Help. Â For the latest information about Mac OS X, go to www.apple.com/macosx. Reinstalling the Software That Came with Your MacBook You can use the software installation discs that came with your computer to reinstall Mac OS X and any applications that came with your computer.
5 Follow the onscreen instructions. 6 After selecting the destination volume for installation, continue following the onscreen instructions. Your computer might restart and ask you to insert the next Mac OS X installation disc. Note: To restore Mac OS X on your computer to the original factory settings, click Options in the “Select a Destination” pane of the Installer, and then select “Erase and Install.
System Profiler To get information about your MacBook, use System Profiler. It shows you what hardware and software is installed, the serial number and operating system version, how much memory is installed, and more. To open System Profiler, choose Apple () > About This Mac from the menu bar and then click More Info.
Country Phone Website Ireland (353) 1850 946 191 www.apple.com/ie/support New Zealand 00800-7666-7666 www.apple.com/nz/support United Kingdom (44) 0870 876 0753 www.apple.com/uk/support Telephone numbers are subject to change, and local and national telephone rates may apply. A complete list is available on the web: www.apple.com/contact/phone_contacts.
5 5 Last, but Not Least www.apple.
For your safety and that of your equipment, follow these rules for handling and cleaning your MacBook and for working more comfortably. Keep these instructions handy for reference by you and others. Important Safety Information WARNING: Failure to follow these safety instructions could result in fire, electric shock, or other injury or damage. Avoiding water and wet locations Keep your MacBook away from sources of liquid, such as drinks, washbasins, bathtubs, shower stalls, and so on.
Using the 60W MagSafe Power Adapter Make sure the AC plug or AC power cord is fully inserted into the power adapter before plugging the adapter into a power outlet. Use only the power adapter that came with your MacBook, or an Apple-authorized power adapter that is compatible with this product. The power adapter may become very warm during normal use. Always put the power adapter directly into a power outlet, or place it on the floor in a well-ventilated location.
Handling the battery Do not drop, disassemble, crush, incinerate, or expose the battery to temperatures above 212° F (100° C). Stop using the battery if it appears damaged in any way. Replace the battery only with an Apple-authorized battery for this product. Dispose of used batteries promptly according to your local environmental guidelines. Avoiding hearing damage Permanent hearing loss may occur if earbuds or headphones are used at high volume.
Laser Information for Optical Disc Drives WARNING: Making adjustments or performing procedures other than those specified in your equipment’s manual may result in hazardous radiation exposure. The optical disc drive in your computer contains a laser that is safe in normal use but that may be harmful to your eyes if disassembled. For your safety, have this equipment serviced only by an Apple Authorized Service Provider.
Using the optical drive The optical drive in your MacBook supports standard 12 cm (4.7 inch) discs. Irregularly shaped discs or discs smaller than 12 cm (4.7 inches) are not supported and can become lodged in the drive. Storing your MacBook If you are going to store your MacBook for an extended period of time, keep it in a cool location (ideally, 71° F or 22° C) and discharge the battery to 50 percent.
Understanding Ergonomics Here are some tips for setting up a healthy work environment. Keyboard and Trackpad When you use the keyboard and trackpad, your shoulders should be relaxed. Your upper arm and forearm should form an angle that is slightly greater than a right angle, with your wrist and hand in roughly a straight line.
Use a light touch when typing or using the trackpad and keep your hands and fingers relaxed. Avoid rolling your thumbs under your palms. This Not this Change hand positions often to avoid fatigue. Some computer users might develop discomfort in their hands, wrists, or arms after intensive work without breaks. If you begin to develop chronic pain or discomfort in your hands, wrists, or arms, consult a qualified health specialist.
You might have to raise your chair so that your forearms and hands are at the proper angle to the keyboard. If this makes it impossible to rest your feet flat on the floor, you can use a footrest with adjustable height and tilt to make up for any gap between the floor and your feet. Or you can lower the desktop to eliminate the need for a footrest. Another option is to use a desk with a keyboard tray that’s lower than the regular work surface.
Regulatory Compliance Information FCC Compliance Statement This device complies with part 15 of the FCC rules. Operation is subject to the following two conditions: (1) This device may not cause harmful interference, and (2) this device must accept any interference received, including interference that may cause undesired operation. See instructions if interference to radio or television reception is suspected.
Responsible party (contact for FCC matters only): Apple Inc. Corporate Compliance 1 Infinite Loop M/S 26-A Cupertino, CA 95014-2084 Wireless Radio Use This device is restricted to indoor use when operating in the 5.15 to 5.25 GHz frequency band. Cet appareil doit être utilisé à l’intérieur. Exposure to Radio Frequency Energy The radiated output power of the AirPort Extreme technology is below the FCC radio frequency exposure limits.
Taiwan Class B Statement ENERGY STAR® Compliance VCCI Class B Statement Russia External USB Modem Information When connecting your MacBook to the phone line using an external USB modem, refer to the telecommunications agency information in the documentation that came with your modem. As an ENERGY STAR® partner, Apple has determined that standard configurations of this product meet the ENERGY STAR® guidelines for energy efficiency.
Disposal and Recycling Information This symbol indicates that your product must be disposed of properly according to local laws and regulations. Because the backlight lamp in this product contains mercury, the product must be disposed of separately from household waste. When your product reaches its end of life, contact Apple or your local authorities to learn about recycling options. For information about Apple’s recycling program, go to www.apple.com/environment/recycling.
Taiwan: European Union—Disposal Information: The symbol above means that according to local laws and regulations your product should be disposed of separately from household waste. When this product reaches its end of life, take it to a collection point designated by local authorities. Some collection points accept products for free.
Looking for Something?
Index A AC plug 10 AC power adapter. See power adapter AC power cord 10 adapter, power.
Ethernet connecting to 11 port 23 Exposé All Windows key 21 external display port 23 external modem 11 F F1 to F12 function keys 21 Fast-forward key 21 FireWire connections 29 port 23 flashing question mark 43 Force Quit 42 forward delete 24 Front Row application 19, 29 frozen application 42 function (fn) key 21 H hand positions 61 headphone port 23 Help, finding answers 27 I iChat AV application 19 iLife ’08 applications 28 infrared receiver (IR) 19 installation instructions memory 33, 35 overview 8 In
screen goes black 45 trouble ejecting a disc 46 trouble using AirPort 50 putting your computer to sleep 15 Q question mark, flashing 43 R RAM.
K Apple Inc. © 2008 Apple Inc. All rights reserved. Under the copyright laws, this manual may not be copied, in whole or in part, without the written consent of Apple. Every effort has been made to ensure that the information in this manual is accurate. Apple is not responsible for printing or clerical errors. Apple 1 Infinite Loop Cupertino, CA 95014-2084 408-996-1010 www.apple.