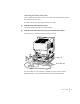
Follow the instructions in this chapter to set up your computer and learn the basics. 1 Getting Started The illustration on the facing page shows all the equipment you need to set up your computer and begin using it. Place your equipment on a sturdy, flat surface near a grounded wall outlet.
Plugging in the computer Before you plug your Macintosh into a wall socket, carefully read all the setup instructions in this chapter. Then, before you connect anything to your computer, follow the instructions in this section on how to plug it in. The plug grounds the computer and protects it from electrical damage while you set up.
If the computer starts up: If you hear a tone, the computer has started up. You need to turn it off before proceeding. To do so, press the power button (also called the standby power button), marked with the ® symbol on the back of the computer. Connecting a monitor You can connect many types of monitors to your Macintosh. To connect a monitor, refer to the instructions that came with it in addition to the instructions here.
2 Connect the monitor power cord to the monitor. On some monitors, the cord is already attached. 3 Plug in the monitor power cord. Some monitor power cords are designed to plug into the back of your computer. Some monitor power cords must be connected to a grounded electrical outlet, not to the computer. Check the information that came with the monitor.
Connecting the monitor video cable After you plug in the monitor power cord, connect the monitor video cable to the computer’s monitor port. To connect the monitor video cable, follow these steps: 1 Attach the monitor video cable to the monitor. On some monitors, the cable is already attached. 2 Attach the monitor video cable to the monitor port on the back of the computer. The monitor port is marked with the ™ icon (symbol).
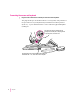
Connecting the mouse and keyboard 1 Plug the mouse cable into the recessed port on the back of the keyboard. The plug and the port are marked with the ◊ icon (symbol). The positions of the port and icon on your keyboard may be different from those pictured. By the way: A port marked with the ◊ icon is called an Apple Desktop Bus (ADB) port. Plug the mouse into the recessed port on the keyboard. The flat part of the plug should be pointing down, as shown here.
2 Plug the keyboard cable into the ADB port marked with the ◊ icon on the back of the computer. V ADB port Some monitors also have a port to which you can connect the keyboard or mouse. See the information that came with your monitor. 3 If you want to adjust the keyboard’s angle, lower its feet. To adjust the keyboard angle, lower the feet until they snap into position.
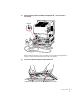
Connecting the modem A modem is hardware that may already be installed inside your computer. The modem enables your computer to send and receive faxes and telephone calls, to connect to the Internet, to access online services, and to communicate with other computer users. (You use the modem through the appropriate software already installed on your Performa. See your modem documentation for further information.
Line splitter (purchased separately) To internal modem To telephone External modem port (This port is covered if an internal modem is installed. If it is covered, do not remove the cover or plug anything into the external modem port.) Phone jack in wall Phone cord Internal modem connector You can use any standard phone cord to connect your internal modem connector to a phone jack. If you have only one phone jack, consider purchasing a line splitter at an electronics supply store.
Connecting other equipment If you are new to the Macintosh, it’s a good idea to get some experience using your computer before you connect other equipment, such as a printer or scanner. To learn basic Macintosh skills, continue with the instructions in this chapter. When you’re ready to connect other equipment, see the instructions in Chapter 3. Turning the computer on for the first time To turn the computer on for the first time, follow these steps: 1 Turn on your monitor.
2 Press and hold down the Power key for about 2 seconds. The Power key is marked with a triangle on your keyboard. You hear a tone from the computer as it starts up. 3 Follow the instructions on your screen. You will see a “welcome screen” with a Launcher (shown below) that you use to choose what you want to do next. m If you don’t know how to use a mouse, press the letter M on your keyboard for an on-screen program that teaches you how to use it.
4 When you’re finished exploring the items on your screen, click Exit. You’ll see the Macintosh desktop as pictured below. (Note: Most computer screens have a slight black border around them.) Hard disk icon Your Launcher has more—and perhaps different—items in it than are shown in this illustration. 5 Macintosh desktop, after you exit the welcome screen Take Tutorial Part 2 or skip to the section “What’s Next?” later in this chapter.
Problems turning on your computer? If the screen is dark, check these items to see if you can identify the problem: m Is the computer plugged into a power source? If it is plugged into a power strip, is the power strip turned on? m Is the computer turned on? The power-on light on the front panel should be on. If it isn’t, press the standby power button (marked with the symbol ®) on the back of the computer.
What’s next? Congratulations! You’ve finished setting up your computer. Now continue with one of the following steps: m If you are new to the Macintosh, see the next section, “Learning the Basics in the Performa Tutorials.” m If you are an experienced Macintosh user, turn to Chapter 2, “Getting Help,” to learn about Macintosh Guide. Or select Macintosh Guide from the Guide menu (h) in the upper-right corner of your screen and explore it yourself.
Learning the basics in the Performa tutorials Read this section if you haven’t already gone through Mouse Skills or the Performa Tutorial that appeared on your screen when you first turned on your computer, or if you want to go on to Performa Tutorial Part 2. These programs teach you the basic skills you’ll need to use your computer.
2 Move the mouse so that the arrow (8) is over the picture of the particular tutorial you want to take. If you don’t see the Performa Tutorial, Tutorial Part 2, or Mouse Skills pictures on your screen, put the arrow on the word “Learning” and click (quickly press and release) the mouse button. If you run out of room on your mouse pad or desk while moving the mouse, pick up the mouse and place it where there’s more room.
Reviewing the basics Use the following illustrations to review the elements on your screen with which you work on your computer. Icons Menu Window Menus The strip across the top of the screen is called the menu bar. The symbols and words in it represent “menus” (lists) of commands. To open a menu, place the pointer on the symbol or word for the menu and press the mouse button. Guide menu To find an answer to a question, look in the Guide (h) menu.
Icons Icons are small pictures that represent disks, programs, documents, and folders. You can double-click any icon to open it and see what it contains. This icon represents your computer’s internal hard disk. Icons like this one represent application programs, which you use to create documents and do other work. Icons like this one represent documents, which you can create and edit. Icons like this represent folders. A folder contains other icons.
Turning the computer off There are two ways to turn off your computer: with the Power key on the keyboard or with the Shut Down command in the Special menu. Using the Power key To turn the computer off using the Power key, follow these instructions: 1 If the computer is in sleep mode (the monitor is on but the screen is dark), press any key except Caps Lock to wake it. 2 Press and hold the Power key (marked with a π) on the keyboard for about 2 seconds.
3 With the tip of the arrow on the word “Special,” press and hold down the mouse button. 4 While holding down the mouse button, move the arrow down the list of choices until the words “Shut Down” are highlighted; then release the mouse button. To turn the computer on again, just press the Power key for about 2 seconds.
Where to find answers When you have questions about using your Macintosh, there are several places where you can look for answers. In the Guide menu The Guide menu (marked with the h icon) contains online help and information about the Macintosh. If you can’t find the information you need in this book, you can find it in the Guide menu. To learn how to get different kinds of help from the Guide menu, see Chapter 2 in this book.
Use the instructions in this chapter to learn about the help available to you in the Guide menu. 2 Getting Help The Guide menu contains online help and information. It is your main source of information when working with your computer. The menu is identified by a question mark (h) in the upper-right corner of the screen.
Getting answers to your questions When you have a question while working with your computer, you can get the answer by choosing Macintosh Guide from the Guide menu. 1 Pull down the Application menu (in the upper-right corner of the screen) and choose Finder to make it the active application program. A checkmark in the menu indicates that the Finder is the active program. 2 Pull down the Guide menu (marked with the h icon) and choose Macintosh Guide. The Macintosh Guide window appears.
3 Notice the three buttons at the top of the window: Topics, Index, and Look For. Macintosh Guide gives you three ways of finding information: m Topics lets you choose from a list of general subjects; it is like the table of contents in a book. m Index lets you choose from an alphabetical list of more specific subjects; it is like the index in a book. m Look For lets you search for information related to a specific word or phrase that you type.
2 In the list of topics, click “Customizing Your Computer.” When you click any topic area, a list of related questions appears on the right side of the Macintosh Guide window. To get instructions, click a question… …and then click OK. 3 Click the question “How do I set the time and date?” and then click OK. Or double-click the question. A small window appears with instructions for you to follow. If you want to return to the main Macintosh Guide window, click this button.
Getting answers with the Index button 1 In the Macintosh Guide window, click the Index button. An alphabetical list of subjects appears on the left side of the window. Slider Scroll bar 2 Scroll through the alphabetical list until the phrase “background pattern” is visible. You can scroll through the list either by dragging the slider to the letter B or by using the scroll bar at the right of the list. 3 Click the phrase “background pattern” in the alphabetical list.
4 Click the question “How do I change the background pattern?” and then click OK. Or double-click the question. A small window appears with instructions for you to follow. If you want to return to the main Macintosh Guide window, click this button. 5 Click here to see the next step (if there is one). Read and follow the instructions in the window. Macintosh Guide provides step-by-step instructions to answer the question you selected.
Getting answers with the Look For button 1 In the Macintosh Guide window, click the Look For button. A small box where you can type text appears on the left side of the window. To activate the text box, click here. Type a word or phrase in the text box… …and then click here. 2 Click the arrow button to activate the text box. 3 Type “sound” in the text box, then click Search.
4 Click the question “How do I change the alert (beep) sound?” and then click OK. Or double-click the question. A small window appears with instructions for you to follow. If you want to close Macintosh Guide, click here. Click here to see the next step (if there is one). 5 Read and follow the instructions in the window. Macintosh Guide provides step-by-step instructions to answer the question you selected.
Tips for using Macintosh Guide Here are a few tips for using Macintosh Guide effectively: m Macintosh Guide is available only when you are in the Finder—the desktop area where you can see the icons of disks, folders, and files. (Other programs may also have help available in the Guide menu, however.) If you don’t see Macintosh Guide in the Guide menu, pull down the Application menu (to the right of the Guide menu) and choose Finder.
Identifying what’s on your computer screen Sometimes you’ll see an unfamiliar item on the screen and ask yourself, “What’s that?” You can get an answer by using a Macintosh feature known as Balloon Help. Using balloons like those you see in comic strips, Balloon Help explains the function of icons, menus, commands, and other items on the Macintosh screen. Follow these steps to use Balloon Help: 1 Pull down the Guide menu (marked with the h icon) and choose Show Balloons.
Learning useful shortcuts You can perform many tasks in the Finder more quickly if you use keyboard or mouse shortcuts. For example, instead of clicking an icon and choosing Open from the File menu, you can simply double-click the icon to open it. Follow these steps to learn keyboard and mouse shortcuts: 1 Pull down the Guide menu (marked with the h icon) and choose Shortcuts. The main Macintosh Shortcuts window appears. 2 Click one of the category buttons.
3 Read about the shortcuts available for the category you selected. Click the right arrow in the lower-right corner of the window to display the next window (if there is one). 4 34 Chapter 2 When you finish reading about the shortcuts for your category, click the Topics button in the lower-left corner to return to the main Macintosh Shortcuts window. Or click the close box in the upper-left corner to close the window.
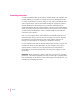
Read this chapter for information on connecting equipment to your computer and using some of its special features, such as sound capabilities. 3 Expanding Your Computer and Using Its Special Features The illustration on the next page shows the basic computer system you now have. So that you can expand your system’s capabilities, your computer has both external ports and internal slots to which you can connect additional hardware.
Monitor Floppy disk drive Computer Remote control sensor - Volume buttons CD-ROM drive (optional) Use these buttons to change the volume of the computer’s sound. C CD-ROM drive Open/Close button Power-on light Internal hard disk drive f Headphone jack Keyboard Mouse Ports and connectors on the back of your computer Video input card (optional) Security lock port Apple Desktop Bus (ADB) port 36 Chapter 3 Connects your Macintosh to a video camera, VCR, or other video equipment.
Video input card (optional) TV/FM tuner card (optional) ≤ Power socket F PCI card access cover ™ Monitor port Security lock port ® Standby power button V Apple Desktop Bus (ADB) port Internal modem card (optional) [ Printer port W External modem port g SCSI port ≈ Sound input port - Sound output port TV/FM tuner card (optional) Connects your Macintosh to an external TV antenna or cable TV service and to an FM radio antenna.
Using your computer’s sound features Your Macintosh can play and record stereo sound from a variety of sources. By connecting audio equipment to the sound input and sound output ports on the computer, you can listen to or reproduce stereo sound. If it has an internal CD-ROM player, your computer can also play and record sound from audio compact discs (CDs).
Adjusting volume and sound There are several ways to adjust the volume on your computer: m Use the volume buttons on the front of the computer (marked with the - icon). - Volume buttons m Use the volume controls on the front of your monitor if your monitor has them. m Use the volume control slider in the AppleCD Audio Player if you are playing an audio CD. The AppleCD Audio Player can be found in the Apple (K) menu.
m Use the volume control sliders in the Monitors & Sound control panel. The Monitors & Sound control panel can be found in the Control Panels folder in the Apple (K) menu. 1 Click here to view sound controls. 2 Adjust the volume slider. For more information about your computer’s sound, click here. Note: Some monitors also place a “Monitor Sound” icon at the top of the Monitors & Sound control panel. Tip: You may prefer to set the Sound Out Level slider to about the middle of the slider bar.
Listening with 3D Surround Sound The 3D Surround Sound technology broadens the sound you hear if you attach external speakers or if your monitor has built-in speakers. 3D Surround Sound makes the speakers sound as if they are set wider apart, and you can hear many “points” of sound around you. 3D Surround Sound is always enabled on your computer unless you disable it. It does not affect your computer’s sound performance or compatibility.
To connect and position the external microphone, follow the steps below. Note: If you want to record sound using a microphone built in to a monitor, see the “Sound” topic of Macintosh Guide, available in the Guide (h) menu. Then select the subtopic, “How do I record or remove a sound?” 1 Shut down the Macintosh. 2 Plug the microphone’s connector into the sound input port (≈) on the back of the computer.
3 Place the microphone at the top center of the monitor, so that the microphone’s Apple (K) icon is facing you. If you can’t place the microphone on top of the monitor, position the microphone according to these guidelines: m The microphone should be between 1 and 3 feet away from you. m The microphone should be directly in front of you to minimize the effect of background noise. 4 Turn on the computer. Next, you need to make sure the Sound Input source in your computer is set to “External Microphone.
5 Open the Monitors & Sound control panel in the Apple (K) menu and click the Sound icon. 6 Click the Sound Input pop-up menu and select “External Microphone.” 1 Click here to view sound controls. 2 Select External Microphone from the pop-up menu. For more information about your computer’s sound, click here. 7 Click the close box in the upper-left corner of the Monitors & Sound control panel to close it. (The control panel does not have to remain open while you’re recording.
Connecting external stereo speakers You can take advantage of your computer’s stereo sound output by attaching externally powered (amplified) speakers. 1 Assemble the speakers and the cable you need. You need a cable with a stereo miniplug at one end to connect one or both speakers to the computer. Stereo miniplug Some speakers require a dual-plug adapter, which has two plugs on its end, to plug into Audio In ports on both speakers.
3 Plug the end of the cable with the stereo miniplug into the sound output port (-) on the Macintosh. Sound input port 4 Sound output port Plug the other end of the cable into the speakers’ Audio In port or ports. If the speakers take a dual-plug cable, connect both plugs to the speakers’ Audio In ports. 5 Connect the speakers together with speaker wires, if necessary. 6 Turn on the computer. Now you’re ready to hear full-range stereo sound coming from the speakers.
Connecting headphones You connect headphones to the headphone jack (f) on the front of the computer or to your monitor if it has a headphone jack. f Headphone jack Note: 3D Surround Sound may not work well through headphones. To disable 3D Surround Sound, open the Monitors & Sound control panel in the Control Panels folder in the Apple (K) menu; then click the checkbox to remove the checkmark next to “Enabled.” You may need to disable 3D Surround Sound when listening through headphones.
Connecting external SCSI devices, such as a scanner or external hard disk Your computer has a port for connecting devices that use the Small Computer System Interface (SCSI, pronounced “skuh-zee”). SCSI devices commonly used with the Macintosh include hard disk drives, CD-ROM drives, scanners, tape or cartridge backup drives, and some printers. The SCSI port permits high-speed communication between the computer and the device. The SCSI icon appears below the port on the computer’s back panel.
Before you connect a device Before you connect a SCSI device to your Macintosh, complete these tasks: m Make sure each SCSI device connected to your Macintosh has its own unique ID number from 0 to 6. The computer itself (the main logic board inside it) has the ID number 7 and the internal CD-ROM drive has the ID number 3, making the ID numbers 0, 1, 2, 4, 5, and 6 available. Make sure other SCSI devices you add to the chain do not use ID numbers 3 or 7.
m Make sure that the last (or only) device in the SCSI chain has a terminator. Make sure that no other external SCSI device has a terminator. To ensure accurate transmission of information, a terminator must be at each end of a SCSI chain. Your computer’s main logic board, which is the first device in the chain, has a built-in terminator. Some external SCSI devices from manufacturers other than Apple have built-in terminators. (Check the information that came with the device.
3 Use a SCSI cable to connect the device either to the computer’s SCSI port or to the last SCSI device in the chain. IMPORTANT Make sure that the last (or only) device in the SCSI chain has a terminator and that no other external SCSI device has a terminator. Otherwise, the computer may not be able to start up. 4 Turn on all devices in your SCSI chain. IMPORTANT Always turn on any external SCSI devices connected to your Macintosh before turning on the computer itself.
Installing PCI and other expansion cards You can expand your computer’s capabilities by installing expansion cards inside the computer cover. Your Macintosh has slots available for three different kinds of expansion cards: a PCI (peripheral component interconnect) slot for a 6.
About Macintosh networking Your Macintosh can connect to a network that consists of as few as two computers or as many as thousands or even millions of computers and other devices. The network allows you and the other people connected to it to share information, access remote services, and share computing resources such as printers and modems. A network extends the features of your Macintosh by extending your reach to the services and resources provided on a network.
Connecting to a LocalTalk network You can connect to a LocalTalk network through the printer port on your computer. To connect to a LocalTalk network, you need LocalTalk cables and a LocalTalk adapter. The Apple LocalTalk Connector Kit DIN-8 is available from Apple-authorized dealers. After you connect to a LocalTalk network, you need to open the Network control panel in the Control Panels folder in the Apple (K) menu, and make sure the LocalTalk icon is selected.
Depending on the type of cables used in the Ethernet network you’re connecting to and the type of card you purchased, you may also need to purchase an Apple Ethernet media adapter or other compatible media adapter. (Consult the service and support information that came with your computer for instructions on how to contact an Apple-authorized service provider or Apple for more information on Apple Ethernet media adapters.
To set up your network configuration, open the AppleTalk control panel to choose the physical network interface you are using. (The AppleTalk control panel also contains zone information—a default zone is chosen for you.) If you plan to use TCP/IP on your Macintosh, you also need to choose settings in the TCP/IP control panel. You can set up your connection in two ways: manually, by entering a static Internet address, or automatically by using a network service to connect with a dynamic Internet address.
Read this chapter to learn how to work with application programs and protect the information on your disks. 4 Using Application Programs and Backing Up Disks Your computer came with several application programs already installed. You open these programs by clicking their buttons in the Launcher. The Apple Extras folder on your hard disk also contains some programs. Two of these are the Apple Video Player program and Apple FM Radio program.
Installing application programs You may want to buy and install additional application programs. See the manuals you receive with these programs for instructions on installing and using them. To use your programs most effectively, follow these guidelines: m Read the manuals you received with the program if you have a problem. m Put only one copy of each program on your hard disk. Having more than one copy can cause errors.
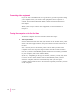
Installing programs from a floppy disk In most cases, you install application programs on your internal hard disk from floppy disks. The following illustration shows how to insert a floppy disk into your computer’s floppy disk drive. Insert the floppy disk, metal end first, into the floppy disk drive of your computer. For instructions on how to eject a floppy disk, see the “Disks” topic of Macintosh Guide, available in the Guide (h) menu.
Working with several programs at a time You can open as many application programs and desk accessories as your computer’s memory allows. All open programs are listed in the Application menu at the right end of the menu bar. You can find out which program is active and which other programs are open by pulling down the Application menu. The name of the active program (the one you’re using right now) has a checkmark next to it, and its icon appears in the menu bar.
Increasing memory available to run applications A computer function called virtual memory allows you to open several applications and windows at the same time by creating extra random-access memory (RAM) on your computer’s hard disk. Virtual memory, however, can also result in slightly slower performance. See the “Memory” topic of Macintosh Guide, available in the Guide (h) menu, for more information. Also see the document titled “About Virtual Memory” in the Documents folder on your desktop.
Making backup copies of your documents Follow these tips for making backup copies of the documents on your computer: m Regularly make copies of the documents you create. m You can back up files stored on your hard disk by copying them to floppy disks. m You can back up an entire floppy disk by copying it to another floppy disk of the same capacity or larger, or by copying it to a hard disk.
Using application programs designed for the PowerPC microprocessor Your Macintosh is compatible with most application programs intended for use with Macintosh computers, but certain programs are designed especially for computers that have the PowerPC microprocessor. These programs are sometimes called “native” applications and they take best advantage of your computer’s speed. Special memory requirements Some native applications may be slightly larger than other programs and may take up more memory.
Read this chapter for information about your computer’s built-in CD-ROM drive, if your computer came with one. 5 Using the Built-in CD-ROM Drive This chapter provides information on the optional internal CD-ROM drive (also called a CD-ROM player). Refer to Appendix A, “Health, Safety, and Maintenance Tips,” for information on the proper handling of CD-ROM discs. With your internal CD-ROM (compact disc read-only memory) drive, you have access to large amounts of information.
Inserting a CD-ROM disc Follow these instructions to insert a CD-ROM disc into your CD-ROM drive. Then follow the instructions provided with your disc, as well as the instructions in this manual. IMPORTANT Some CD-ROM disc labels have artwork on them that can cause the disc to be slightly off-center when it rotates in the drive. This may make the computer vibrate. See the next section, “If Your CD-ROM Disc Vibrates in the CD-ROM Drive,” for more information.
4 Push the tray in, or press the Open/Close button, to close the tray. In a few moments, an icon for the CD-ROM disc appears on your screen. If your CD-ROM disc vibrates in the CD-ROM drive Some CD-ROM disc labels have artwork that is noticeably thicker on one side than the other and can cause the disc’s weight to be slightly off-center. This uneven distribution of weight coupled with the high rotation speed of your CD-ROM drive can cause some discs to wobble in the drive and make your computer vibrate.
Ejecting a CD-ROM disc Follow these instructions to open the tray and eject a CD-ROM disc from your computer. If you have problems ejecting a CD-ROM disc, see “Problems Using the CD-ROM Drive” in the section, “Solutions to CD-ROM Problems” in Chapter 6. IMPORTANT You may not be able to eject a disc if it is being shared. To turn off file sharing, use the Sharing Setup control panel. 1 Open the tray. There are several ways to open the tray of your CD-ROM drive.
Using the CD-ROM discs that came with your computer Some of the CD-ROM discs that came with your computer—and some CD-ROM discs in general—require you to copy one or several items from the disc to your hard disk before you can view them. Other CD-ROM discs let you view their content directly from the disc itself. If a CD-ROM disc requires you to copy some items to your hard disk, a message tells you so when you try to open a program on it. IMPORTANT Never copy an entire CD-ROM disc to your hard disk.
Other CD-ROM formats Your CD-ROM drive also works with file formats other than the ones listed above (for example, CD-ROM XA) if you install the appropriate software. To find out about the availability of Macintosh software for additional file formats, contact the publisher of a particular disc. Audio CDs Your CD-ROM drive can play audio CDs and audio tracks on CD-ROM discs using your computer’s built-in speaker. You can also attach headphones or speakers to your computer for stereo sound.
Working with Photo CDs You can use your CD-ROM drive to open Photo CD images stored on Photo CDs. A Photo CD image is a digitized version of a standard photograph that you can open and view on your computer screen. You can do many things with the images on your Photo CDs: m Open and view the images individually. m View the images in a series, as you would view a slide presentation.
Obtaining Photo CDs Your own photographs can be recorded as Photo CD images on a Photo CD. To obtain a Photo CD of your own photographs, take your standard 35-mm film to a photofinisher who has a Photo CD system. The photofinisher develops your film, digitizes the photographs, and gives you back a Photo CD containing your images. A single Photo CD can hold approximately one hundred images.
For most work, a resolution of 768 x 512 pixels or smaller is suitable. For detailed work or very high-quality reproductions, you may want to use a higher resolution. Make sure to open high-resolution images with application programs designed to handle large image files. SimpleText cannot open very large files. Sharing a CD-ROM disc over a network You can share a CD-ROM disc using the file-sharing feature of System 7.5.
Consult this chapter if you experience problems using your computer. 6 Troubleshooting When you have questions If you want to know how to do a particular task with your computer, refer to Macintosh Guide in the Guide (h) menu. For instructions on using Macintosh Guide, see Chapter 2 of this manual. If you have trouble While you’re using your computer, you may occasionally see a bomb icon or an error message, or the pointer (8) may “freeze” on the screen.
WARNING If you have a problem with your computer and nothing presented in this chapter solves it, consult the service and support information that came with your computer for instructions on how to contact an Apple-authorized service provider or Apple for assistance. If you attempt to repair the computer yourself, any damage you may cause will not be covered by the limited warranty. Contact an Appleauthorized dealer or service provider for additional information about this or any other warranty question.
If you need repair service, consult the service and support information that came with your computer for instructions on how to contact an Appleauthorized service provider or Apple for assistance. If you know the problem is with a program not published by Apple, call the program’s publisher. Click the Phone Numbers button in the Service/Support area of the Launcher to get a software publisher’s phone number (if you’re screen isn’t currently “frozen”).
3 If the Power key doesn’t work, hold down the x and Control keys while you press the Power key (π). This key combination restarts the computer. (Use this key combination only when you can’t choose Restart from the Special menu or restart the computer using the Power key.) 4 If your computer still doesn’t restart, press the standby power button (®) on the back of the computer to turn it off, wait at least 10 seconds, and turn it on again.
3 In the Save Set dialog box, type a name for your currently selected extensions (for example, “My Extensions”) and click OK. The name of your set is added to the Sets pop-up menu. This saves your current set of extensions. 4 Choose All Off from the Sets pop-up menu to turn off all extensions. 5 Turn on Macintosh Easy Open by clicking it in the list so that a checkmark appears beside it. You can find Macintosh Easy Open by scrolling down the list of extensions.
Solutions to common problems with your computer This section contains descriptions of problems you might experience with your computer. Some problems may be caused by your CD-ROM drive, so if you don’t find your problem included here, be sure to check the section “Solutions to CD-ROM Problems” later in this chapter. The computer is turned on but the screen is dark.
You inadvertently delete a program from your computer’s hard disk. m You can replace any of the software that came with your computer by dragging it from the Macintosh Performa CD: Performa Software to your hard disk. See the section “Copying Files From the Performa Software CD-ROM Disc to Your Hard Disk” in Chapter 7. When you start up, a disk icon with a blinking question mark appears in the middle of the screen and stays there for longer than 15 seconds.
m System software is not installed on the startup hard disk, the system software is damaged, or the hard disk is not working properly. Start up your computer using the Macintosh Performa CD: Performa Software. Do this by inserting the CD-ROM disc into the CD-ROM drive and holding down the C key while you restart the computer. (See the section “Starting Up From the Macintosh Performa CD: Performa Software” later in this chapter if you need more help.
A “sad Macintosh” icon appears and the computer won’t start up. This icon indicates that your Macintosh cannot start up because of a problem with the system software or the computer hardware. Eject any floppy disks by turning off the computer and then holding down the mouse button while you turn the computer on again. Try starting up with the Macintosh Performa CD: Performa Software. Do this by inserting the CD-ROM disc into the CD-ROM drive and holding down the C key while you restart the computer.
m Check the ID numbers of all SCSI equipment (anything connected to the SCSI port [g]) connected to your computer. Each SCSI device must have its own unique ID number. If your computer came with the optional CD-ROM drive installed, it has SCSI ID number 3, and the computer itself has SCSI ID number 7. Therefore, any SCSI equipment you connect should not use ID numbers 3 or 7.
m The disk may have been formatted for use on another kind of computer. You may be able to use a program that lets you work with such disks on your Macintosh. If you are trying unsuccessfully to use a DOS floppy disk, consider the following: m When formatting floppy disks on a DOS computer for use in a Macintosh, you need to format standard double-sided disks as 720K disks and highdensity disks as 1440K disks.
You can’t eject a floppy disk. If you can’t eject a floppy disk in the usual way, by selecting the disk’s icon and choosing Eject Disk from the Special menu or by dragging the disk’s icon to the trash, try the following in order: m Hold down the x and Shift keys and press the number 1 key on your keyboard. m Turn off the computer. If the disk isn’t ejected, then hold down the button on your mouse or other pointing device while you turn the computer on again.
You can’t start an application program or it quits unexpectedly. Or, when you try to open a program, you see a message that not enough memory is available. One of the following is probably the cause: m The Macintosh ran out of memory. Quit the programs that you have open and then open the program you want to use, or restart your Macintosh. Use the Memory control panel to turn on virtual memory.
A dialog box with a bomb appears. There is a software problem. m Write down what you were doing when the message appeared, and write down the text of the message. m Restart your Macintosh. (See “Start Over by Restarting Your Computer” in the section “If You Have Trouble” earlier in this chapter.) Most software problems are temporary, and restarting usually corrects the problem. m If the problem recurs, check the startup disk and application program you were using when the dialog box appeared.
m If the problem recurs, you may need to reinstall system software. See Chapter 7, “Reinstalling Your Computer’s Software,” for instructions. m If the bomb only occurs in one application program, try reinstalling the program from the original disks. If reinstalling doesn’t solve the problem, contact the manufacturer of the program. The pointer (8) doesn’t move when you move the mouse. One of the following situations is probably the cause. m There is a software problem.
Typing on the keyboard produces nothing on the screen. One of the following is probably the cause: m You haven’t selected any text or set the insertion point (i). Make sure the program you want to type in is the active program. Then place the pointer (8) in the active window and click to set an insertion point (i) or drag to select text (if you want to replace the text with your typing). m If the computer beeps every time you press a key, Easy Access is probably turned on.
Check the startup disk and application program you were using when the problem occurred. To check that the programs and the system extensions you’re using are compatible with the system software, restart while holding down the Shift key; this temporarily turns off all system extensions. If your computer works normally after you do this, use the Extensions Manager control panel to turn on extensions and control panels one at a time. Restart after you turn on each extension.
You can’t open a document, or you see a message that an application program can’t be found. m Some documents can be opened by more than one application program. Try starting a program that you think might be able to open the document; then choose Open from the program’s File menu to open the document. m Purchase and install the correct software to use the document, or find out if the creator of the document can convert it to a form that one of your programs can use.
If a DOS document is displayed incorrectly, or you see strange codes or characters in the document, try one of the following: m Your application program may have special procedures for opening and saving documents with different file formats. See the information that came with your program, or call the program’s publisher. m Try opening the document in another program. Note: Some characters that can be displayed on the Macintosh are not accurately displayed on DOS computers.
You can’t record sound using an external microphone or the microphone built in to your monitor. m Any time you want to record sound, you need to make sure your sound input source is set to “External Microphone.” Open the Monitors & Sound control panel in the Apple (K) menu, click the Sound icon, and choose “External Microphone” from the Sound Input pop-up menu. m If you’re using your monitor’s built-in microphone to record, use the Monitors & Sound control panel to make the monitor’s speakers mute.
Solutions to CD-ROM problems Problems using the CD-ROM drive The CD-ROM drive icon does not appear on the screen. m If you have SCSI devices (anything connected to the SCSI port [g]) attached to your computer, make sure that each device has a unique SCSI ID number (your CD-ROM drive has SCSI ID 3). Refer to the documentation that came with your SCSI devices if you need to reset SCSI ID numbers. m If you reinstalled the CD-ROM software, make sure to restart your computer afterward.
m You may not have properly ejected the CD-ROM disc. The right way to eject a CD-ROM disc is either to select the CD-ROM disc and choose Put Away from the File menu or to drag the CD-ROM disc’s icon to the trash. If you select the CD-ROM disc and choose Eject Disk from the Special menu, the computer keeps the CD-ROM disc in its memory and continually asks you to reinsert it. Reinsert the CD-ROM disc, then drag its icon to the trash.
If no CD-ROM disc icon appears on your screen: m Press the Open/Close button of your CD-ROM drive. m The signal to open the tray may not be reaching the computer. Turn off your computer, and then do the following: Locate the small pinhole to the lower right of the CD-ROM tray opening, insert the end of a large straightened paper clip firmly and horizontally into the pinhole, push gently until the tray is released, and then carefully pull the tray open.
Problems using CD-ROM discs You insert a CD-ROM disc, but its icon doesn’t appear on the Macintosh desktop. m Make sure that the disc label is facing up and the disc is centered in the tray. If you are using a small (8 cm) disc, make sure your computer is as level as possible and the disc is centered within the inside ring on the tray. m Make sure the tray is closed all the way. m Try restarting your computer.
Your computer displays the message “This is not a Macintosh disk: Do you want to initialize it?” when you insert a CD-ROM disc in the CD-ROM drive. m Make sure that the Foreign File Access and Audio CD Access CD-ROM extensions are installed and turned on. You can find them in the Extensions folder in the System Folder on your hard disk. If they are not turned on, use the Extensions Manager control panel in the Control Panels folder in the Apple (K) menu to turn them on.
You can’t save changes you make to information on a CD-ROM disc. m A CD-ROM disc is a read-only medium. This means that information can be read (retrieved) from it, but not written (stored) on it. You can save the changed information on a hard disk or floppy disk. Your CD-ROM disc is vibrating in the CD-ROM drive. m Some CD-ROM disc labels have artwork that is noticeably thicker on one side than the other and can cause the disc’s weight to be slightly off-center.
Problems playing audio CDs You don’t hear any sound when you play an audio CD or an audio track on a CD-ROM disc using the AppleCD Audio Player. m If you have headphones or speakers connected to the computer, make sure they are firmly connected. Make sure the volume control on your headphones or speakers is not turned down too low. m If you do not have headphones or speakers connected to the computer, make sure that nothing else is plugged into the computer’s sound output port (-).
Problems using Photo CDs You insert a Photo CD disc, but its icon doesn’t appear on the desktop. m Reinstall the CD-ROM and QuickTime software. The easiest way to do this is by reinstalling your system software, following the instructions in Chapter 7, “Reinstalling Your Computer’s Software.” Your computer does not display color icons for individual images on a Photo CD. m Your computer may be low on memory. To view color icons, restart your computer and then reopen the Photos folder.
If your computer’s performance decreases If you notice a decrease in your computer’s speed and general performance after you install special software (a control panel, system extension, or custom utility), it may be because the software is not compatible with Macintosh computers built with the PowerPC microprocessor. m To find out if a system extension or control panel is the problem, hold down the Shift key while you restart the computer. This temporarily turns off control panels and extensions.
Solving printer problems The following suggestions should work for all printers. (Note: Also refer to the manual that came with the printer.) m Make sure that the printer driver for your printer is turned on in the Extensions Manager control panel in the Control Panels folder in the Apple (K) menu. To find out the name of the printer driver—for example, LaserWriter—refer to the documentation that came with your printer. The printer driver should appear in the Extensions list and have a checkmark beside it.
Note: If you have an Apple printer, you need to determine which printer driver to reinstall—the one that came with your printer or one of the drivers included on your Macintosh Performa CD: Performa Software. Depending on when you bought your printer, one of these printer drivers will be more recent than the other. It is the more recent one you want. Look at the date of the printer driver that came with your printer. (Usually, the printer driver comes on a floppy disk with the printer.
If you see a blinking question mark on your screen The blinking question mark means that your Macintosh is unable to find usable system software on your hard disk. 1 Press the Open/Close button of your CD-ROM drive to open the CD-ROM tray. 2 Place the Macintosh Performa CD: Performa Software in the tray with the disc label facing up. Be sure to use the CD with the words “Performa Software” at the top. Make sure the disc is lying flat in the tray.
Repairing a damaged disk If you see a message reporting that a disk is damaged or unreadable, you may need to repair the disk. Try these suggestions first If you can’t start up from a hard disk or you don’t see the hard disk icon on the desktop, try the following: m If the hard disk is internal, shut down your Macintosh, wait at least 10 seconds, and then turn it on again. m If the hard disk is external, make sure that it is turned on and that its cable is connected firmly; then restart the Macintosh.
Checking for damage on your hard disk You can test a hard disk for damage with the Drive Setup program, which is on the Macintosh Performa CD: Performa Software, a CD that came with your computer. 1 Start up your computer from the Macintosh Performa CD: Performa Software. See “Starting Up From the Macintosh Performa CD: Performa Software” earlier in this chapter. 108 Chapter 6 2 Click the Drive Setup icon in the Launcher to open the Drive Setup program.
If the test reveals a problem, you may be able to correct it by using Disk First Aid or another disk repair program (see the instructions in the next section) or you may need to reinitialize the disk (see “Initializing a Hard Disk” later in this chapter). Consult an Apple-authorized service provider for assistance if necessary.
3 Click the icon of the disk you want to test. Disk icons appear in a box at the top of the Disk First Aid window. 4 Click Repair to begin testing and repairing the disk. You can’t repair the startup disk or the disk that contains the Disk First Aid program, but you can test these disks by clicking Verify. If the program reveals a problem with either of these disks, start up the computer from another disk so that you can repair the damaged disk.
m If you can’t repair the disk, you’ll need to reinitialize it, which erases all the information on it. Before you reinitialize, be sure you recover all the information you can and back it up. Then erase (reinitialize) the disk. For instructions on reinitializing a floppy disk, see the “Disks” topic of Macintosh Guide, available in the Guide (h) menu. For instructions on reinitializing a hard disk, see the next section, “Initializing a Hard Disk.
2 Click the Drive Setup icon in the Launcher to open the Drive Setup program. 3 In the list of drives, click the disk you want to initialize. Click the drive you want to initialize... ...then click Initialize. 4 Click Initialize to initialize the hard disk. 5 Click Quit when you see a message reporting that initialization was successful. If a message reports that initialization failed, try again.
Consult this chapter if you have problems with your computer that require you to reinstall the computer’s software. 7 Reinstalling Your Computer’s Software System software is the set of programs and other files that your computer uses to start itself up, keep track of your files, and run application programs. System software is kept in the System Folder.
If your hard disk already has system software installed and there is a problem with the disk or the software, you may see this icon in the middle of the screen: If this icon appears, first test your startup hard disk and repair any damage by following the instructions in “Repairing a Damaged Disk” in Chapter 6. If repairing the disk doesn’t help, follow the instructions in the next section.
Note: Also keep the Macintosh Performa CD: Guided Tour handy. This CD contains backup copies of the Guided Tour programs you may have seen when you first turned on your computer. Instructions later in this chapter also describe how to use the Macintosh Performa CD: Guided Tour CD to restore these programs. The “If You Still Have Problems” section at the end of this chapter tells you what to do if using the CD-ROM disc does not solve the problem.
3 To close the tray, push it in or press the Open/Close button. Your Macintosh recognizes the CD-ROM disc as a startup disk, and in a few seconds the desktop below appears. Your screen may look slightly different from this one. Now continue with the steps in “Reinstalling Your System Software” or “Reinstalling All Your Original Software.” If you see the usual Macintosh desktop 1 Press the Open/Close button of your CD-ROM drive to open the CD-ROM tray.
In a few seconds the Macintosh desktop with the Launcher appears. Your screen may look slightly different from this one. Now continue with the steps in “Reinstalling Your System Software” or “Reinstalling All Your Original Software.” Reinstalling your system software Software can sometimes develop problems and may need to be replaced. Restore System Software is a program that reinstalls the system software that was on your computer when you purchased it.
2 Locate the Restore System Software icon in the Launcher window. 3 Click the Restore System Software icon to open it. In a moment you’ll see this screen: 4 Click the Continue button, or press the Return key on your keyboard. Restoring begins. A status box appears and keeps you informed of progress during the restoration, which takes several minutes.
In a few moments, the Macintosh desktop with the Launcher appears on your screen: Your screen may look slightly different from this one. 6 Eject the CD-ROM disc by dragging its icon to the Trash. 7 Insert the Macintosh Performa CD: Guided Tour into the CD-ROM drive. The Macintosh Performa CD: Guided Tour reinstalls the software programs that you may have seen before when you first turned on your computer. Reinstall these in case you need to refer to them again.
11 When you see a message that the software was restored successfully, click the Restart button or press the Return key on your keyboard. In a few moments, the Macintosh desktop with the Launcher appears on screen (as in step 5). You have successfully restored Apple software to your hard disk. 12 Eject the CD-ROM disc by dragging its icon to the Trash.
2 Click the Restore All Software icon in the Launcher window. 3 In the dialog box that appears, click the Continue button or press the Return key on your keyboard. Restoring begins. A status box appears and keeps you informed of progress during the restoration, which takes several minutes. 4 When you see a message that the software was restored successfully, click the Restart button or press the Return key on your keyboard.
6 Insert the Macintosh Performa CD: Guided Tour that came with your computer into the CD-ROM drive. The Macintosh Performa CD: Guided Tour reinstalls the software programs that you may have seen before when you first turned on your computer. Reinstall these in case you need to refer to them again. 7 Hold down the C key on your keyboard while you choose Restart from the Special menu. Continue to hold down the C key until you see the “Welcome to Macintosh” message.
Copying files from the Performa Software CD-ROM disc to your hard disk The Macintosh Performa CD: Performa Software has a folder on it named Hard Disk Files. You can copy any file in this folder by dragging the file to your hard disk.
Creating a startup floppy disk The Macintosh Performa CD: Performa Software contains a disk copy program (in the Disk Images folder) that enables you to create a floppy disk that you can use to start up your computer. You may want to create a startup floppy disk to use in case you are unable at a future time to start up from the CD-ROM disc. See the text file in the Disk Images folder for instructions on using the disk copy program to make a startup floppy disk.
Read this chapter for instructions on installing expansion cards or additional memory in your computer. 8 Installing Expansion Cards or Additional Memory This chapter provides information about expansion cards and memory, including an optional High Performance Module, and explains how to install them.
About expansion cards Expansion cards are printed circuit boards that can be installed in your computer to give it special features, such as enhanced video capabilities, networking and communications capabilities, and additional processing power. Your Macintosh has slots available for three different kinds of expansion cards: m a PCI (peripheral component interconnect) slot that can accommodate a 6.
This chapter contains instructions for installing a PCI card or a communication card. To install a video input card or a TV/FM tuner card (if you don’t already have these cards installed), follow the instructions that came with the kit or card. WARNING To avoid damaging your computer and expansion card, do not attempt to install any expansion card without first checking the documentation for that card.
You should have an Apple-certified technician install additional DRAM. However, you may feel comfortable installing DRAM yourself. m If you want to install additional DRAM yourself, you must purchase the memory chips, or DIMMs, from an Apple-authorized dealer. Then follow the instructions later in this chapter, in the section “Installing DIMMs or a High Performance Module.
Your computer already comes with 8 MB soldered on your computer’s main logic board plus 8 MB installed in one of the DIMM slots, for a total of 16 MB of DRAM. One DIMM slot remains for installing an additional 8-MB, 16-MB, 32-MB, or 64-MB DIMM, for a total of 24 MB, 32 MB, 48 MB, or 80 MB of DRAM respectively.
Opening the computer IMPORTANT To avoid generating static electricity from your body that may damage components, do not walk around the room until you have completed the installation of the expansion card and closed the computer. Additionally, move the logic board as little as possible while it is outside the computer case. 1 Shut down your computer by choosing Shut Down from the Special menu. You can also press the Power key (marked with a π) on the keyboard.
4 Pulling gently, swing the panel down, and slip it out. Remove the back panel. 5 If there are security screws on the vertical plate on the back of the computer, remove them with a screwdriver. If there are security screws, remove both screws from the vertical plate.
6 Touch any metal on the back of the computer to discharge static electricity from your body. Always do this before you touch any parts or install any components inside the computer. This discharges static electricity from your body and helps protect components inside the computer. Touch any metal on the exposed metal plate. 7 Unplug the power cord from your computer. You can unplug the power cord since you discharged static electricity in the previous step.
8 Gently pull down on the wire handle and swing it out to unlock it from its storage position. Then grasp the handle and gently pull the logic board out of the computer. The vertical plate and the logic board to which it’s attached slide all the way out of the computer. 9 Once the logic board is out, set it on a clean, flat, stable surface. Rest the end of it on a thick magazine or a thin book to protect the components underneath. Illus trati on W orld New s Vol. 1, N o.
Installing an expansion card This section contains instructions for installing a PCI card or a communication card. (To install a video input card or a TV/FM tuner card, follow the instructions that came with the card.) Installing a PCI card This section contains instructions for installing a PCI card, which must be no longer than 6.88 inches.
2 Lift out the retainer clamp and set it aside. You’ll need the retainer clamp later, after you install the card. Remove the retainer clamp.
3 If your PCI card has ports for connecting equipment, remove the plastic access cover from the vertical plate. On the inside of the computer, squeeze together the two plastic tabs holding the access cover in place; then pull the access cover off from the outside. Squeeze the two plastic tabs together.
4 Remove the metal retainer from the inside of the vertical plate. Vertical plate 5 Metal retainer Remove the PCI card adapter from the main logic board.
6 Remove the PCI card from its static-proof bag. Hold the card by its edges to avoid touching any connectors. Connectors 7 Connect the PCI card and the PCI card adapter. Place the adapter on top of a magazine on a firm surface. (Make sure the magazine is thick enough to protect your working surface from being scratched by the metal pins on the adapter.) Press the card firmly into the adapter.
8 Align the PCI card and the adapter over the PCI slot. PCI access port Vertical plate 9 PCI slot Insert the adapter into the PCI slot on the main logic board. Make sure the metal fence on the PCI card engages the hook on the vertical plate and that any connectors on the card protrude through the PCI access port opening. The card is properly seated when the card’s metal “fence” engages this hook on the vertical plate.
10 Insert the retainer clamp back into the hole and hold it there while you screw it into place. Replace the retainer clamp. Vertical plate Screw the retainer clamp in place. Vertical plate 11 140 Chapter 8 If you have a communication card, DIMMs, or a High Performance Module to install, go to those instructions later in this chapter. If you are finished installing items in your computer, proceed to “Closing the Computer.
Installing a communication card This section contains instructions for installing an Ethernet or an internal modem card in the communication slot. You use an Ethernet card to communicate with other computers through a local area network (LAN). For example, in businesses, an Ethernet card connected to a LAN enables more than one computer to print on a shared printer and to access documents on a central, shared server. Note: Using a modem is not the same as being connected to a local area network.
To install a communication card, follow these steps: 1 Remove the plastic access cover from the vertical plate. Push the two plastic tabs apart and pull off the metal retainer so the access cover can come off. Metal retainer Vertical plate Communication slot 2 Remove the communication card from its static-proof bag. Hold the card by its edges to avoid touching its connectors. 3 Align the card with the communication card access hole.
4 Check the external connector on your card, see which of the following two illustrations matches the card you have, and install the card according to the illustration. If the card has a hook, make sure it engages the vertical plate before pushing the card into the slot. Hook Vertical plate Communication card access hole Communication slot If the card does not have a hook, simply pass the external connector through the opening in the vertical plate as shown. (Some cards have a flat external connector.
5 Passing the external connector through the hole in the vertical plate, insert the card into the communication slot. Press down on the card until the connector is solidly in place. Don’t force the card. If you meet resistance, pull it out and try again. If your card has a hook, make sure the hook engages the vertical plate. 6 To see if the card is properly connected, lift it gently. If it resists and stays in place, it’s connected.
Installing DIMMs or a High Performance Module WARNING Although instructions for installing DRAM DIMMs and a High Performance Module are provided in this manual, Apple Computer strongly recommends that you have an Apple-certified technician install them. Consult the service and support information that came with your computer for instructions on how to contact an Appleauthorized service provider or Apple for service.
2 With the ejector in the “open” position, align the DRAM DIMM in one of the slots as pictured. IMPORTANT Do not touch the DIMM’s connectors. Handle the DIMM only by the edges. DRAM DIMM (Your DIMM’s shape and components may vary.) Connectors The DRAM DIMM is designed to fit into the slot only one way. Be sure to align the notches in the DIMM with the small ribs inside the slot. Notches Ejector (The ejector should be pushed outward and down to be in the open position, as shown.
Installing a High Performance Module into the cache module slot 1 Aligning the notches in the module with the small ribs inside the cache module slot, insert the module in the slot. The module is designed to fit into the slot only one way. IMPORTANT Do not touch the module’s connectors. Handle the module only by the edges. Cache module slot High Performance Module (Your module’s shape and components may vary.) The module is designed to fit into the slot only one way.
Closing the computer 1 Slip the base of the logic board into the guide rails inside the computer’s case. Make sure the logic board slides into the guides that are on both sides of the computer’s interior.
2 Press the reset button, and slide the logic board back into the computer. 1 Press the reset button. 2 Gently but firmly push on the vertical plate until the logic board is solidly back in place. Note: When you press the reset button, some of your computer’s software settings will change. After you turn on your computer later, you may want to open the control panels for the date and time, keyboard, and mouse to make sure that they are set the way you want them.
4 Slip the three hooks at the base of the back panel into the grooves on the computer case. Slip the three hooks on the back panel into the grooves on the computer case. 5 Swing the back panel up and snap it into place. Snap the plastic back panel into place. 6 150 Chapter 8 Plug all the cables except the power cord back into the computer.
7 Reconnect the power cord. Plug the power cord into the back of the computer. Your computer is now ready to turn on and use. WARNING Never turn on your computer unless all of its internal and external parts are in place. Operating the computer when it is open or missing parts can be dangerous, and can damage your computer. Reminder: When you turn on your computer, don’t forget to open the control panels for the date and time, keyboard, and mouse to make sure that they are set the way you want them.
Read this appendix for important health and safety instructions, as well as tips on keeping your computer in good working order. Appendix A Health, Safety, and Maintenance Tips For your own safety and that of your equipment, follow all the instructions in this chapter. Keep these instructions available for reference by you and others.
Musculoskeletal discomfort As with any activity that involves sitting for long periods of time, using a computer can make your muscles sore and stiff. To minimize these effects, set up your work environment carefully, using the guidelines that follow, and take frequent breaks to rest tired muscles. To make working with your computer more comfortable, allow enough space in your work area so that you can change position frequently and maintain a relaxed posture.
Eye fatigue Eye fatigue can occur whenever the eyes are focused on a nearby object for a long time. This problem occurs because the eye muscles must work harder to view an object that’s closer than about 20 feet (6 meters). Improper lighting can hasten the development of eye fatigue. Although eye fatigue is annoying, there’s no evidence that it leads to permanent damage.
You may have to raise your chair so your forearms and hands are at the proper angle to the keyboard. If this makes it impossible to rest your feet flat on the floor, you can use a footrest with adjustable height and tilt to make up for any gap between the floor and your feet. Or you may lower the desktop to eliminate the need for a footrest. Another option is to use a desk with a keyboard tray that’s lower than the regular work surface. m Position the mouse at the same height as your keyboard.
Avoiding fatigue m Change your seated position, stand up, or stretch whenever you start to feel tired. Frequent short breaks are helpful in reducing fatigue. m Use a light touch when typing or using a mouse and keep your hands and fingers relaxed. m Some computer users may develop discomfort in their hands, wrists, or arms after intensive work without breaks. If you begin to develop chronic pain or discomfort in your hands, wrists, or arms, consult a qualified health specialist.
Safety instructions For your own safety and that of your equipment, always take the following precautions.
Handling your computer equipment Follow these guidelines for handling your computer and its components: m When setting up your computer, place components on a sturdy, flat surface, and carefully follow all setup instructions. m When connecting or disconnecting a cable, always hold the cable by its connector (the plug, not the cord). m Turn off your computer and all its components before connecting or disconnecting any cables to add or remove any component.
Handling the monitor Follow these procedures for handling the monitor: m Turn down the screen brightness control if you leave the computer turned on for extended periods. If the brightness is not turned down, the image on the screen could “burn in” and damage the screen. You can also use a “screen saver” program, which dims or varies the image on the screen when the computer has been idle for a specified period of time. These programs are available from independent suppliers and user groups.
Handling floppy disks Store disks at temperatures between 50° F and 125° F. Do not use a pencil or an eraser on a disk or disk label. Keep disks dry. 125° F (52° C) 50° F (10° C) Do not touch the exposed part of the disk behind the metal shutter. Keep disks away from magnets. Avoid exposing disks to extremely hot temperatures. Handling CD-ROM discs Keep these important safety instructions in mind as you use CD-ROM discs: m Hold a disc by the edges or by one edge and the center hole.
m To avoid damage to your discs, keep these points in mind: Do not expose discs to direct sunlight. Do not write on discs. Do not spill liquids on discs. Do not put tape on discs. Do not scratch discs. Do not get dust on discs. Other important safety instructions to keep in mind as you use your CD-ROM drive: m Position your computer so that when the tray opens, it doesn’t bump into anything. m Do not leave the disc tray open.
The tray on your CD-ROM drive automatically closes when you shut down your computer. You may want to open the tray and take out your CD-ROM disc before shutting down. Ejecting a disk For instructions on ejecting any disk (a floppy disk, a CD-ROM disc, or a removable media disk), see the “Disks” topic of Macintosh Guide, available in the Guide (h) menu.
Power supply The power supply in your computer is a high-voltage component and should not be opened for any reason, even when the computer is off. If the power supply needs service, contact your Apple-authorized dealer or service provider. WARNING To protect the power supply from damage, make sure the voltage switch on the back of the computer is set correctly before you plug the computer into a power outlet. Refer to Chapter 1 for instructions on setting the voltage switch.
Cleaning the mouse The mouse contains a small ball that must roll smoothly for the mouse to work properly. You can keep this ball free of dirt and grease by using the mouse on a clean, lint-free surface and cleaning it occasionally. You need a few cotton swabs and a clean, soft, lint-free cloth. 1 Turn off your computer. 2 Turn the mouse upside-down and turn the plastic ring on the bottom counterclockwise to disengage it.
5 Wipe the mouse ball with a clean, soft, dry, and lint-free cloth. 6 If necessary, wash the mouse ball with warm soapy water (use a mild soap such as a dishwashing liquid) and then dry the mouse ball thoroughly. 7 Gently blow into the mouse case to remove any dust that has collected there. 8 Put the ball and the ring back in place. Your mouse should roll smoothly across your mouse pad or desk. If it doesn’t, repeat these instructions carefully.
Turn the ring a very short distance, until it stops. When the recessed area on the ring is not lined up with the recessed area surrounding the ring, the mouse is locked. Recessed area on ring Recessed area surrounding ring The mouse ring is locked when the recessed area on the ring does not line up with the recessed area surrounding the ring. To unlock the mouse, follow these steps: 1 Insert a straightened paper clip into the hole on the plastic ring. Insert a straightened paper clip into this hole.
Turn the ring a very short distance. When the recessed area on the ring is lined up with the recessed area surrounding the ring, the mouse is unlocked. Recessed area on ring Recessed area surrounding ring The mouse ring is unlocked when the recessed area on the ring lines up with the recessed area surrounding the ring.
Read this appendix to learn how to use the special keys on your keyboard. Appendix B Special Keys on Your Keyboard Your computer keyboard contains certain special keys that typewriter keyboards don’t have. Many of these keys allow you to give commands to the computer without using the mouse. For example, in many application programs, pressing the x (Command) key at the same time as the Q key lets you quit a program. The following table describes what you can do with the special keys on your keyboard.
Special keys on Apple keyboards (continued) Control key control Delete key Use to delete selected material, or the character to the left of the insertion point. delete Enter key enter Escape key esc Function keys F1 Option key Numeric keys alt option num lock clear = / 7 8 9 4 5 6 1 2 * Use in combination with other keys to produce special characters or modify actions.
Typing special characters and symbols You can type a variety of international and other special symbols and characters (including characters with diacritical marks, such as accents) by pressing combinations of keys. The Key Caps program, which is installed with your system software, shows you the characters produced when you type certain keys and key combinations in the fonts available on your computer. Choose Key Caps from the Apple (K) menu; then choose the font from the Key Caps menu.
Note: If you see rectangles instead of diacritical marks on some of the pictures of keys in Key Caps, try pressing Option-x to see the diacritical marks. However, use the Option key (not Option-x) in combination with the other keys to type letters with diacritical marks. If you press the Option key at the same time as a key for a specific diacritical mark and then release both keys, Key Caps outlines in bold the keys for letters that can be typed with that mark.
Special key combinations If difficulties with your mouse or computer don’t allow you to use standard methods of quitting a program or restarting your computer, you can try using these special key combinations.
If you can’t find what you’re looking for in this index, look in Macintosh Guide— available in the Guide (h) menu on your computer. Index A accent marks, typing 172 ADB port.
application programs (continued) Disk First Aid 109–110 displaying windows in 60 Drive Setup 83–84, 108, 111–112 guidelines for using 58 increasing memory for 61 installing 58–59 Key Caps 171–172 memory used by 63, 87 opening 57, 87, 92 preinstalled 57 putting in the Launcher 58 quitting 77, 87, 169, 173 Restore All Software 120–122 Restore System Software 117–120 screen savers 160 switching between 60 system error and 88 troubleshooting 58, 87–94 working with several at a time 60–61 arrow frozen on screen
audio CDs 70, 101 audio tracks on 70, 101 capacity of 65 cleaning 99, 161 ejecting 68, 96, 99 file formats for 69–70 file sharing and 68 handling 161–163 inserting into drive 66 installing programs from 59 opening documents on, troubleshooting 99 Photo CDs 70, 71–73, 102 polishing kit 99 safety precautions for 161–162 sharing over network 73 small (8 cm) discs 66 starting up from 85, 105–106 troubleshooting 95, 98–102, 105–106 types available 65, 69–70 vibration of 67, 100 CD-ROM drive 65–73.
connecting Apple PlainTalk microphone 41–44 audio equipment 38–47 cables 159 connector into port 159 to Ethernet network 53, 54–55 external SCSI devices 48–51 headphones 47 keyboard 6–7 to LocalTalk network 53, 54 modem 8–10 monitor 3–5 mouse 6–7 to a network 52–56 power cord 3, 4 SCSI devices 48–51 speakers, external 45–46 connectors audio 45 internal modem 8–9 plugging into port 159 Control key 170 Control Panels (Apple menu) Extensions Manager control panel 78, 79 incompatible 87–89 Macintosh Easy Open c
maximum amount installed 127 purpose of 127 DRAM DIMM slots 126, 145–146 drivers for printers 104 for SCSI devices 51 Drive Setup program on Macintosh Performa CD: Performa Software 83, 108, 111–112 Dual Inline Memory Modules (DIMMs). See DRAM DIMMs dynamic random-access memory.
file sharing CD-ROM discs and 73 ejecting CD-ROM discs 68 Finder activating 24 Macintosh Guide and 24 shortcuts for commands in 33–34 floppy disk drive location of 36 replacing 52 floppy disks backing up 61–62 creating a startup floppy disk 124 DOS 84–85 ejecting 86, 163 handling 161 initializing 84–85 inserting 59 installing programs from 59 protecting information on 61–62 repairing 109–111 starting up from 62, 124 storing 161 troubleshooting 84, 85, 109–111, 163 folders Apple Extras folder, Read Me files
health-related information 153–157. See also safety precautions arranging your office 155–156 electromagnetic emissions 157 eye fatigue 155 general fatigue 157 musculoskeletal discomfort 154 posture 154–156 help, sources of 21, 23–34.
K keyboard adjusting angle of 7 connecting 6–7 handling 160 posture for 155–156 Power key on 11, 20, 77–79 shortcuts with.
Macintosh Performa CD: Performa Software disc checking for damaged disk with 108–109 copying its files to hard disk 57, 123 Drive Setup program on 83, 108, 111–112 initializing hard disk with 111–112 preinstalled applications on 57 reinstalling system software with 114–120 starting up from 85, 105–106 MacTCP control panel, Ethernet networks and 55 maintenance CD-ROM discs 99, 161–163 CD-ROM drive 162 cleaning computer equipment 164–166 floppy disks 161 keyboard 160 monitor 160, 164 mouse 89, 165–166 screen
mouse cleaning 89, 165–166 connecting 6–7 holding 15 locking and unlocking 166–168 moving 15–16 moving pointer with 15, 16 position of 156 shortcuts using 33–34 spills on 159 troubleshooting connections of 89 mouse button 15 mouse cable 6 moving Macintosh Guide window 25, 31 mouse 15–16 pointer on screen 15, 16 windows 18 N network alternative network, connecting to 53 backing up files on 62 connecting to 52–56 Ethernet, connecting to 53, 54–55 local area network 52–53 LocalTalk, connecting to 53, 54 setti
plugging in the computer 2–3 pointer frozen on screen 75, 76–77, 90 moving on screen 15,16 placing on insertion point 90 pointing devices, troubleshooting 89.
Restore System Software program 117–120 restoring information on hard disk 62 system software 117–120 Return key 170 ROM (read-only memory) 65 S “sad Macintosh” icon 83 safety precautions 158–164.
to quit an application 77, 169 to rebuild the desktop 173 to restart when Restart button cannot be chosen 77 to start the computer from a CD-ROM disc 173 to start the Extensions Manager 173 to turn off system extensions 173 Shortcuts command (Guide menu) 33–34 Show All command (Application menu) 60 Show Balloons (Guide menu) 32 Shut Down command (Special menu) 19, 20 shutting down the computer 19–20 SimpleText word processor, opening Photo CD images with 72 size box on windows 18 sleep, waking from 19, 80 s
startup disk (continued) Macintosh Performa CD: Performa Software disc as 105–106 rebuilding desktop of 78–79 repairing 107 troubleshooting 81–82, 108 static electricity, avoiding 130, 132 stereo miniplug 45 storage devices, replacing 52 support 21, 76–77 support hotline 21 switching programs 60 symbols, typing 171–172 system error 75, 77, 88 system extensions incompatibility of 87, 88 turning off 173 System Folder, extra copy warning 58 system software accidentally deleting 81 backup copies of 62 cannot be
icons do not appear correctly on screen 84 interference on monitor 160 ISO 9600 discs 100 keyboard 90–91 memory 87 microphone 94 mouse connections 89 performance problems 103 Photo CDs 102 pointer doesn’t move when you move the mouse 75, 76–77, 89 Power key does not turn off computer 77–78 printer problems 81, 104–105 question mark icon at startup 81, 114, 115 quitting application program when problem occurs 77 rebuilding desktop 78–79, 84 reinstalling system software 113–120 repairing damaged disks 107–112
Macintosh Performa User’s Manual Includes setup, troubleshooting, and health-related information for Macintosh Performa 6360 series computers
K Apple Computer, Inc. © 1996 Apple Computer, Inc. All rights reserved. Under the copyright laws, this manual may not be copied, in whole or in part, without the written consent of Apple. Your rights to the software are governed by the accompanying software license agreement. The Apple logo is a trademark of Apple Computer, Inc., registered in the U.S. and other countries.
Contents Communications regulation information Preface Welcome to Macintosh 1 Getting Started vii ix 1 Plugging in the computer Connecting a monitor 2 3 Connecting the mouse and keyboard Connecting the modem 6 8 Connecting other equipment 10 Turning the computer on for the first time Problems turning on your computer? What’s next? 10 13 14 Learning the basics in the Performa tutorials Reviewing the basics 17 Turning the computer off 19 Turning the computer on 20 Where to find answers
2 Getting Help 23 Getting answers to your questions 24 Tips for using Macintosh Guide 31 Identifying what’s on your computer screen Learning useful shortcuts 32 33 3 Expanding Your Computer and Using Its Special Features Using your computer’s sound features 38 Connecting the Apple PlainTalk microphone Connecting external stereo speakers Connecting headphones 35 41 45 47 Connecting external SCSI devices, such as a scanner or external hard disk 48 Expanding memory 51 Installing PCI and other
Playing audio CDs 70 Working with Photo CDs 71 Sharing a CD-ROM disc over a network 6 Troubleshooting 75 When you have questions If you have trouble 73 75 75 Solutions to common problems with your computer Solutions to CD-ROM problems 95 If your computer’s performance decreases Solving printer problems 80 103 104 Starting up from the Macintosh Performa CD: Performa Software Repairing a damaged disk Initializing a hard disk 105 107 111 7 Reinstalling Your Computer’s Software 113 When sh
8 Installing Expansion Cards or Additional Memory About expansion cards About memory 126 127 Opening the computer 130 Installing an expansion card 134 Installing DIMMs or a High Performance Module Closing the computer 148 Appendix A Health, Safety, and Maintenance Tips 153 Health-related information about computer use Safety instructions 158 Handling your computer equipment Cleaning your equipment 159 164 Locking and unlocking the mouse 166 Appendix B Special Keys on Your Keyboard Typing s
Communications regulation information FCC statement This equipment has been tested and found to comply with the limits for a Class B digital device in accordance with the specifications in Part 15 of FCC rules. See instructions if interference to radio or television reception is suspected. Radio and television interference The equipment described in this manual generates, uses, and can radiate radio-frequency energy.
DOC statement DOC Class B Compliance This digital apparatus does not exceed the Class B limits for radio noise emissions from digital apparatus as set out in the interference-causing equipment standard entitled “Digital Apparatus,” ICES-003 of the Department of Communications.
Welcome to Macintosh Congratulations on the purchase of your new Macintosh. Your computer is designed to give you the highest performance combined with real ease of use. It’s also easy to set up and easy to expand. This book guides you through the setup procedure, tells you how to expand your Macintosh, and provides many tips on using your new system. Your Macintosh computer is powered by the new †™ microprocessor (or “chip”). This microprocessor was designed by Apple Computer, Inc., Motorola, Inc.
Monitor Macintosh Performa computer Keyboard cable (permanently attached to the keyboard) Keyboard Apple PlainTalk Microphone (optional) Mouse Phone cord (comes with optional internal modem) Monitor video cable (sometimes built into the monitor) Computer power cord Monitor power cord