Follow the instructions in this chapter to set up your computer and learn the basics. 1 Getting Started The information and illustrations in this chapter provide an overview of your Macintosh PowerBook system and get you started using the computer. To begin, take a few moments to review some important details about the computer’s hardware, software, and learning materials. Becoming familiar with your Macintosh PowerBook Your PowerBook is designed to keep you working productively in any location.
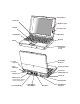
Sleep indicator Speaker grill ¤ Brightness control Trackpad O Contrast control Trackpad button Microphone Battery On/off key Expansion bay (CD-ROM drive installed) - Sound Exchangeable BookCover output port ¯ Power PC Card eject buttons adapter port Two PC Card (PCMCIA card) slots √ Sound input port Security slot Expansion port (for optional video, network, or other expansion card) g SCSI port (HDI-30) Infrared window ´ Printer/External V Apple Desktop Bus (ADB) port Reset button modem
Software for mobility and efficiency Your PowerBook comes with a variety of applications, utility programs, and control panels that provide broad functionality and flexibility.
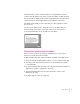
Control Strip for quick changes The Control Strip appears on the desktop when you start up your PowerBook for the first time. This strip lets you change common settings quickly—by pressing an icon and then choosing the option you want from a pop-up menu.
The Guide menu contains online instructions for using Macintosh system software when the Finder is the active program. In addition to Mac OS Guide and the tutorial, the Guide menu contains an explanation for using the Guide online instructions (About Apple Guide) and a summary of shortcuts. The Guide menu usually provides online help for other applications when they are active. You also use the Guide menu to turn balloons on or off.
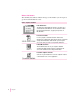
Where to find answers The summary that follows indicates the type of information you can expect to get from each information source. On the computer’s hard disk In the Guide menu The Guide menu (marked with the h icon) is your main source of information about the Macintosh. You can learn basic skills in the tutorial and get interactive, step-by-step help for tasks in Mac OS Guide. In electronic manuals For some programs, condensed instructions and reference information are supplied in an online manual.
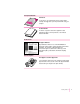
In the printed materials In this book Macintosh PowerBoo k User’s Man ual Use this book to set up and learn about your computer and for useful tips and suggestions if you have problems while using your computer. In other manuals For answers to questions about other equipment or about application programs you have purchased, see the manuals that came with them.
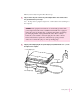
Preparing to set up the computer Now that you know some essential details about your PowerBook, you’re ready to set it up and begin using it. To set up your computer for the first time, you need the power adapter and the power cord that came with it. When setting up your computer, place your computer on a sturdy, flat surface near a grounded electrical outlet.
When you are ready to begin, follow these steps: 1 Plug one end of the power cord into the power adapter and the other end into a threehole grounded outlet or power strip. Note: It’s important to plug the adapter into a wall outlet before attaching it to the computer. WARNING This equipment is intended to be electrically grounded. The power adapter that came with your Macintosh PowerBook is equipped with a three-wire grounding plug—a plug that has a third (grounding) pin.
Opening the display 1 Slide the latch to the left and lift up the display. Slide the latch to the left to open the display. 2 Position the display at a comfortable viewing angle. You can adjust the angle of the display at any time by tilting it toward or away from you.
Removing the battery label (if necessary) Most new PowerBooks are shipped with a label covering the battery to protect it from losing its charge completely. If there is a label, you need to remove it before the battery will provide power for the computer. 1 With the display open, peel off the part of the label on the computer’s case, taking care not to tear the label. 2 Close the display. 3 Move the latch under the battery to the right and hold it in that position.
Turning the computer on To turn on the computer for the first time: m Press the Power key (marked with “on/off”) at the upper-right corner of the keyboard to turn the computer on. Power key on/off You should hear a tone when you turn on the computer. It takes the computer a few minutes to start up. You’ll see the Mac OS startup screen as the system software is loaded on the computer. In a few moments the Macintosh desktop appears, like the picture below.
Problems turning the computer on? m Nothing happened when you pressed the Power key. The battery may be drained. Make sure you plug in the power adapter, and that the power adapter is firmly connected to both the computer and a power source. If the power adapter is plugged into a power strip, make sure the power strip is plugged in and turned on. Then try pressing the key again. If the computer still doesn’t turn on, see “Problems Starting Up the Computer” in Chapter 6.
m You see a picture of a disk with a blinking question mark on the screen. This icon usually means that the computer can’t find system software on the hard disk or any disks attached to the computer. You may need to reinstall system software. See “Reinstalling the Mac OS System Software” in Chapter 7. What’s next? You’ve now finished setting up your Macintosh PowerBook. Continue with one of the following steps: m If you are new to the Macintosh, turn to the next section, “Learning the Basics.
Learning the basics If you are new to the Macintosh, you should begin by looking at the easy-touse program called the Macintosh Tutorial. The tutorial teaches you the basic skills you’ll need to use your computer. To start the tutorial, follow these steps: 1 Move your finger on the trackpad to move the arrow pointer (8) on the screen. Place your index finger on the trackpad and your thumb on the trackpad button. Don’t press the trackpad button yet.
Tips for using the trackpad For best results when using the trackpad, keep in mind these tips: m Use your index finger (left or right hand). Use only one finger. m Use only your finger on the trackpad (and be sure your finger is dry). Do not use a pen or any other object. m Sometimes humidity or condensation may cause moisture to gather on the trackpad. If this happens, gently wipe the trackpad with a clean cloth before you use it. m You can use the trackpad to click and drag.
Reviewing the basics You can use the following illustrations to review the elements you use on your screen to do work with your computer. Icons Menu Window Control Strip Menus The strip across the top of the screen is called the menu bar. The symbols and words in it represent menus of commands. To open a menu, place the pointer on the symbol or word for the menu and press the trackpad button. Guide menu To find an answer to a question, look in the Guide (h) menu.
Icons Icons are small pictures that represent disks, programs, documents, and folders. You can double-click any icon to open it and see what it contains. This icon represents your computer’s internal hard disk. Icons like this one represent application programs, which you use to create documents and do other work. Icons like this one represent documents, which you can create and edit. Icons like this represent folders. A folder contains other icons.
Control Strip The Control Strip gives you a quick and easy way to monitor and update your PowerBook’s power management options and other useful features. For instructions on using the Control Strip, see “How do I use the Control Strip?” in the “Customizing Your Computer” topic area of Mac OS Guide, available in the Guide (h) menu. Reviewing the Guide menu The Guide (h) menu is your main source of information when you’re working with your computer.
Using Mac OS Guide to get answers to your questions When you have a question while working with your computer, you can get the answer by choosing Mac OS Guide from the Guide (h) menu. 1 Pull down the Application menu (in the upper-right corner of the screen) and choose Finder to make it the active application program. A checkmark in the menu indicates that the Finder is the active program. 2 Pull down the Guide menu (marked with the h icon) and choose Mac OS Guide. The Mac OS Guide window appears.
3 Notice the three buttons at the top of the window: Topics, Index, and Look For. Mac OS Guide gives you three ways of finding information: m Topics lets you choose from a list of general subjects; it is like the table of contents in a book. m Index lets you choose from an alphabetical list of more specific subjects; it is like the index in a book. m Look For lets you search for information related to a specific word or phrase that you type.
2 Click “Customizing Your Computer” in the list of topics. When you click any topic area, a list of related questions appears on the right side of the Mac OS Guide window. To get instructions, click a question… …and then click OK. 3 Click the question “How do I set the time and date?” and then click OK. Or double-click the question. A small window appears with instructions for you to follow. If you want to return to the main Mac OS Guide window, click here.
Tips for using Mac OS Guide Here are a few tips for using Mac OS Guide effectively: m Mac OS Guide is available only when you are in the Finder—the desktop area where you can see the icons of disks, folders, and files. (Other programs may also have help available in the Guide menu, however.) If you don’t see Mac OS Guide in the Guide menu, pull down the Application menu (to the right of the Guide menu) and choose Finder. m Follow the steps when you’re instructed to; don’t skip ahead or read ahead.
Turning the computer off Always use one of the following methods to shut down the computer. If you don’t, you risk losing any work you haven’t previously saved on a disk. You also risk losing any open documents. Turning the computer off with the Power key To turn the computer off, press the Power key. Detailed instructions follow. 1 If the computer is in sleep, press the Power key (or any key on the keyboard except Caps Lock or the trackpad button) to wake it.
Turning the computer off with the Shut Down command You can also turn your computer off by using the Shut Down command in the Special menu. Follow these steps: 1 If the computer is in sleep, press the Power key (or any key on the keyboard except Caps Lock or the trackpad button) to wake it. 2 Move the tip of the arrow to the word “Special” at the top center of the screen. If the word “Special” does not appear at the top of the screen, you’re not working in the Finder.
Putting the computer to sleep Sleep is a power conservation feature of Macintosh PowerBook computers, reducing the amount of power the computer draws when it’s not being used. When the computer is in sleep, it has a darkened screen and appears to be off. A small green light flashes on the top of the display case when the computer is in sleep. (Note: The computer must be on in order for you to put it to sleep.) To put the computer to sleep, do this: 1 Press and hold the Power key for about two seconds.
m You can also put your computer to sleep by closing the display. When the computer is in sleep, a small green light flashes in the upper-right corner of the display. After closing the display, be sure to check that the sleep light is blinking (at the top-right edge of the display). If you don’t see the blinking light, open the display and use the Control Strip or the Special menu to put the computer in sleep. Note: You may notice that the computer sleeps when the display is not closed completely.
Automatic sleep If you don’t use the computer for several minutes, it goes to sleep automatically. This conserves battery power. To wake the computer, press any key on the keyboard (except Caps Lock or the trackpad button). The screen reappears as it was before the computer went to sleep. Note: If the display is partly or fully closed, open it about halfway (to an angle of 45 degrees) and press a key to wake the computer. You can control the automatic sleep feature.
2 Click the Restart button. You can also do this to restart: m Choose Restart from the Special menu. If the Special menu does not appear in the menu bar, you’re working in the wrong program. Click anywhere on the desktop to return to the Finder. When you choose Restart, the computer prompts you to save your work, closes all open programs, and restarts itself. Restarting using either of the methods outlined above does not affect your RAM disk (if you created one) or its contents.
Read this chapter for information on using expansion bay modules and PC Cards. 2 Using Expansion Bay Modules and PC Cards Using expansion bay modules The floppy disk drive and the optional CD-ROM drive in your Macintosh PowerBook are removable modules, which you can easily switch or replace with another module. The place in your computer where modules go is called the expansion bay. When no module is installed in the expansion bay, you can use it to store an extra battery for your computer.
Removing an expansion bay module To remove an expansion bay module from your Macintosh PowerBook, follow these steps: 1 Quit any application programs or files that are using the floppy disk or compact disc (CD) or other medium inserted in the expansion bay module. Remember to save your work. 2 If a floppy disk or CD is inserted in the module, click its icon to select it and drag its icon to the Trash (or choose Put Away from the File menu). You should not remove the module if a disk is in use.
WARNING If you remove a module while using the power adapter, be careful not to tilt the computer on end or let its weight rest on the adapter’s connector. 5 While holding the latch open, grasp the module by its gripping surface and pull it out of the computer. 1 Slide and hold the latch on the underside of the computer. 2 Hold the module by the gripping surface and pull it completely out of the computer. IMPORTANT You should not remove an expansion bay module if it is in use or you may lose data.
Inserting an expansion bay module Follow these steps to insert an expansion bay module: 1 Make sure the computer is in sleep or shut down. 2 Slide the module in until you hear it click into place. Make sure the gripping surface is facing down. Use a smooth motion but don’t move the module too slowly. (The computer may not recognize the module if you insert it very slowly.) The latch clicks closed when the module is in place. Insert the CD-ROM drive module all the way in until it clicks.
Inserting a disc To load a compact disc in the drive, follow these steps: 1 Start up the PowerBook, if it’s not already on. 2 Press the Open button to open the tray of the CD-ROM drive. The tray opens. (If the tray doesn’t open, a disc may already be in the drive. Drag its icon to the Trash to open the tray. You’ll see a message if the disc is in use.) 3 Place a CD-ROM disc in the tray, with the label facing up. Make sure the disc is lying flat in the tray. 1 Push the Open button.
Note: When the CD-ROM drive is in use, you may notice some vibration as the compact disc spins rapidly. Certain discs can cause the drive to vibrate because they have heavily inked artwork or a label that creates an imbalance as the drive spins. Some vibration is not unusual for a high-speed CD-ROM drive. To minimize vibration from unbalanced compact discs, do not put labels on your CDs. In addition, place the computer on a flat, solid surface when using the CD-ROM drive.
Using PC Cards (PCMCIA cards) PC Cards (also known as PCMCIA cards) are about the size of a thick credit card and have a 68-pin connector at one end. They come in many varieties, such as fax/modem cards, mass-storage cards, Ethernet connection cards, and wireless communication cards. You can use PC Cards to expand your Macintosh PowerBook’s capabilities. This section tells you how to insert and eject PC Cards and provides examples for setting up your communications software with a PC Card modem.
To insert a card, do this: m Insert the card, connector first and label up, into the slot. Make sure the card is level. A Type I or Type II PC Card can be inserted in either the upper or lower slot. A Type III PC Card must be inserted in the lower slot.
You’ll feel some resistance as you slide the card in. When the card is firmly seated, you hear a click. Use a smooth motion but don’t move the card in too slowly. (The computer may not recognize the card if you insert it very slowly.) An icon for the PC Card appears on the desktop. You are now ready to use the card. Ejecting a PC Card Your computer must be on or off in order to eject a PC Card. You cannot eject a PC Card when the computer is in sleep.
Other ways to eject a card When the computer is turned on, you can also do any of the following: m Click the card’s icon to select it, pull down the File menu, and choose Put Away. After the card is ejected, pull it out of the slot. m Click the card’s icon to select it, pull down the Special menu, and choose Eject PC Card. After the card is ejected, pull it out of the slot.
If you can’t eject a card If you are unable to eject a card, follow these steps: 1 Straighten one end of a paper clip. 2 Insert the end of the straightened paper clip into the hole next to the slot that contains the card. Press gently but firmly until the card is ejected. If you can’t eject a card, insert the end of a straightened paper clip into the hole next to the slot. This hole is for the upper slot. This hole is for the lower slot. 3 Pull the card out of the slot.
Using a PC Card modem When you are using a PC Card modem, make sure you do the following: 1 Install the communications software you want to use. PC Card modems work with your communications software by accessing a feature of your Macintosh PowerBook’s software called the Communications Toolbox. Your software must support the Communications Toolbox in order to use PC Card modems.
Using Apple Remote Access with a PC Card modem Apple Remote Access uses modem files (sometimes called connection scripts or CCLs) to get the best performance from some modems. Follow these steps to select your modem file: 1 Insert your PC Card modem. 2 Open the Remote Access Client application program. If you need to install the software, open the Installer program or the Install Remote Access Client icon and follow the instructions on the screen.
5 Choose the port that your PC Card modem is in. You should see either the upper or lower PC Card slot listed. If you don’t, make sure your modem is properly inserted. If you insert the PC Card modem in the other slot, you need to reselect the modem port. Using Apple Telecom and Fax Terminal with a PC Card modem To use the Apple Telecom and Fax Terminal software with a PC Card modem, follow these steps: 1 Insert your PC Card modem. 2 Open the Fax Terminal program by choosing it from the Apple menu.
4 Choose the type of PC Card modem you have in the pop-up menu on the upper left. 5 Choose the slot your modem is in from the pop-up menu on the upper right. 6 Change any other settings you want in the dialog box and click OK. Then prepare and send your fax. Configuring other software for use with a PC Card modem Always be sure to specify the location of a PC Card modem when you prepare to use software with it.
Read this chapter for information on expanding your computer system with additional hardware. 3 Connecting Additional Equipment and Changing BookCovers The illustration below shows where equipment should be connected to your Macintosh PowerBook. In most cases, you should refer to the manuals that came with your equipment for instructions on connecting it. Always shut down your Macintosh PowerBook before you connect any cable other than the power adapter.
Additional information is provided in this chapter for adding the following devices to your computer system: m printers m external modems m SCSI devices m external monitors m sound input and output devices m a security cable and lock m exchangeable cover panels m additional memory Connecting a printer The modem/printer port on your computer can accept either a direct connection (to a printer such as a StyleWriter) or a network connection (to a printer such as a LaserWriter).
Connecting an external modem You can use a PC Card modem in your computer’s PC Card slot. For information on connecting and using a PC Card modem, see the documentation that came with your modem, “Using a PC Card Modem” in the section “Using PC Cards (PCMCIA Cards)” in Chapter 2 of this manual, and the “Using PC Cards” topic area of Mac OS Guide, available in the Guide (h) menu. You can also connect an external modem to the printer/external modem port on the back panel of the computer.
Connecting SCSI devices A SCSI device is any product—including hard disk drives, CD-ROM drives, and scanners—that communicates with your computer by means of a standard electronic interface. (SCSI stands for Small Computer System Interface.) You can attach up to six SCSI devices to your computer by linking them together in a chain that starts at your computer’s SCSI port. To connect a SCSI device to your Macintosh PowerBook, you need an Apple HDI-30 SCSI System Cable or equivalent.
Where to add cable terminators when connecting a single SCSI device: Connecting one SCSI device Terminator HDI-30 SCSI System Cable Terminator (If this SCSI device has an internal terminator, omit this external terminator.) Where to add cable terminators when connecting two or more SCSI devices: Connecting more than one SCSI device Terminator (If this SCSI device has an internal terminator, omit this external terminator.
Connecting your computer as a hard disk Before making any connections, you need to assign a unique SCSI ID number to the PowerBook. The unique ID number allows the computer to communicate with several connected devices. The ID number preset at the factory is 2. If you have another SCSI device with that number, you must change the ID number on it or in the PowerBook Setup control panel.
6 Shut down the computer you are connecting to and turn off any other devices in the SCSI chain. 7 Connect the small connector on the Apple HDI-30 SCSI Disk Adapter to the SCSI port on your PowerBook. 8 If you are connecting the Macintosh PowerBook directly to the other computer (rather than to an external device in the SCSI chain), attach a SCSI system cable to the other computer. Make sure you have a terminator connected to the SCSI cable that is attached to your PowerBook.
WARNING If you do not see the SCSI icon, and the computer starts normally or displays an error message, press the Power key to shut down (if you can) and then immediately disconnect your computer from the SCSI chain. (If you can’t choose Shut Down, try pressing the reset button. If you cannot shut down your Macintosh PowerBook, you should disconnect the cable anyway, or you may lose information.) Then go back and repeat steps 5 through 9, making sure to use the proper cables.
Simplifying the connection process If you plan to use your Macintosh PowerBook regularly as a SCSI disk with the same computer, you can leave the SCSI adapter cable attached to the other computer or its SCSI chain. Make sure a terminator is attached between the cable and the adapter. When you want to use your PowerBook as a hard disk, simply shut down all devices and connect the adapter cable to the SCSI port on your PowerBook. These cables can stay attached to your other computer or its SCSI chain.
Quitting SCSI disk mode 1 Shut down the computer your PowerBook is connected to. 2 Press the Power (on/off) key once to turn the PowerBook off. Occasionally the PowerBook may not shut down (the pointer freezes on the screen). If this happens, press the reset button on the back panel to turn off the computer. 3 Turn off any other SCSI devices in the chain. 4 Disconnect the PowerBook from the adapter cable.
Connecting an external monitor Your PowerBook has an expansion slot in which you can install an optional video card for connecting an external monitor. An external monitor connected to your computer can function as an extension of your PowerBook’s built-in screen—that is, you can drag objects from one screen to another and do your work on either one. Or you can show the same image on both screens. To connect an external monitor, you need to install a video card in the expansion slot.
3 Place the monitor where you will be using it. Keep the computer and the monitor at least 8 inches apart. Interference between the monitor and your computer’s floppy disk drive can cause errors on your floppy disks. Floppy disk drive 8 inches minimum Arrange the monitor so the top of the screen is slightly below eye level while you work. Position the monitor to minimize glare and reflections on the screen from lights and windows. 4 Make sure the monitor’s power cord is attached to the monitor.
5 Make sure the monitor cable is attached to the monitor. Then attach the other end of the monitor cable to the PowerBook’s video adapter. Video port Video adapter Monitor cable 6 Attach the video adapter to the video port (marked with the icon ™) on the computer’s back panel. 7 Turn on the external monitor. 8 Press the Power (on/off) key to turn on your computer. (You can press any key if your PowerBook is in sleep.) The external monitor is automatically activated.
Working with an external monitor For information on displaying the menu bar on the external monitor or using an external monitor for presentations, see the “Monitors” topic of Mac OS Guide, available in the Guide (h) menu. Note: The screen-dimming feature in the PowerBook control panel turns the screen brightness down to a low level when you haven’t used the computer for a few minutes. (You can think of dimming as “screen sleep.”) Dimming also affects the external monitor.
Connecting sound input and output devices Your computer has a built-in microphone. For information on using the microphone to record sounds, see the “Sound” topic of Mac OS Guide, available in the Guide (h) menu. Microphone Your Macintosh PowerBook also has a stereo sound input port (marked with the √ icon) for connecting external sound input devices that provide linelevel output. This port accepts a standard stereo miniplug like that used to attach headphones to a portable tape player.
Connecting other devices For instructions on connecting a device not discussed in this chapter—for example, an external input device (such as a mouse) or networking hardware—refer to the manuals that came with the device. Attaching a security cable and lock to the computer You can purchase a security cable and lock to protect your Macintosh PowerBook. With a lock, you can secure your computer to a desk or table.
Changing BookCovers on the computer’s case Your Macintosh PowerBook comes with a removable panel, the BookCover, on the top of the case (behind the display when the computer is open).You can remove this panel and replace it with a different color. The computer comes with one clear panel and one graphite-colored panel. You can use the clear panel and put artwork under it to personalize your computer or to keep track of meetings and appointments.
2 While holding the latch open by its downward-pointing hook, grasp the panel on the top with your fingers and slide it toward you until it disengages from the case. You can anchor one thumb (the one not holding the latch open) on the front edge of the display case and push backward with it as you pull the BookCover with your fingers. When the panel disengages (after moving about half an inch), you can release the latch hook. 1 Push and hold the latch all the way to the left. 2 Then slide the panel off.
Adding an insert Follow these steps to remove a panel and replace it with another panel. 1 Remove the BookCover as described in the previous section. 2 Place the insert on the plastic case and position it as you’d like it displayed. Be sure the insert is not too thick for the BookCover to fit over it easily. If the insert is smaller than the BookCover’s area, you may want to use a small piece of tape to hold the insert in place. Replacing a BookCover Follow these steps to replace a BookCover.
2 Make sure that the BookCover’s center tabs and the two shorter side tabs are all positioned so that they will fit into the openings on the rear part of the display case. It’s important to position the BookCover carefully to avoid breaking one of the tabs when the cover snaps into the case. You may want to change the angle of the display to see whether the tabs are in the proper position. 3 Move the latch hook to the left and hold it open with one thumb.
Creating your own BookCover inserts In addition to the set of printed inserts that came with the computer, you can use the template on your hard disk to create new inserts. See the instructions in the template’s folder for more information about using the template.
Adding memory to your computer Your Macintosh PowerBook comes with at least 12 MB of RAM. You can increase your computer’s memory by adding a RAM expansion card. You can find out how much memory your computer has by choosing About This Macintosh from the Apple (K) menu in the Finder. You can purchase memory upgrades from Apple-authorized dealers. For complete instructions on installing a RAM expansion card, see Appendix C.
Read this chapter for information on installing and using application programs on your computer.
To get started with your software, follow these steps: 1 Open the Macintosh HD icon (if necessary). A window similar to this appears.
3 When you’re finished, choose Quit from the File menu to leave PowerBook Highlights. IMPORTANT If you delete the PowerBook Highlights icon, you have not deleted your preinstalled software. (Most of the software is in the Applications folder on your computer’s hard disk.) Getting help for application programs Some application programs that come on your PowerBook (such as File Assistant and Apple IR File Exchange) are documented in their own Apple Guide online help systems.
Installing application programs You’ll probably want to buy and install additional application programs. Refer to the manuals you receive with your programs for instructions on installing and using them. In most cases, you install application programs onto your internal hard disk from a CD-ROM disc or from floppy disks that you receive as part of an application program package. The following illustration shows how to insert a floppy disk in the floppy disk drive.
Finding out which programs are open If you have several programs and windows open, you can find out which program is active and which other programs are open by pulling down the Application menu. Switching programs You can switch to another open program or desk accessory by choosing its name from the Application menu. If a program’s icon is dimmed in the menu, that means its windows are hidden. Choosing the program from the Application menu displays its windows.
Backing up your files Making backup copies of important files is good protection against possible damage to the originals. Backing up and restoring system software and preinstalled programs m You can make a set of backup floppy disks for the core system software on your hard disk by using the Floppy Disk Maker application program. This program and the disk image files it uses are in the System Backup folder, inside the Apple Extras folder on your hard disk.
Tips for backing up all types of files m You can back up an entire floppy disk by copying it to another floppy disk or to a hard disk. m You can use a commercial backup program to copy new and changed files from a hard disk to another hard disk, to a tape drive, or to a series of floppy disks. m If your computer is on a network, you can back up files by copying them to a shared disk on the network. m You can back up files by copying them from one computer to the other using SCSI disk mode.
Shared libraries Native programs use special files called shared libraries. These files help the programs to run more efficiently and can be used by more than one native program simultaneously. Any necessary shared libraries are installed automatically in the System Folder when you install native programs.
Read this chapter for information about your Macintosh PowerBook’s battery. 5 Power Management Power sources Your computer can draw its operating power from two sources. m Main battery Your computer came with a nickel-metal-hydride (NiMH) battery. This battery typically provides power for 2–4 hours of work time. Exact work time depends on the Macintosh PowerBook model you have and the battery conservation features you use.
Responding to low-power messages When the battery runs low, the computer displays a series of low-power messages. The work time remaining after you see the first message varies depending on how you are using the computer. It’s a good idea to act promptly. What you should do When you see a low-power message, you should do the following: m Plug in the power adapter, or m Save your work and put the computer to sleep. Then m Replace the empty battery with a charged one within two minutes.
IMPORTANT Recharge a depleted battery as soon as possible. Leaving a depleted battery in the computer for a length of time (especially in a hot location, such as the trunk of a car) may damage the battery so that it can’t be recharged. If this happens, you need to replace the battery. Using the Control Strip to monitor battery charge The Battery Monitor portion of the Control Strip shows the current power source and the approximate amount of charge left in your battery.
Recharging the battery To recharge the battery, plug in the power adapter. Do not use an external recharger designed for another Macintosh PowerBook model. Use only the power adapter that came with your computer or a recharger designed specifically for this model. ¯ Power adapter port Power cord Power adapter plug Power adapter A lightning bolt icon appears in the battery monitor portion of the Control Strip when the power adapter is plugged in and a battery is recharging.
WARNING Use only the power adapter that came with your computer. Adapters for other electronic devices (including other portable computers) may look similar, but they may damage your computer. The correct power adapter for your PowerBook 1400 series computer supplies 45 watts of power (model number M4896). Adapters for older models of the PowerBook provide lower wattages.
5 Put the battery cap on the battery to protect the battery contacts. Always snap the battery cap on the battery when the battery is out of the computer. WARNING Always put the battery cap over the metal contacts when the battery is not in the computer. If the battery’s metal contacts are not covered, a short circuit could occur, creating a safety hazard. 6 If you are inserting another battery, remove the battery cap from the new battery to expose the contacts.
m Elsewhere Many locations have government or Apple-sponsored collection or recycling programs for spent batteries. Dispose of spent batteries in accordance with the mandatory or voluntary battery collection programs in your location. Contact your Apple-authorized service provider for information about the recommended disposal procedures in your area. Maximizing work time Your Macintosh PowerBook’s battery typically provides 2–4 hours of work time before you need to recharge.
Chapter 6 Tips and Troubleshooting Chapter 7 Diagnostic Techniques II part
Consult this chapter if you have questions or experience problems using your computer. 6 Tips and Troubleshooting When you have questions If you want to know how to do a particular task with your computer, refer to Mac OS Guide in the Guide (h) menu. For instructions on using Mac OS Guide, see Chapter 1 of this manual. If the suggestions in this chapter and Mac OS Guide don’t solve the problem, go to Chapter 7 for instructions on some general diagnostic techniques.
Problems starting up the computer The computer doesn’t start up. m The battery may need recharging. Plug the power cord into a working outlet and then plug the power adapter into the computer. Let the battery recharge for a few minutes. m Check that the power cord is plugged into a working outlet. If it’s plugged into a power strip, make sure the power strip is turned on. The power adapter should get warm after being plugged in for 10 minutes.
The computer makes an unusual sound at startup. m If you hear four tones, start up the computer with the Disk Tools disk that came with your computer. If the computer does not start up, or if the hard disk icon does not appear, the hard disk may need repair. Contact an Apple-authorized service provider or call the Apple Assistance Center. If the hard disk icon does appear, see Chapter 7.
6. Open the System Folder, then open the Preferences folder. 7. Drag the Display Preferences icon to the Trash. 8. Restart your computer without holding down the Shift key. The computer starts up with your Extensions turned on again. 9. When the computer has finished starting up, restore any custom control panel and network settings. m If you hear eight tones, there may be a problem with a RAM expansion card.
When I start up the computer, I see a message about the system software. m The system software on the startup disk you’re using may be incomplete or damaged or may be the wrong version. Make sure you’re using the correct disk as a startup disk. m If you’re sure you’re using the correct startup disk, you may need to reinstall system software. See “Reinstalling the Mac OS System Software” in Chapter 7. The computer displays a flashing question mark icon.
When the computer starts up, a message says there is not enough memory. m There may not be enough memory to load all the system software extensions you’ve installed. Restart the computer, holding down the Shift key until you see the message “Extensions off” in the Welcome to Macintosh box. Then try the following to increase available memory: m Reduce the size of the disk cache in the Memory control panel. m If you use a RAM disk, reduce its size or turn it off in the Memory control panel.
When the computer starts up, no icons appear in the windows, and the pointer alternates between an arrow and a wristwatch, or an empty flashing box appears. m There is a problem with the display of windows. Restart the computer, holding down the Option key until the desktop icons appear. (When the desktop appears, all windows will be closed.) When I start up the computer, the display lights up for a moment, then shuts down. m Make sure you are using the correct power adapter for your computer model.
The computer exhibits odd behavior, such as many unexplained system failures. m Check for multiple System Folders on your startup disk, using the Find File command. Throw away extra System Folders (but do not throw away any System Folders from your RAM Disk Backup folder). The System Folder that your computer is using has a small computer icon on it. m Check for viruses on all your disks, using a virus-detection program. Eliminate any viruses the program finds.
A program won’t open. m The application program may already be open. Check the Applications menu to see what programs are running. m There may not be enough memory available to open the program. Quit any programs you’re not using and try again. If that doesn’t work, try restarting the computer. m If the program is on a floppy disk, make sure the disk is unlocked. (You unlock a disk by sliding the tab at the corner of the disk so that it covers the hole.
m If you get this message when you are trying to open or use a program, follow these steps: 1. Choose About This Macintosh from the Apple (K) menu. Take note of the number in the “Largest Unused Block” section. This number tells you how much memory is available to open programs. 2. Quit the program if it’s open, select its icon, and choose Get Info from the File menu. Take note of the numbers in the Minimum Size and Preferred Size boxes. 3.
m If you know the correct program is on your hard disk, there may be a problem with the information that the computer uses to keep track of files. Restart the computer and hold down the Command (x) and Option keys until you see a message asking if you want to rebuild the desktop. Release the keys and click OK.
Some icons look different from usual. m There may be a problem with the information that the computer uses to keep track of files. Restart the computer and hold down the Command (x) and Option keys until you see a message asking if you want to rebuild the desktop. Release the keys and click OK. Note: If you have Macintosh Easy Open installed, you must turn off all extensions except the Macintosh Easy Open control panel before you follow the steps given above to rebuild your desktop.
m If the file is on a floppy disk, the disk may be locked. Unlock the disk by sliding the tab so that it covers the hole at the corner of the disk. m The file may be in a shared folder that can’t be changed. You can throw away the file by turning off file sharing temporarily (click Stop in the Sharing Setup control panel). Or you can select the shared folder, choose Sharing from the File menu, and uncheck the box labeled either “Can’t be moved, renamed, or deleted” or “Same as enclosing folder.
Problems with hardware Floppy disk drive I can’t eject a floppy disk. m The disk may be stuck. Restart the computer, holding down the button on your trackpad. If the disk is not ejected, you can eject it manually. Carefully insert the end of a straightened paper clip into the small hole near the disk drive’s opening, and push firmly until the disk is ejected. Insert the end of a large, straightened paper clip into this hole. I can’t save or copy files onto a floppy disk. m The disk may be locked.
Hard disk drive The computer won’t start up from the internal hard disk, or the hard disk icon doesn’t appear on the desktop. m There may be a temporary software problem. Turn off the computer, wait at least 10 seconds, and then turn it on again. The hard disk keeps stopping and starting again. m The hard disk may be going to sleep to conserve power. Use the PowerBook control panel to change the power conservation settings. The computer is using the wrong disk as a startup disk.
Keyboard Typing on the keyboard produces nothing on the screen. m Make sure the program you’re using is set to accept text input. Usually you need to set an insertion point or select some text before typing. If you’re using a communications program, you may need to turn on the “local echo” setting. m Open the Easy Access control panel and make sure Slow Keys is turned off. m Open Key Caps in the Apple (K) menu and check whether the computer is recognizing keyboard input.
m If tilting the display affects the flickering, there may be a loose cable. Contact an Apple-authorized service provider, or call the Apple Assistance Center (listed in the resource materials that came with your computer). The computer freezes when screen dimming takes effect. m Screen dimming does not work with some programs. Open the PowerBook control panel and turn off screen dimming. External monitors The monitor remains dark. m Shut down the PowerBook.
The pointer won’t move from one monitor to another. m The pointer moves between monitors in the area where the monitor icons touch in the Monitors & Sound control panel. Open the Monitors & Sound control panel and check that the positions of the monitor icons match the positions of the actual monitors. If not, drag the icons until they are positioned as you want them. (See the “Monitors” topic area of Mac OS Guide for instructions on using the Monitors & Sound control panel.
The printer does not appear in the Chooser. m Make sure you’ve selected the correct kind of printer on the left side of the Chooser window. For example, if you’re using a StyleWriter II, make sure to select StyleWriter II, not StyleWriter. m Use the scroll bars to look through all the selections in the Chooser windows. m Check the connections between your computer and the printer, including relevant sections of the network if appropriate.
SCSI equipment and SCSI disk mode External SCSI equipment doesn’t work, or a hard disk icon does not appear on the desktop. m You cannot use password protection with your PowerBook in SCSI disk mode. Turn password protection off in the Password Security control panel. m Check that all cables are connected securely, that the devices are plugged into working outlets, and that the devices are turned on. IMPORTANT Make sure that all equipment is turned off before connecting or disconnecting cables.
m Make sure you are using the correct cable for SCSI disk mode. The HDI-30 SCSI Disk Adapter is about 10 inches long, is dark gray, and has 30 pins in the connector (no “missing” pins). Do not use the HDI-30 SCSI System Cable, which is light gray, is about 18 inches long, and has 29 pins in the connector (one “missing” pin). That cable is for connecting SCSI equipment to your PowerBook. m Check that all cable connections are secure. m The PowerBook’s battery may be drained.
Problems with equipment connected to your computer If a problem occurs while your Macintosh PowerBook is connected to equipment such as SCSI equipment, external monitor, modem, printer, mouse, or keyboard, these steps may help you determine the source of the trouble: 1 Shut down or turn off your Macintosh PowerBook and anything that’s connected to it. Disconnect everything connected to your Macintosh PowerBook (except the power adapter) and restart it.
Problems with networks and file sharing Solutions to common problems If you are having problems using the network or file sharing, try the following before attempting further solutions: m Make sure that AppleTalk is turned on in the Chooser. m Open the AppleTalk or TCP/IP control panel and make sure the correct network type is selected. m Make sure that all the network software is installed. The Network and AppleShare extensions should be in the Extensions folder.
Solutions to other problems The computer I want to connect to doesn’t appear in the Chooser. m Make sure the computer you’re trying to connect to is turned on. m Make sure file sharing is active on the computer you’re trying to connect to. (That computer’s Sharing Setup control panel should say that file sharing is on.) I connected to another computer, but the shared disk I want to use is not available. m You may already be connected to the shared disk. Check for its icon on your desktop.
A message says that file sharing can’t be turned on. m Make sure AppleTalk is turned on in the Chooser. m Make sure you have at least 400K of available space on your hard disk. m Some disk-formatting programs don’t work with file sharing. If you use such a program, contact the manufacturer or vendor for compatibility information. m There may be a problem with some of the information your computer uses to start up file sharing. Follow these steps in order until the problem is solved: 1.
The file-sharing section doesn’t appear in the Sharing Setup control panel. m You may have turned off AppleTalk or file sharing using the Extensions Manager control panel. Turn them back on. m If the file-sharing and network software is not in your System Folder, use the Installer icon in the Launcher to reinstall file-sharing and networking software. (See “Doing a Custom Installation” in the “Reinstalling the Mac OS System Software” section in Chapter 7 for more information.
The modem didn’t dial the phone number. m Check that the phone cord is plugged into the computer and into a working phone line. m Try dialing the number again. Sometimes there is a temporary connection problem. m Quit the program and restart it. Sometimes this procedure solves temporary problems with the modem. m Another program may be using the modem. Quit all other programs that use the modem. m Try using another communications program.
Consult this chapter before you call the Apple Assistance Center to solve problems with system software and your hard disk. 7 Diagnostic Techniques This chapter provides a step-by-step approach to diagnosing and solving problems involving system software and hard disks. Try the steps listed in each section in the order they are given until your problems are fixed. Checking your system software extensions System software extensions are files that add features to your system software.
Follow these steps to reset the PRAM and NVRAM: 1. Shut down your computer. 2. Make sure the Caps Lock key is not engaged. 3. Position the fingers of your left hand on these keys: Command (x), Option, and R. Locate the P key, so you can find it quickly for step 4. 4. Press the Power key (marked with “on/off”) to turn on your computer. Immediately after you hear the startup sound, press and hold down the Command (x), Option, and R keys at the same time as you press and hold down the P key. 5.
3 Turn off troublesome extensions using the Extensions Manager control panel. Tips for locating problem extensions: m If you recently installed a new item in the System Folder, it may be causing the problem. If you recently installed a new application program, a new extension may have been installed along with it. Check for new items in the Extensions folder and Control Panels folder. Also check for items of the kind “extension” or “control panel” in the System Folder itself.
Testing your hard disk The following steps will help you determine whether you have a problem with your hard disk or a problem with the system software on your hard disk. 1 Start up your computer from the CD-ROM disc or the Disk Tools floppy disk that came with your computer. If you’re starting up from the CD, hold down the x-Shift-Option-Delete keys as the computer starts up. If the computer starts up normally, you may have a problem with the system software on your hard disk.
3 In the list of drives, click the disk you want to test. 4 Pull down the Functions menu and choose Test Drive. 5 When a message tells you that testing is complete, click Quit. If testing indicates a repair is necessary, use Disk First Aid (available on the CD or the Disk Tools floppy disk) or another disk repair utility to see if it can repair the disk 6 If testing indicates that no repair is necessary, but you’re still having a problem with your computer, go to the next section.
Reinstalling the Mac OS system software When should you install system software? Your computer came with all the necessary Mac OS system software installed on its internal hard disk, so you don’t need to install system software on that disk unless you encounter software problems.
Doing a normal installation Follow the steps in this section to do what is commonly called a “normal” installation of system software. If you’re installing system software on a new hard disk for the first time, make sure that your hard disk has been initialized, a process that prepares the disk to store information. (You initialize a disk using either the Drive Setup program or the recommended hard disk utility that came with the hard disk. Your internal hard disk was initialized at the factory.
Next, a screen appears describing the four steps in the installation process. Step 1: Read important information Click the first button to read about the installation process, as well as compatibility and troubleshooting information. Click here. Read the onscreen document that appears. Since the onscreen document was written after this book, it may contain additional information. When you’re finished reading the document, choose Quit from the File menu to return to the Install Mac OS screen.
Step 2: Update your hard disk driver Hard disks with old drivers might cause problems after reinstalling system software. Your computer might not start up, or you might not see the hard disk icons on the desktop. To avoid these problems, it’s a good idea to update your drivers. The disk utilities that Apple provides won’t update some disks. You can skip step 2 if m You don’t have an Apple hard disk.
Click the second button in the main Install Mac OS screen to update your disk drivers. Click here. After you click the second button, you first see a dialog box asking you to confirm that you can use the provided utilities. Click Continue. The Drive Setup window appears. To update your disk drivers, do the following: 1 Select the name of a hard disk attached to your computer. 2 Click Update Driver. Repeat steps 1–2 to update the drivers on any additional attached disks.
3 When you’ve finished updating the drivers on all your disks, close the window to quit the Drive Setup program. Step 3: Choose a disk for installation Click the third button to select the disk on which you want to install the Mac OS. Click here. In the dialog box that appears, choose the disk on which you’re going to install the software. Then click Select. Choose the destination disk from this pop-up menu.
You see a message if you don’t have 70 MB (the amount necessary for the standard installation) of available space on the disk you choose. Depending on the installation options you select, you may need up to 120 MB. If there isn’t enough space available, you need to remove files from the disk before installing the software. Step 4: Install the software Click the fourth button to install the Mac OS and additional software. Click here.
1 In the dialog box that appears, select the software you want to install. Note: Your screen may look slightly different from the picture below. Remember to check the information presented in the first step on the main Install Mac OS screen for late-breaking information. If you’re installing from floppy disks, you won’t see all the choices available on the CD. Click to put an X in the box for each software product you want to install. Recommended choices are preselected.
Installing a customized system: The Install Mac OS program installs the software recommended for your model of computer. You can use the Customize option to choose exactly which software to install. For instructions, see “Doing a Custom Installation” later in this chapter. 2 Click Start to install the software you selected. The Install Mac OS program checks your destination disk for any problems and repairs them, if necessary. After your disk is tested, the software you selected is installed.
Doing a clean installation This section provides instructions for what is commonly called a “clean” installation of system software. A normal system software installation replaces changed system files and adds new ones, but leaves other files alone. When you install system software using a “clean” installation, the Installer creates a new System Folder on your hard disk. The old System Folder is renamed Previous System Folder.
The following screen appears. 3 Click Options. 4 In the screen that appears, click the checkbox next to Create New System Folder, then click OK. Click to put an X in this box, then click OK. 5 Click Start. A new System Folder is installed on your hard disk. (The old System Folder is renamed Previous System Folder.) Reinstall extensions, control panels, and other startup items. Reinstall items from the original disks, if possible.
Doing a custom installation For most computer users, the installation procedure described in “Doing a Normal Installation” is best, because it automatically installs everything you need for your model of computer. However, if you’d like to select only the software specific to your needs, you can customize your installation. You can install or update one or more specific files, or save space on your hard disk by installing only the files you want.
2 Click the fourth button on the main Install Mac OS screen. The following dialog box appears. 3 Click Customize. The following screen appears. Note: Your screen may look slightly different from the picture below. If you’re installing from floppy disks, you won’t see all the choices available on the CD. Click to put an X in the box for each software product you want to install. Recommended choices are preselected. To go back to the easy installation process, click this button.
4 Select the software you want to install. You can choose to install some of the optional software described in “Step 4: Install the Software” earlier in this chapter, and you can choose which portions of the default system to install. You can choose from the following additional options: m Mac OS, the basic system software. m OpenDoc, which adds new functionality to your applications in the form of self-contained software “parts.” A variety of parts will be available from Apple and other sources.
5 Click Start. If your disk has problems that can’t be repaired: Use a third-party disk repair utility to see if it can repair the disk. If you don’t have a disk repair utility, or if that utility can’t repair the disk either, you may need to reinitialize the hard disk. To reinitialize the hard disk, first back up your hard disk because reinitializing erases everything on the disk. Next, use Drive Setup (available on the Disk Tools floppy disk or on the CD) to reinitialize the hard disk.
The Custom Install dialog box appears, listing all available components for the selected software product. 8 Scroll through the list of components and click the checkbox next to each component you want to install. To select individual items within each component, click the arrow to the left of the component, then click the item you want to install. To get additional information about a component, click the box with the letter i in it to the right of the component.
Appendix A Health, Safety, and Maintenance Tips Appendix B Using Your Keyboard Appendix C Installing Expansion Cards Appendix D Making Backup Floppy Disks III part
Refer to this appendix for important health-related information and safety tips. Appendix A Health, Safety, and Maintenance Tips Health-related information about computer use Muscle soreness, eye fatigue, and other discomforts and injuries sometimes associated with using computers can occur from performing any number of activities. In fact, misuse of the same muscles during multiple activities can create a problem that might not otherwise exist.
Musculoskeletal discomfort As with any activity that involves sitting for long periods of time, using a computer can make your muscles sore and stiff. To minimize these effects, set up your work environment carefully, using the guidelines that follow, and take frequent breaks to rest tired muscles. To make working with your computer more comfortable, allow enough space in your work area so that you can change position frequently and maintain a relaxed posture.
Eye fatigue Eye fatigue can occur whenever the eyes are focused on a nearby object for a long time. This problem occurs because the eye muscles must work harder to view an object that’s closer than about 20 feet (6 meters). Improper lighting can hasten the development of eye fatigue. Although eye fatigue is annoying, there’s no evidence that it leads to permanent damage.
Keyboard and trackpad m When you use the keyboard and trackpad, your shoulders should be relaxed. Your upper arm and forearm should form an approximate right angle, with your wrist and hand in roughly a straight line. This Not this m You may have to raise your chair so your forearms and hands are at the proper angle to the keyboard.
Some computer users may develop discomfort in their hands, wrists, or arms after intensive work without breaks. If you begin to develop chronic pain or discomfort in your hands, wrists, or arms, consult a qualified health specialist. m Change hand positions often to avoid fatigue. m Change the computer’s position. The back of the keyboard is slightly elevated when the feet are in use. Otherwise, the keyboard is level.
External monitor If you use an external monitor, this suggestion may be helpful. m If possible, arrange the monitor so the top of the screen is slightly below your eye level when you’re sitting at the keyboard. The best distance from your eyes to the screen is up to you, although most people seem to prefer 18 to 28 inches (45 to 70 cm). Avoiding fatigue m Change your seated position, stand up, or stretch whenever you start to feel tired. Frequent short breaks are helpful in reducing fatigue.
Important care and safety instructions For your own safety and that of your equipment, read and follow all the instructions in this section. Keep these instructions available for reference by you and others. Warning m Electrical equipment may be hazardous if misused. Operation of this product, or similar products, must always be supervised by an adult. Do not allow children access to the interior of any electrical product and do not permit them to handle any cables.
m Keep dirt and liquids away from the ports on the back panel, the keyboard, and the trackpad. If you spill any food or liquid onto the computer, shut it down immediately and unplug it before cleaning up the spill. Depending on what you spilled and how much got into the computer, you may have to bring the computer to an Apple-authorized service provider for cleaning. m Do not touch the screen with any sharp or pointed objects. m Use only the battery supplied with your computer, or an identical model.
Caring for batteries Always handle batteries carefully. m Always put the battery cap on the battery when the battery is out of the Macintosh PowerBook. The battery contacts should not be exposed when the battery is out of the computer. m Never get batteries wet. m Do not short-circuit the battery terminals (that is, do not touch the terminals with a metal object). Doing so may cause an explosion or a fire. m Do not drop, puncture, disassemble, mutilate, or incinerate the battery.
Handling floppy disks Store disks at temperatures between 50° F and 125° F. Do not use a pencil or an eraser on a disk or disk label. Keep disks dry. 125° F (52° C) 50° F (10° C) Do not touch the exposed part of the disk behind the metal shutter. 148 Appendix A Keep disks away from magnets. Avoid exposing disks to extremely hot temperatures.
Traveling with the Macintosh PowerBook IMPORTANT Always bring either the CD-ROM disc or the Disk Tools floppy disk that came with your computer when you travel (depending on which type of disk drive you are using). If you experience system software problems while traveling, you may need these disks to correct any problem. Airplanes and airports Some airlines have reported that use of portable electronic devices may have interfered with the aircraft’s flight navigation or communications systems.
m Take the necessary plug adapters if you’re traveling overseas. (You may need to use them with the power cord.) You do not need a voltage transformer. The power adapter can handle 90 volts to 260 volts AC (48 Hz to 62 Hz). Check the diagrams below to determine which plug adapters you’ll need, or ask your travel agent.
Storing the Macintosh PowerBook 1 Save your work on a hard disk or floppy disks. 2 Press the Power key and click shut down, or choose Shut Down from the Special menu. 3 Close the display. 4 Store the computer in a cool, dry place. Storage temperatures should remain between –25° C and 60° C (between –13° F and 140° F). Avoid leaving the computer where temperatures may be extreme or unpredictable—in the trunk of a car, for example.
Refer to this appendix for information on using your Macintosh PowerBook 1400 series keyboard. Appendix B Using Your Keyboard The keyboard on the Macintosh PowerBook 1400 series computer works in much the same way as the keyboards on other computers and on electric typewriters. However, there are a few special keys you should know about. Many of these keys allow you to give commands to the computer without using the trackpad.
Special keys on the Macintosh PowerBook 1400 series keyboard esc F1 F2 ~ ! 1 ' Delete key Function keys Escape key F3 F4 @ # 2 3 $ 4 F5 F6 % 5 F7 & 7 6 F9 F8 F10 ( 9 * 8 F11 Q Caps Lock key caps lock W A S Z shift Control key E ctrl Appendix B D X T F C Y G V U H B I J N K M { [ P : ; L < > , on/off + = O .
Typing special characters and symbols You can type a variety of international and other special symbols and characters (including characters with diacritical marks, such as accents) by pressing combinations of keys. The Key Caps program, which is installed with your system software, shows you the characters produced when you type certain keys and key combinations in the fonts available on your computer. Choose Key Caps from the Apple (K) menu, then choose the font from the Key Caps menu.
If you press the Option key, Key Caps outlines lightly the keys that you can use in combination with letter keys to type letters with accents or other diacritical marks. If you see rectangles: If you see rectangles instead of diacritical marks on some of the pictures of keys in Key Caps, try pressing Option-x to see the diacritical marks. However, you only need to use the Option key (not Option-x) in combination with the other keys to type letters with diacritical marks.
Special key combinations If difficulties with your trackpad or computer don’t allow you to use standard methods of quitting a program or restarting your computer, you can try using these special key combinations. To do this... …press this key combination Force a program to quit x-Option-Esc Force the computer to restart x–Control–Power key Here are other key combinations you may find useful. To do this...
Refer to this appendix for instructions on installing an expansion card in your Macintosh PowerBook. Appendix C Installing Expansion Cards You can purchase cards to augment your PowerBook’s operation. Two kinds of cards are available for the computer. You can install two different types of cards in the computer: m a RAM card m an expansion slot card with back-panel connector You can install two RAM cards (one above the other, piggyback style) and one expansion slot card.
Installing a RAM card You need the RAM card and small Phillips and flat-blade screwdrivers for the installation. Make sure you are installing a RAM card made for a Macintosh PowerBook 1400 series computer. The RAM card must use low-profile memory chips. The card has connectors on the top and bottom so that another RAM card can be plugged into it, piggyback style.
3 Remove the battery from the computer. If you’re unfamiliar with this procedure, follow the instructions in “Removing or Replacing the Battery” in Chapter 5 of this manual. WARNING Do not install a RAM card without disconnecting the power adapter and removing the battery. Installing a card while a power source is connected could damage the computer. 4 Slide the speaker grill (above the top row of keys) to the left and lift it out of the computer.
5 Place your finger under the top edge of the keyboard and gently fold it forward so that the keyboard rests upside down on the lower part of the computer’s case. If you can’t easily put your finger under the keyboard, carefully slide the end of the flat screwdriver under it and lift. Take care not to move the bottom edge of the keyboard away from the case, to avoid straining or disconnecting the keyboard’s cable.
6 Remove the six screws holding the metal heat shield in place. Then lift out the heat shield and set the shield and screws aside. Use the small Phillips screwdriver to loosen the screws. Note that the two screws at the rear corners of the shield are longer than the other four screws.
7 Locate the vertical connector for the RAM card near the right side of the computer. The connector is approximately 2 inches in from the right side of the case. The RAM card’s design allows for one card to be connected to the socket on top of a card that is installed on the computer’s main logic board. Therefore, your computer may have a RAM card already installed; if so, you will still see the vertical connector on the top of the installed RAM card.
8 Carefully remove the RAM card from its packaging and position it above the area for installation in the computer. Hold the card by its edges on the left side, taking care not to touch any of the components or the wires inside the connectors. 9 Tilt the right side of the card so that its right edge fits under the right edge of the computer’s case and slip the card’s right edge into the card guide on the inside of the case.
m If a RAM card is already installed, slide the right edge of the card above the card guide. A second RAM card can be installed above the card guide. Card guide 10 Lower the left side of the card so that its connector is aligned with the vertical connector in the computer and gently push the card down until it is seated. If the two connectors don’t join easily, detach the card and align the connectors again. Forcing the connectors together could damage the card or the socket.
11 Replace the metal heat shield and fasten it in place with the screws. Slide the front edge of the heat shield under the case, then lower the back of the shield. Be sure to put the long screws at the two rear corners of the shield.
12 168 Appendix C Replace the keyboard by folding it backward and lowering the top edge into place.
13 Replace the speaker grill by lowering it into the opening above the top row of keys. Slide the grill to the right to secure it. Position it so that the three downward-pointing tabs are at the right front of the grill. The tabs click into place when you slide the grill to the right. Lower the speaker grill, then slide it to the right. 14 Replace the battery and reconnect the plugs, cables, and power adapter. Now you’re ready to use the expanded RAM in your PowerBook.
Making sure the RAM card is properly installed Once you have completed the process for installing a RAM card, you can check to make sure the additional RAM is now available on your computer. Follow these steps: 1 Press the Power (on/off) key to turn your computer on. 2 Choose About This Macintosh from the Apple (K) menu. 3 Look at the amount of memory in your computer.
Installing an expansion slot card You can install an expansion slot card in your PowerBook to add a port for external connections to the computer. One type of expansion slot card available for your Macintosh PowerBook 1400 series computer provides a video connection for an external monitor. You need the expansion slot card and small Phillips and flat-blade screwdrivers for the installation.
4 Use a small flat-blade screwdriver to remove the expansion port cover. The cover is held firmly in place by small tabs. You may need to pry it off by placing the screwdriver in the small indentation at the center of the cover’s right edge. Expansion port cover Small flat-blade screwdriver Be sure to save the cover so that you can replace it should you remove the expansion slot card later.
5 Slide the speaker grill (above the top row of keys) to the left and lift it out of the computer. The grill is held in place firmly and may require some force to move it sideways. Slide speaker grill to the left, then lift. Set the speaker grill aside.
6 Place your finger under the top edge of the keyboard and gently fold it forward so that the keyboard rests upside down on the lower part of the computer’s case. If you can’t easily put your finger under the keyboard, carefully slide the end of the flat screwdriver under it and lift. Take care not to move the bottom edge of the keyboard away from the case, to avoid straining or disconnecting the keyboard’s cable.
7 Remove the six screws holding the metal heat shield in place. Then lift out the heat shield and set the shield and screws aside. Use a small Phillips screwdriver to loosen the screws. Note that the two screws at the rear corners of the shield are longer than the other four screws.
8 Locate the horizontal connector for the expansion slot card near the center of the computer. The connector is about one-half inch to the right of the keyboard cable. If you don’t see the horizontal connector next to the keyboard cable, an expansion slot card may already be installed in your computer. 9 Remove the expansion slot card from its packaging and position it above the area for installation in the computer. Hold the card by its edges, with the connector facing down at the end closer to you.
11 Align the card’s connector with the horizontal connector in the computer and gently push the card down until it is seated. If the two connectors don’t join easily, detach the card and align the connectors again. Forcing the connectors together could damage the card or the socket.
12 Replace the metal heat shield and fasten it in place with the screws. Slide the front edge of the heat shield under the case, then lower the back of the shield. Be sure to put the long screws at the two rear corners of the shield.
13 Replace the keyboard by folding it backward and lowering the top edge into place.
14 Replace the speaker grill by lowering it into the opening above the top row of keys. Slide the grill to the right to secure it. Position it so that the three downward-pointing tabs are at the right front of the grill. The tabs click into place when you slide the grill to the right. Lower the speaker grill, then slide it to the right.
15 Secure the card to the expansion port on the computer’s back panel by fastening the two screws supplied with the card into the holes in the port. Use a small Phillips screwdriver to tighten the screws. Expansion card screws Expansion port cover Slide bottom left corner under wire. 16 Place the expansion port cover supplied with the card over the two screws and snap it into place. Be sure that the lower-left corner of the cover is under the wire hinge of the small door on the back panel.
Refer to this appendix for information on backing up system software on floppy disks. Appendix D Making Backup Floppy Disks It’s a good idea to make backup copies of important software on floppy disks in case your hard disk or some of its contents is damaged. You can use the Floppy Disk Maker program, which is on your hard disk and on the CD that came with your PowerBook, to make a set of system software disks or to back up some key items.
Making software disks This section describes how to create floppy disks of the software that comes on your computer. Why make software disks? Your Macintosh PowerBook computer comes with different kinds of software installed. System software is the set of programs and other files that your computer uses to start itself up, keep track of your files, and run application programs. When you turn on your computer, it looks for a disk that contains the system software.
What you need Just as you need paper to make copies of important documents, you need floppy disks to make copies of the information on your hard disk. You can probably buy the floppy disks at the same place you bought your computer. Floppy disks come in a variety of sizes and capacities. The ones you need for backing up your hard disk are called high-density 3.5-inch disks. You can recognize the disks by the way they look: High-density disks have two holes... ...and they have this symbol.
Making a set of disks To make backup copies of system software, follow these steps. 1 Locate the System Backup folder on the hard disk or the Disk Images folder on the CDROM disc and open it. 2 Open the Floppy Disk Maker program. The program’s welcome screen appears. 3 Click Minimum Set or Full Set, depending on the kind of disk set you want to make. If you are using the disk images on the hard disk, you cannot make a full set of floppy disks. You must use the CD for a full disk set.
4 Follow the instructions on the screen until a message tells you that you’re finished. Insert a new disk whenever the screen messages tell you to. Do not use the Disk Tools floppy disk that came with your computer. Insert the disk metal end first, label side up. As you complete each disk, make a label with the name displayed on the screen. Then immediately put the label on the disk so that you’ll know what its contents are later. 5 When you’re finished, click Quit.
6 If you quit in the middle of the disk-making process and want to resume copying, click Resume Minimum or Resume Full (depending on the type of set you are making) when you see the Floppy Disk Maker box. Once you’ve made a full set of disks, you can delete the disk images to free up space on your hard disk. However, keeping copies of at least the system software images is a good idea. You should keep these disk images on your hard disk, or backed up on an external hard disk or PC Card (PCMCIA card).
3 Click the icon for the folder you want to copy to select it. If you want to make one individual disk for a program (in case you lost a disk or an individual disk got damaged), double-click the program’s folder to open it. Then click the icon of the individual disk image to select it. The folder (or individual disk) appears in the list to the right under “Disk images to be copied.” 4 Click Add. Repeat steps 3 and 4 until all the software you want to copy appears in the list to the right.
Can’t Find It? See also Mac OS Guide’s onscreen index. Open the Guide (h) menu and choose Mac OS Guide; then click the Index button. Index A accent marks, typing 155–156 active program 72, 73 active window 18 acute accent (´), typing 155 ADB port. See Apple Desktop Bus (ADB) port adding memory 68. See also RAM card air travel tips 149 amplifier, connecting 61 Apple Assistance Center 87, 115 Apple-authorized service providers.
Can’t Find It? See also Mac OS Guide’s onscreen index. Open the Guide (h) menu and choose Mac OS Guide; then click the Index button.
C cables for external monitors 50, 59 safety instructions 145 for SCSI connections 50, 51, 53, 107 security 62 cable terminators 51 Caps Lock key 154 card.
Can’t Find It? See also Mac OS Guide’s onscreen index. Open the Guide (h) menu and choose Mac OS Guide; then click the Index button. Control Panels folder 117 Control Strip 4, 19, 79, 80 copying information on a floppy disk 75 information on a hard disk 74–75 cumulative trauma disorders (CTDs) 140 cursor. See pointer customer service.
posture while using 141–144 preparing to set up 8 removable 31–34 safety precautions 8, 82, 145–150 storing 151 error messages. See also troubleshooting during startup 91 number code in 91 problem extensions and 115, 117 troubleshooting 87, 93 errors.
Can’t Find It? See also Mac OS Guide’s onscreen index. Open the Guide (h) menu and choose Mac OS Guide; then click the Index button. Control Panels 117 Disk Images 188 Extensions 117 icon for 18 PC Card Modem Files 43 Preferences 117 shared 112 System Backup 183, 186 Utilities 3 fonts Key Caps program 155–156 troubleshooting 98 frozen system.
change in appearance of 98 dimmed 73 document 18 Drive Setup 117 folder 18 Guide 17, 19, 20 hard disk 18 lightning bolt 80 lightning bolt in battery 79 missing 93 opening 18 PC Card modem 42 PowerBook Highlights 69–71 SCSI mode 53, 106 System Software Installer 122 Trash 18 ID numbers for SCSI devices 52 Index button, Mac OS Guide 21 infrared (IR) window.
Can’t Find It? See also Mac OS Guide’s onscreen index. Open the Guide (h) menu and choose Mac OS Guide; then click the Index button. 198 Index Mac OS Guide 20–23. See also Guide menu “Huh” button 23 Index button 21 Look For button 21 tips for using 23 Topics button 21–22 troubleshooting and 87 Mac OS software 133 mass-storage cards 37 memory.
using 42–45 using Apple Remote Access with 43–45 PC Card Modem Files folder 43 PC Card Modem icon 42 PC Card slots 2, 37, 38, 39, 44 PCMCIA card.
Can’t Find It? See also Mac OS Guide’s onscreen index. Open the Guide (h) menu and choose Mac OS Guide; then click the Index button.
SCSI terminators 50, 51 security cable and lock 62 security slots 2 setting up becoming familiar with equipment 1–7 plugging in the computer 8–9 preparing to set up the computer 8 shared disks. See also file sharing backing up files to 75 ejecting CD-ROM discs 110 not available for use 110 Remote Access Setup network software and 113 shared files. See file sharing shared libraries, native programs and 76 Sharing Setup control panel 112 Shift key 115, 116, 154 shortcuts.
Can’t Find It? See also Mac OS Guide’s onscreen index. Open the Guide (h) menu and choose Mac OS Guide; then system software backing up 74, 183–189 clean installation 129–130 custom installation 131–135 normal installation 121–128 on PowerBook 1400 CD 118, 119 reinstalling 120–135 restoring 74 troubleshooting 90, 91, 94, 115–128 using Floppy Disk Maker to create backup copies of 120, 185–189 click the Index button. T Tab key 146 technical support.
RAM card 170 rebuilding desktop 92, 157 reinstalling system software 120–135 reset button 2, 25, 29 restarting the computer 29, 92, 157 right-angle bracket prompt 157 screen 13, 102–103 SCSI devices 106–107, 108 SCSI disk mode 54, 106–107 shared library missing 76 sleep mode 97 software compatibility 117 spills 138 starting up 13–14, 88–93, 106 system software 90, 91, 94, 115–135 trackpad 101 turning computer off 25 turning computer on 13–14, 88–89, 106 unusual sounds 89–90, 99 window display 93 turning com
Macintosh PowerBook User’s Manual Includessetup, troubleshooting, and important health-related information for Macintosh PowerBook 1400 series computers
K Apple Computer, Inc. © 1997 Apple Computer, Inc. All rights reserved. Under the copyright laws, this manual may not be copied, in whole or in part, without the written consent of Apple. Your rights to the software are governed by the accompanying software license agreement. The Apple logo is a trademark of Apple Computer, Inc., registered in the U.S. and other countries.
Contents Communications regulation information Preface Welcome to PowerPC vii ix Part I 1 Getting Started 1 Becoming familiar with your Macintosh PowerBook Preparing to set up the computer Plugging in the computer Opening the display 8 8 10 Removing the battery label (if necessary) Turning the computer on 11 12 Problems turning the computer on? What’s next? 1 13 14 Learning the basics Reviewing the basics 15 17 Reviewing the Guide menu Turning the computer off 19 24 Putting the compute
2 Using Expansion Bay Modules and PC Cards Using expansion bay modules 31 31 Using a CD in the CD-ROM drive 34 Using PC Cards (PCMCIA cards) 37 3 Connecting Additional Equipment and Changing BookCovers Connecting a printer 48 Connecting an external modem Connecting SCSI devices 49 50 Connecting an external monitor 57 Connecting sound input and output devices Connecting other devices 61 62 Attaching a security cable and lock to the computer Changing BookCovers on the computer’s case Adding m
5 Power Management Power sources 77 77 Monitoring the battery charge Recharging the battery 77 80 Removing or replacing the battery Maximizing work time 81 83 Part II 6 Tips and Troubleshooting When you have questions 87 87 When you run into trouble 87 Problems starting up the computer 88 Problems working with programs Other problems while working Problems with hardware 93 97 100 Problems with equipment connected to your computer Problems with networks and file sharing Problems with Apple
Part III Appendix A Health, Safety, and Maintenance Tips 139 Health-related information about computer use Important care and safety instructions Caring for batteries 145 147 Handling floppy disks 148 Traveling with the Macintosh PowerBook Storing the Macintosh PowerBook Service and support 151 151 Appendix B Using Your Keyboard 153 Typing special characters and symbols Special key combinations 157 Appendix C Installing Expansion Cards Installing a RAM card 160 171 Appendix D Making Backup F
Communications regulation information FCC statement This equipment has been tested and found to comply with the limits for a Class B digital device in accordance with the specifications in Part 15 of FCC rules. See instructions if interference to radio or television reception is suspected. Radio and television interference The equipment described in this manual generates, uses, and can radiate radio-frequency energy.
Industry Canada statement This Class B device meets all requirements of the Canadian Interference-Causing equipment regulations. Cet appareil numérique de la Class B respecte toutes les exigences du Règlement sur le matériel brouilleur du Canada. VCCI Class 2 statement Laser information WARNING Making adjustments or performing procedures other than those specified in your equipment’s manual may result in hazardous radiation exposure. WARNING Do not attempt to disassemble the cabinet containing the laser.
Welcome to PowerPC Congratulations on the purchase of your new Macintosh PowerBook computer. Your computer is designed to give you the highest performance combined with real ease of use—it’s easy to set up, easy to use, and easy to expand. This book will guide you through the setup procedure, tell you how to expand your computer, and provide many tips on using your new system. Your computer is powered by the new † microprocessor (or “chip”). This microprocessor was designed by Apple Computer, Inc.
Chapter 1 Getting Started Chapter 2 Using Expansion Bay Modules and PC Cards Chapter 3 Connecting Additional Equipment and Changing BookCovers Chapter 4 Installing and Using Application Programs Chapter 5 Power Management I part