
3.5
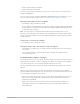
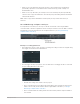


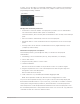


Table Of Contents
- Contents
- Instruments overview
- Alchemy
- MainStage Alchemy overview
- Alchemy user interface
- MainStage Alchemy name bar
- Alchemy Preset browser
- Alchemy sound sources
- MainStage Alchemy source overview
- MainStage Alchemy source master controls
- MainStage Alchemy Import browser
- MainStage Alchemy source subpage controls
- MainStage Alchemy source filters
- MainStage Alchemy source filter use tips
- MainStage Alchemy source elements overview
- MainStage Alchemy additive element controls
- MainStage Alchemy additive element effects
- MainStage Alchemy spectral element controls
- MainStage Alchemy spectral element effects
- MainStage Alchemy pitch correction controls
- MainStage Alchemy formant filter controls
- MainStage Alchemy granular element controls
- MainStage Alchemy sampler element controls
- MainStage Alchemy VA element controls
- MainStage Alchemy source modulations
- MainStage Alchemy morph controls
- Alchemy source editors
- MainStage Alchemy source edit window overview
- MainStage Alchemy inspector global controls
- MainStage Alchemy inspector group controls
- MainStage Alchemy inspector zone controls
- MainStage Alchemy keymap editor
- MainStage Alchemy zone waveform editor
- MainStage Alchemy additive edit window overview
- MainStage Alchemy partial bar display
- MainStage Alchemy partial envelope
- MainStage Alchemy spectral edit window
- Alchemy main filters
- MainStage Alchemy master voice section
- Alchemy modulation section
- MainStage Alchemy modulation overview
- MainStage Alchemy modulation rack controls
- MainStage Alchemy LFO controls
- MainStage Alchemy AHDSR envelopes
- MainStage Alchemy multiple segment envelopes
- MainStage Alchemy sequencer
- MainStage Alchemy envelope follower
- MainStage Alchemy ModMap
- MainStage Alchemy MIDI control modulators
- MainStage Alchemy note property modulators
- MainStage Alchemy perform control modulators
- Alchemy perform section
- Alchemy arpeggiator
- MainStage Alchemy arpeggiator overview
- MainStage Alchemy basic arpeggiator controls
- MainStage Alchemy arpeggiator sequencer
- MainStage Alchemy arpeggiator menu commands
- Use the MainStage Alchemy arpeggiator
- Turn the selected arpeggiator on or off in Alchemy
- Create classic arpeggiator patterns in Alchemy
- Create an octave bouncing bassline in Alchemy
- Arpeggiate multiple sources with different settings for each in Alchemy
- Create a more complex arpeggiator pattern using the sequencer section in Alchemy
- Create a step sequencer style pattern with pitch glides in Alchemy
- Create synchronized rhythmic pulsing chord patterns in Alchemy
- Alchemy effects section
- MainStage Alchemy extended parameters
- Alchemy tutorials
- MainStage Alchemy tutorial introduction
- MainStage Alchemy basic synthesis tweaks
- Use performance and effect controls to tweak a sound in Alchemy
- Swap the source to tweak a sound in Alchemy
- Mute a source to use a partial preset in Alchemy
- Adjust the tuning and envelope of a source in Alchemy
- Adjust filters to tweak a sound in Alchemy
- Recycle sources and sound settings from other presets in Alchemy
- Create MainStage Alchemy sounds from scratch
- MainStage Alchemy elemental morphs overview
- MainStage Alchemy morph use and tips
- Manually time-aligning morphed sounds in Alchemy
- Explore source morphing options and controls in Alchemy
- Crossfade all four sources using an X/Y pad performance control in Alchemy
- Morph four spectral sources using an X/Y pad performance control in Alchemy
- Create a linear morph between two speech samples in Alchemy
- Morph four additive sources using a pair of MSEG envelopes in Alchemy
- Morph drum beats in MainStage Alchemy
- Morph melodic sounds in MainStage Alchemy
- Manipulate loops in MainStage Alchemy
- Drum Kit Designer
- Drum Synth
- ES1
- MainStage ES1 overview
- ES1 oscillator parameters
- MainStage ES1 global parameters
- ES1 filter parameters
- MainStage ES1 amplifier parameters
- ES1 envelope parameters
- ES1 modulation
- MainStage ES1 MIDI controllers
- ES2
- MainStage ES2 overview
- MainStage ES2 interface overview
- ES2 sound sources
- MainStage ES2 oscillator parameters overview
- MainStage ES2 basic oscillator waveforms
- Use pulse width modulation in MainStage ES2
- Use frequency modulation in MainStage ES2
- Use ring modulation in MainStage ES2
- Use MainStage ES2 Digiwaves
- Use the MainStage ES2 noise generator
- Detune analog oscillators in MainStage ES2
- Stretch tuning in MainStage ES2
- Balance MainStage ES2 oscillator levels
- Set MainStage ES2 oscillator start points
- SynchronizeMainStage ES2 oscillators
- ES2 global parameters
- ES2 filter parameters
- MainStage ES2 filter overview
- Change the MainStage ES2 filter configuration
- Crossfade between MainStage ES2 filters
- MainStage ES2 Filter 1 modes
- MainStage ES2 Filter 2 slopes
- ES2 filter cutoff and resonance
- Overdrive MainStage ES2 filters
- Modulate MainStage ES2 Filter 2 frequency
- ES2 amplifier parameters
- ES2 modulation
- MainStage ES2 modulation overview
- ES2 modulation router
- ES2 LFOs
- Use MainStage ES2 LFOs
- ES2 envelopes
- Use the MainStage ES2 Vector Envelope
- Vector Envelope points, times, and loops
- Use the MainStage ES2 Planar Pad
- ES2 modulation target reference
- MainStage ES2 modulation source reference
- MainStage ES2 via modulation source reference
- MainStage ES2 integrated effects processor
- ES2 macro controls and controller assignments
- MainStage ES2 extended parameters
- Create random ES2 sound variations
- ES2 tutorials
- Create ES2 sounds from scratch
- MainStage ES2 sound design from scratch
- Create fat MainStage ES2 sounds
- Create MainStage ES2 bass sounds
- Create MainStage ES2 FM sounds
- Use FM Intensity and Frequency to create new sounds in ES2
- Control ES2 FM intensity with an envelope and FM scaling
- Use FM Drive and Filter FM to change the tonal color in ES2
- Create FM sounds with Digiwaves in ES2
- Create FM sounds with wavetables in ES2
- Create distorted FM sounds with monophonic unison in ES2
- Create FM sounds with unusual spectra in ES2
- Create MainStage ES2 PWM sounds
- Create MainStage ES2 ring modulated sounds
- Create MainStage ES2 oscillator sync sounds
- Vector synthesis in MainStage ES2
- Create ES2 sounds with templates
- Create ES2 sounds from scratch
- EFM1
- ES E
- ES M
- ES P
- EVOC 20 PolySynth
- EVOC 20 PolySynth and vocoding
- MainStage EVOC 20 PolySynth interface
- MainStage EVOC 20 PolySynth analysis controls
- MainStage EVOC 20 PolySynth (U/V) detection
- EVOC 20 PolySynth synthesis parameters
- MainStage EVOC 20 PolySynth formant filter
- MainStage EVOC 20 PolySynth modulation
- MainStage EVOC 20 PolySynth output parameters
- EVOC 20 PolySynth performance tips
- Vocoder history
- MainStage EVOC 20 block diagram
- Playback
- MainStage Playback plug-in overview
- Add a MainStage Playback plug-in
- MainStage Playback interface
- Use the MainStage Playback waveform display
- MainStage Playback transport and function buttons
- MainStage Playback information display
- MainStage Playback Sync, Snap To, and Play From parameters
- Use the MainStage Playback group functions
- Use the MainStage Playback Action menu and File field
- Use markers with the MainStage Playback plug-in
- Use the Playback plug-in in a concert
- Add an audio file to the MainStage Playback plug-in
- Set the Sync mode for the MainStage Playback plug-in
- Choose the flex mode for the MainStage Playback plug-in
- Add screen controls for the MainStage Playback plug-in
- Tips for using the MainStage Playback plug-in
- Assign MainStage Playback plug-ins to groups
- Quick Sampler
- MainStage Quick Sampler overview
- Add content to MainStage Quick Sampler
- Quick Sampler modes
- MainStage Quick Sampler waveform display
- Use Flex in MainStage Quick Sampler
- Quick Sampler modulators
- MainStage Quick Sampler Pitch controls
- MainStage Quick Sampler Filter controls
- MainStage Quick Sampler filter types
- MainStage Quick Sampler Amp controls
- MainStage Quick Sampler extended parameters
- Retro Synth
- MainStage Retro Synth overview
- MainStage Retro Synth Analog oscillator
- MainStage Retro Synth Sync oscillator
- Retro Synth Table oscillator controls
- MainStage Retro Synth FM oscillator
- MainStage Retro Synth filter controls
- MainStage Retro Synth filter types
- MainStage Retro Synth amp and effect controls
- Retro Synth modulation controls
- MainStage Retro Synth global settings
- MainStage Retro Synth extended parameters
- Sampler
- Sampler overview
- Load and save instruments in Sampler
- Sampler Synthesizer Parameters
- Sampler Modulation
- Sampler Edit panes
- Sampler Mapping and Zone pane overview
- Use the Sampler Key Mapping Editor
- Use Sampler Group view
- Make advanced group selections in Sampler
- Fade between sample groups in Sampler
- Use Sampler Zone view
- Use the Sampler Mapping pane menu bar
- Mapping pane menu parameters
- Use Mapping pane Edit menu commands
- Use Mapping pane Group menu commands
- Use Mapping pane Zone menu commands
- Use Mapping pane Zone menu Split commands
- Use Mapping pane Zone menu Automap commands
- Use Mapping pane Zone menu Remap commands
- Use Mapping pane Zone menu Loop commands
- Use Mapping pane Zone menu Audio Files commands
- Use Mapping pane View menu commands
- Use the Sampler Zone pane
- Synchronize Sampler audio with Flex
- Create instruments, zones, and groups
- Sampler instruments overview
- Create instruments with Sampler
- Quickly create an instrument
- Create zones with drag and drop
- Create a zone by dragging content into the zone pane
- Create a zone by dragging content to one or more keys
- Add multiple files to the Key Mapping Editor
- Add multiple files to the Zone view and create a new group
- Create a new, empty instrument
- Create an empty zone with a menu command, and assign a sample to it
- Create instruments with menu commands
- Create groups in Sampler
- Edit Sampler zones and groups
- Edit zones and groups in Sampler
- Select a zone or group in Sampler
- Graphically edit zones and groups in Sampler
- Move one or more zones by dragging
- Move one or more selected zones to the left or right with a key command
- Restrict zone dragging to one direction
- Change the root key when moving a zone
- Change the start or end note of a zone
- Change the velocity range of a zone
- Divide a zone vertically
- Divide a zone horizontally
- Use zone and group output labels in Sampler
- Use key labels in Sampler
- Sampler articulation handling
- Manage sampler instruments
- Sampler memory management
- Sampler extended parameters
- Sculpture
- MainStage Sculpture overview
- MainStage Sculpture interface
- Sculpture string parameters
- Sculpture objects parameters
- Sculpture pickups parameters
- MainStage Sculpture global parameters
- MainStage Sculpture amplitude envelope
- Use the MainStage Sculpture Waveshaper
- MainStage Sculpture filter parameters
- Sculpture Body EQ parameters
- Sculpture delay effect parameters
- MainStage Sculpture output parameters
- Sculpture modulation controls
- MainStage Sculpture modulation overview
- Sculpture LFOs
- MainStage Sculpture Vibrato parameters
- MainStage Sculpture Jitter generators
- MainStage Sculpture note-on random modulators
- MainStage Sculpture velocity modulators
- Use Controller A and B in MainStage Sculpture
- Sculpture envelope parameters
- Sculpture morph parameters
- Assign MainStage Sculpture MIDI controllers
- MainStage Sculpture extended parameters
- Sculpture tutorials
- Explore Sculpture
- Create basic sounds in Sculpture
- Advanced Sculpture tutorial: electric bass
- Electric bass programming in MainStage Sculpture
- Program a basic bass sound in MainStage Sculpture
- Create the proper working environment for design of your own bass sound in Sculpture
- Recreate the sound characteristics of a typical bass instrument in Sculpture
- Recreate the material properties of a set of round wound strings in Sculpture
- Splay overtones in Sculpture
- Emulate string and fret vibrations with Object 2 in Sculpture
- Use Object 3 to dampen overtones in Sculpture
- Set the range for the basic bass sound in Sculpture
- Refine the basic MainStage Sculpture bass sound
- Use the Resolution parameter to control the timbre, independent of pitch in Sculpture
- Use the Inner Loss parameter to scale the overtone content, dependent on pitch in Sculpture
- Set sustain levels for the basic bass sound, dependent on pitch in Sculpture
- Alter the frequency spectrum of your basic bass with the Body EQ in Sculpture
- Program a picked bass sound in MainStage Sculpture
- Simulate playing with a pick in Sculpture
- Compensate for thinning side effects with the Body EQ in Sculpture
- Emulate bass guitar damping in Sculpture
- Simulate harmonics created by fingers lightly touching the strings in Sculpture
- Emulate a vintage flat wound pick bass in Sculpture
- Emulate a Bert Kaempfert-style percussive bass in Sculpture
- Program a slap bass sound in MainStage Sculpture
- Program a fretless bass sound in MainStage Sculpture
- Add effects to your MainStage Sculpture bass sound
- Advanced Sculpture tutorial: synthesizer sounds
- Studio Instruments
- Ultrabeat
- MainStage Ultrabeat overview
- MainStage Ultrabeat interface
- Ultrabeat Assignment section
- MainStage Ultrabeat Synthesizer section
- Ultrabeat sound sources
- MainStage Ultrabeat oscillator overview
- Use MainStage Ultrabeat oscillator 1 phase osc mode
- Use MainStage Ultrabeat oscillator 1 FM mode
- Use the MainStage Ultrabeat oscillator 1 side chain
- Use MainStage Ultrabeat oscillator 2 phase osc mode
- MainStage Ultrabeat waveform characteristics
- Use MainStage Ultrabeat oscillator 2 sample mode
- Use MainStage Ultrabeat oscillator 2 model mode
- MainStage Ultrabeat ring modulator
- MainStage Ultrabeat noise generator
- MainStage Ultrabeat filter section
- MainStage Ultrabeat distortion circuit
- Ultrabeat Output section
- Ultrabeat modulation
- MainStage Ultrabeat modulation overview
- Mod and via modulations in MainStage Ultrabeat
- Create a modulation routing in MainStage Ultrabeat
- Assign MainStage Ultrabeat MIDI controllers
- Use MainStage Ultrabeat LFOs
- MainStage Ultrabeat envelope overview
- MainStage Ultrabeat envelope parameters
- Use the MainStage Ultrabeat modulation target display
- Ultrabeat step sequencer
- MainStage Ultrabeat step sequencer overview
- MainStage Ultrabeat step sequencer basics
- MainStage Ultrabeat step sequencer interface
- MainStage Ultrabeat global sequencer controls
- Use MainStage Ultrabeat pattern controls
- Use the MainStage Ultrabeat swing function
- Ultrabeat Step grid
- Automate Ultrabeat step sequencer parameters
- MainStage Ultrabeat sequencer MIDI control
- Ultrabeat tutorials
- Sound programming in MainStage Ultrabeat
- Create kick drums in MainStage Ultrabeat
- Create snare drums in MainStage Ultrabeat
- Create tonal percussion in MainStage Ultrabeat
- Create hi-hats or cymbals in MainStage Ultrabeat
- Create metallic sounds in MainStage Ultrabeat
- Tips for extreme MainStage Ultrabeat sounds
- Utilities
- Vintage B3 Organ
- MainStage Vintage B3 Organ overview
- Vintage B3 Main window
- MainStage Vintage B3 Main window overview
- MainStage Vintage B3 draw bar controls
- MainStage Vintage B3 Scanner Vibrato and Chorus
- MainStage Vintage B3 Percussion effect
- Use MainStage Vintage B3 preset keys
- Set up Vintage B3 for your MIDI equipment
- Vintage B3 Rotor Cabinet window
- Vintage B3 Options window
- Vintage B3 Effects window
- Vintage B3 Expert window
- Use a MIDI controller with Vintage B3
- B3 and Leslie information
- Vintage Clav
- MainStage Vintage Clav overview
- MainStage Vintage Clav interface
- Vintage Clav Main window
- Vintage Clav Effects window
- Vintage Clav Details window
- MainStage Vintage Clav extended parameters
- D6 Clavinet information
- Vintage Electric Piano
- MainStage Vintage Electric Piano overview
- MainStage Vintage Electric Piano interface
- Vintage Electric Piano Effects window
- Vintage Electric Piano Details window
- MainStage Vintage Electric Piano extended parameters
- Vintage Electric Piano emulations
- MainStage Vintage Electric Piano MIDI controllers
- Vintage Mellotron
- Legacy instruments
- MainStage legacy instruments overview
- Emulated instruments
- MainStage Legacy Bass
- MainStage Legacy Church Organ
- MainStage Legacy Drum Kits
- MainStage Legacy Electric Clav(inet)
- MainStage Legacy Electric Piano
- MainStage Legacy Guitar
- MainStage Legacy Horns
- MainStage Legacy Piano
- MainStage Legacy Sound Effects
- MainStage Legacy Strings
- MainStage Legacy Tuned Percussion
- MainStage Legacy Voice
- MainStage Legacy Woodwind
- MainStage Legacy Tonewheel Organ
- Synthesizers
- MainStage Legacy Analog Basic
- MainStage Legacy Analog Mono
- MainStage Legacy Analog Pad
- MainStage Legacy Analog Swirl
- MainStage Legacy Analog Sync
- MainStage Legacy Digital Basic
- MainStage Legacy Digital Mono
- MainStage Legacy Digital Stepper
- MainStage Legacy External Instrument
- MainStage Legacy Hybrid Basic
- MainStage Legacy Hybrid Morph
- Synthesizer basics

496MainStage Instruments
In effect, you are “breeding” a sound, while maintaining some control by selecting parent
and child sounds. This approach can result in new, complex sounds—even if your sound
programming knowledge is limited.
Morph point randomize parameters
• Point buttons: Define the number of morph points you want to use for randomization.
The active button indicates which points are randomized.
The bottom button, when selected, limits randomization to the currently selected morph
point.
• Auto Select button: Automatically select the closest morph point.
• Randomize button: Create randomized values for all parameters of the chosen morph
points.
• Intensity slider: Set the amount of randomization from 1% (slight deviation) to 100%
(completely random values).
Randomize morph points in Sculpture
This example provides a general approach that you can follow for morph point
randomization.
1. In MainStage, select a Point button (the top, five-point button, for example).
2. Turn on Auto Select.
3. Drag the Int(ensity) slider to a value of 25%.
4. Click the Rnd button.
Note the movement of a number of the parameters in the core synthesis engine.
5. Drag the morph ball to each corner in the Morph Pad. Do this along the edges and
through the center of the Morph Pad.
Note how this affects the morph.
6. Strike a few notes on your MIDI keyboard while dragging the ball.
Note: The morph ball is visible only when the Record Trigger button is active.
As you move the morph ball around, you’ll see ghost controls in the Pickup display and
the ball in the Material Pad move. If you look closely, you should see a number of red dots
moving in the string and object parameters, which indicate the current morph position.
Note that positions on the Morph Pad that fall in between the various morph points cause
the randomized parameters to interpolate between values. You can use the Copy and Paste
commands to make use of these in-between values.