
3

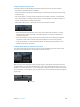
Table Of Contents
- MainStage 3 Instruments
- Contents
- Chapter 1: Drum Kit Designer
- Chapter 2: ES1
- Chapter 3: ES2
- ES2 overview
- ES2 interface
- ES2 sound sources
- ES2 oscillator parameters overview
- ES2 basic oscillator waveforms
- Use pulse width modulation in ES2
- Use frequency modulation in ES2
- Use ring modulation in ES2
- Use ES2 Digiwaves
- Use the ES2 noise generator
- ES2 emulation of detuned analog oscillators
- Stretch tuning in ES2
- Balance ES2 oscillator levels
- ES2 oscillator start points
- Synchronize ES2 oscillators
- ES2 global parameters
- ES2 filter parameters
- ES2 amplifier parameters
- ES2 modulation
- ES2 integrated effects processor
- ES2 macro controls and controller assignments
- ES2 extended parameters
- Create random ES2 sound variations
- ES2 tutorials
- Chapter 4: EFM1
- Chapter 5: ES E
- Chapter 6: ES M
- Chapter 7: ES P
- Chapter 8: EVOC 20 PolySynth
- EVOC 20 PolySynth and vocoding
- EVOC 20 PolySynth interface
- EVOC 20 PolySynth analysis parameters
- EVOC 20 PolySynth (U/V) detection parameters
- EVOC 20 PolySynth synthesis parameters
- EVOC 20 PolySynth formant filter
- EVOC 20 PolySynth modulation parameters
- EVOC 20 PolySynth output parameters
- EVOC 20 PolySynth performance tips
- Vocoder history
- EVOC 20 block diagram
- Chapter 9: EXS24 mkII
- EXS24 mkII overview
- Sampler instruments
- EXS24 mkII Parameter window
- EXS24 mkII Parameter window overview
- Sampler Instruments pop-up menu
- EXS24 mkII global parameters
- EXS24 mkII pitch parameters
- EXS24 mkII filter parameters
- EXS24 mkII output parameters
- EXS24 mkII extended parameters
- EXS24 mkII modulation overview
- EXS24 mkII modulation router
- EXS24 mkII LFOs
- EXS24 mkII envelope overview
- EXS24 mkII modulation reference
- EXS24 mkII Instrument Editor window
- EXS24 mkII preferences
- EXS24 mkII memory management
- Chapter 10: External Instrument
- Chapter 11: Klopfgeist
- Chapter 12: Retro Synth
- Retro Synth overview
- Retro Synth Analog oscillator controls
- Retro Synth Sync oscillator controls
- Retro Synth Table oscillator controls
- Retro Synth FM oscillator controls
- Retro Synth filter controls
- Retro Synth amp and effect controls
- Retro Synth modulation controls
- Retro Synth global and controller settings
- Retro Synth extended parameters
- Chapter 13: Sculpture
- Sculpture overview
- Sculpture interface
- Sculpture string parameters
- Sculpture objects parameters
- Sculpture pickups parameters
- Sculpture global parameters
- Sculpture amplitude envelope parameters
- Use Sculpture’s Waveshaper
- Sculpture filter parameters
- Sculpture delay effect parameters
- Sculpture Body EQ parameters
- Sculpture output parameters
- Sculpture modulation controls
- Sculpture morph parameters
- Define Sculpture MIDI controllers
- Sculpture tutorials
- Chapter 14: Ultrabeat
- Ultrabeat overview
- Ultrabeat interface
- Ultrabeat Assignment section
- Ultrabeat Synthesizer section overview
- Ultrabeat sound sources
- Ultrabeat oscillator overview
- Ultrabeat oscillator 1 phase oscillator mode
- Use Ultrabeat oscillator 1 FM mode
- Use Ultrabeat oscillator 1 side chain mode
- Use Ultrabeat oscillator 2 phase oscillator mode
- Basic waveform characteristics
- Use Ultrabeat oscillator 2 sample mode
- Use Ultrabeat oscillator 2 model mode
- Ultrabeat ring modulator
- Ultrabeat noise generator
- Use Ultrabeat’s filter section
- Ultrabeat distortion circuit
- Ultrabeat Output section
- Ultrabeat modulation
- Ultrabeat step sequencer
- Ultrabeat step sequencer overview
- Step sequencer basics
- Ultrabeat step sequencer interface
- Ultrabeat global sequencer controls
- Ultrabeat pattern controls
- Use Ultrabeat’s swing function
- Ultrabeat Step grid
- Automate parameters in Ultrabeat’s step sequencer
- Export Ultrabeat patterns as MIDI regions
- MIDI control of Ultrabeat’s step sequencer
- Ultrabeat tutorials
- Chapter 15: Vintage B3
- Chapter 16: Vintage Clav
- Chapter 17: Vintage Electric Piano
- Appendix A: Legacy instruments
- Appendix B: Synthesizer Basics

Chapter 13 Sculpture 288
Record Morph Envelopes in Sculpture
The following section describes the steps you follow to record a Morph Envelope.
Choose a record trigger mode
m Click the Trigger mode pop-up menu to the right of the R button, then choose one of the
following trigger modes, which will start recording when R(ecord) Enable is turned on:
•
NoteOn: Recording starts when a note is played.
•
Note + Move Morph Point: Recording starts when MIDI control change messages (as assigned
in the Morph X and Y parameters of the MIDI Controller Assign section) arrive while a note
is held.
•
Note + Sustain Pedal: Recording starts when the sustain pedal is depressed while a note is held.
Record a Morph Envelope
1 Choose a trigger mode if you don’t want to use the Morph Pad.
Skip this step if using the Morph Pad.
2 Click the R(ecord) Enable button to arm the morph envelope record function.
3 Play a note on your MIDI keyboard, and do either of the following:
•
Drag the silver ball in the Morph Pad.
•
Move an external controller (see Dene Sculpture MIDI controllers on page 289).
Following the recording of a controller movement, R(ecord) Enable is automatically set to o and
Mode is set to Env only. This ensures that only the recorded movement is active, regardless of the
controller’s position or further movements after you nish recording.
Note: The mode defaults to (Morph) Pad as soon as you click the R button. See Sculpture Morph
Envelope parameters on page 285.
Stop a morph envelope recording
Do one of the following:
m Click the R(ecord) Enable button (or trigger) a second time.
m Release all keys, and allow all voices to complete their decay phase. This automatically ends
the recording.
Note: You can stop recording early, before the decay phase completes, by releasing all keys and
then pressing a single key.