
3
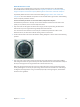
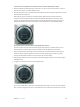

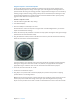
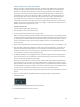
Table Of Contents
- MainStage 3 Instruments
- Contents
- Chapter 1: Drum Kit Designer
- Chapter 2: ES1
- Chapter 3: ES2
- ES2 overview
- ES2 interface
- ES2 sound sources
- ES2 oscillator parameters overview
- ES2 basic oscillator waveforms
- Use pulse width modulation in ES2
- Use frequency modulation in ES2
- Use ring modulation in ES2
- Use ES2 Digiwaves
- Use the ES2 noise generator
- ES2 emulation of detuned analog oscillators
- Stretch tuning in ES2
- Balance ES2 oscillator levels
- ES2 oscillator start points
- Synchronize ES2 oscillators
- ES2 global parameters
- ES2 filter parameters
- ES2 amplifier parameters
- ES2 modulation
- ES2 integrated effects processor
- ES2 macro controls and controller assignments
- ES2 extended parameters
- Create random ES2 sound variations
- ES2 tutorials
- Chapter 4: EFM1
- Chapter 5: ES E
- Chapter 6: ES M
- Chapter 7: ES P
- Chapter 8: EVOC 20 PolySynth
- EVOC 20 PolySynth and vocoding
- EVOC 20 PolySynth interface
- EVOC 20 PolySynth analysis parameters
- EVOC 20 PolySynth (U/V) detection parameters
- EVOC 20 PolySynth synthesis parameters
- EVOC 20 PolySynth formant filter
- EVOC 20 PolySynth modulation parameters
- EVOC 20 PolySynth output parameters
- EVOC 20 PolySynth performance tips
- Vocoder history
- EVOC 20 block diagram
- Chapter 9: EXS24 mkII
- EXS24 mkII overview
- Sampler instruments
- EXS24 mkII Parameter window
- EXS24 mkII Parameter window overview
- Sampler Instruments pop-up menu
- EXS24 mkII global parameters
- EXS24 mkII pitch parameters
- EXS24 mkII filter parameters
- EXS24 mkII output parameters
- EXS24 mkII extended parameters
- EXS24 mkII modulation overview
- EXS24 mkII modulation router
- EXS24 mkII LFOs
- EXS24 mkII envelope overview
- EXS24 mkII modulation reference
- EXS24 mkII Instrument Editor window
- EXS24 mkII preferences
- EXS24 mkII memory management
- Chapter 10: External Instrument
- Chapter 11: Klopfgeist
- Chapter 12: Retro Synth
- Retro Synth overview
- Retro Synth Analog oscillator controls
- Retro Synth Sync oscillator controls
- Retro Synth Table oscillator controls
- Retro Synth FM oscillator controls
- Retro Synth filter controls
- Retro Synth amp and effect controls
- Retro Synth modulation controls
- Retro Synth global and controller settings
- Retro Synth extended parameters
- Chapter 13: Sculpture
- Sculpture overview
- Sculpture interface
- Sculpture string parameters
- Sculpture objects parameters
- Sculpture pickups parameters
- Sculpture global parameters
- Sculpture amplitude envelope parameters
- Use Sculpture’s Waveshaper
- Sculpture filter parameters
- Sculpture delay effect parameters
- Sculpture Body EQ parameters
- Sculpture output parameters
- Sculpture modulation controls
- Sculpture morph parameters
- Define Sculpture MIDI controllers
- Sculpture tutorials
- Chapter 14: Ultrabeat
- Ultrabeat overview
- Ultrabeat interface
- Ultrabeat Assignment section
- Ultrabeat Synthesizer section overview
- Ultrabeat sound sources
- Ultrabeat oscillator overview
- Ultrabeat oscillator 1 phase oscillator mode
- Use Ultrabeat oscillator 1 FM mode
- Use Ultrabeat oscillator 1 side chain mode
- Use Ultrabeat oscillator 2 phase oscillator mode
- Basic waveform characteristics
- Use Ultrabeat oscillator 2 sample mode
- Use Ultrabeat oscillator 2 model mode
- Ultrabeat ring modulator
- Ultrabeat noise generator
- Use Ultrabeat’s filter section
- Ultrabeat distortion circuit
- Ultrabeat Output section
- Ultrabeat modulation
- Ultrabeat step sequencer
- Ultrabeat step sequencer overview
- Step sequencer basics
- Ultrabeat step sequencer interface
- Ultrabeat global sequencer controls
- Ultrabeat pattern controls
- Use Ultrabeat’s swing function
- Ultrabeat Step grid
- Automate parameters in Ultrabeat’s step sequencer
- Export Ultrabeat patterns as MIDI regions
- MIDI control of Ultrabeat’s step sequencer
- Ultrabeat tutorials
- Chapter 15: Vintage B3
- Chapter 16: Vintage Clav
- Chapter 17: Vintage Electric Piano
- Appendix A: Legacy instruments
- Appendix B: Synthesizer Basics

Chapter 13 Sculpture 312
Use the Inner Loss parameter to scale the overtone content, dependent on pitch
1 Move the Material Pad ball above the words Inner Loss. Try to move the ball solely in a vertical
direction to maintain a constant Stiness value.
2 Drag the green line next to the ball toward the bottom until the small green diamond is located
directly above the word Steel.
When playing, you’ll recognize the smooth transition that takes place between the wiry,
overtone-rich sound at the bottom end and the extremely dampened sound in the upper
register. This exaggerated setting was chosen to clearly demonstrate the scaling principle in
stringed instruments. To achieve an authentic sound and timbre, try the following setting:
Set sustain levels for the basic bass sound, dependent on pitch
In basses in particular, low notes sustain far longer than high notes. Sculpture allows you to
authentically and convincingly simulate this behavior with the Media Loss parameter.
1 Play a few held notes in the range around C2 and above. You’ll hear that these notes die out
much too slowly. Drag the Media Loss slider up until this range begins to fade out quickly
enough. The downside is that the lower notes now die out too quickly.
2 Drag the green Media Loss Key Scale slider down until the fade-out phase of the lower range is
suciently long.
3 Compare your results with these recommended values:
You’ve now created a basic bass that’s articulated with your ngers. Save this as E-Bass Fingered
Basic. You’ll be using this basic bass as a foundation for the construction of further bass sounds.