
3
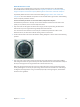
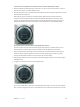
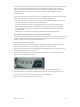

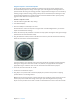
Table Of Contents
- MainStage 3 Instruments
- Contents
- Chapter 1: Drum Kit Designer
- Chapter 2: ES1
- Chapter 3: ES2
- ES2 overview
- ES2 interface
- ES2 sound sources
- ES2 oscillator parameters overview
- ES2 basic oscillator waveforms
- Use pulse width modulation in ES2
- Use frequency modulation in ES2
- Use ring modulation in ES2
- Use ES2 Digiwaves
- Use the ES2 noise generator
- ES2 emulation of detuned analog oscillators
- Stretch tuning in ES2
- Balance ES2 oscillator levels
- ES2 oscillator start points
- Synchronize ES2 oscillators
- ES2 global parameters
- ES2 filter parameters
- ES2 amplifier parameters
- ES2 modulation
- ES2 integrated effects processor
- ES2 macro controls and controller assignments
- ES2 extended parameters
- Create random ES2 sound variations
- ES2 tutorials
- Chapter 4: EFM1
- Chapter 5: ES E
- Chapter 6: ES M
- Chapter 7: ES P
- Chapter 8: EVOC 20 PolySynth
- EVOC 20 PolySynth and vocoding
- EVOC 20 PolySynth interface
- EVOC 20 PolySynth analysis parameters
- EVOC 20 PolySynth (U/V) detection parameters
- EVOC 20 PolySynth synthesis parameters
- EVOC 20 PolySynth formant filter
- EVOC 20 PolySynth modulation parameters
- EVOC 20 PolySynth output parameters
- EVOC 20 PolySynth performance tips
- Vocoder history
- EVOC 20 block diagram
- Chapter 9: EXS24 mkII
- EXS24 mkII overview
- Sampler instruments
- EXS24 mkII Parameter window
- EXS24 mkII Parameter window overview
- Sampler Instruments pop-up menu
- EXS24 mkII global parameters
- EXS24 mkII pitch parameters
- EXS24 mkII filter parameters
- EXS24 mkII output parameters
- EXS24 mkII extended parameters
- EXS24 mkII modulation overview
- EXS24 mkII modulation router
- EXS24 mkII LFOs
- EXS24 mkII envelope overview
- EXS24 mkII modulation reference
- EXS24 mkII Instrument Editor window
- EXS24 mkII preferences
- EXS24 mkII memory management
- Chapter 10: External Instrument
- Chapter 11: Klopfgeist
- Chapter 12: Retro Synth
- Retro Synth overview
- Retro Synth Analog oscillator controls
- Retro Synth Sync oscillator controls
- Retro Synth Table oscillator controls
- Retro Synth FM oscillator controls
- Retro Synth filter controls
- Retro Synth amp and effect controls
- Retro Synth modulation controls
- Retro Synth global and controller settings
- Retro Synth extended parameters
- Chapter 13: Sculpture
- Sculpture overview
- Sculpture interface
- Sculpture string parameters
- Sculpture objects parameters
- Sculpture pickups parameters
- Sculpture global parameters
- Sculpture amplitude envelope parameters
- Use Sculpture’s Waveshaper
- Sculpture filter parameters
- Sculpture delay effect parameters
- Sculpture Body EQ parameters
- Sculpture output parameters
- Sculpture modulation controls
- Sculpture morph parameters
- Define Sculpture MIDI controllers
- Sculpture tutorials
- Chapter 14: Ultrabeat
- Ultrabeat overview
- Ultrabeat interface
- Ultrabeat Assignment section
- Ultrabeat Synthesizer section overview
- Ultrabeat sound sources
- Ultrabeat oscillator overview
- Ultrabeat oscillator 1 phase oscillator mode
- Use Ultrabeat oscillator 1 FM mode
- Use Ultrabeat oscillator 1 side chain mode
- Use Ultrabeat oscillator 2 phase oscillator mode
- Basic waveform characteristics
- Use Ultrabeat oscillator 2 sample mode
- Use Ultrabeat oscillator 2 model mode
- Ultrabeat ring modulator
- Ultrabeat noise generator
- Use Ultrabeat’s filter section
- Ultrabeat distortion circuit
- Ultrabeat Output section
- Ultrabeat modulation
- Ultrabeat step sequencer
- Ultrabeat step sequencer overview
- Step sequencer basics
- Ultrabeat step sequencer interface
- Ultrabeat global sequencer controls
- Ultrabeat pattern controls
- Use Ultrabeat’s swing function
- Ultrabeat Step grid
- Automate parameters in Ultrabeat’s step sequencer
- Export Ultrabeat patterns as MIDI regions
- MIDI control of Ultrabeat’s step sequencer
- Ultrabeat tutorials
- Chapter 15: Vintage B3
- Chapter 16: Vintage Clav
- Chapter 17: Vintage Electric Piano
- Appendix A: Legacy instruments
- Appendix B: Synthesizer Basics

Chapter 13 Sculpture 313
The scope for sound design, by altering the frequency spectrum of electromagnetic instruments,
is far more exible than that oered by acoustic instruments. In addition to the number of
pickups, a major role is also played by the choice of amplier, the equalization setting within
the amplier, and—last but not least—the physical properties of the speakers and their
enclosing cabinet.
The central features of your electric bass sound are complete, but the sound can be improved by
paying close attention to some details. Here are a few general suggestions:
•
Vary the position of the pickups. Try placing each of them in dierent positions. This cancels
out certain frequencies, and others are summed together.
•
Try turning on the Invert switch, even though this eect is not typical for electric basses.
•
What is typical for bass sounds is the placement of the pickups in the outer-left third of
the string model. The farther you move them to the left, the thinner and more nasal the
sound becomes.
•
Shifting Object 1 will have a similar eect. Try dierent combinations here as well.
Alter the frequency spectrum of your basic bass with the Body EQ
The Body EQ is ideal for giving the bass sound that nal, nishing touch. Your electric bass sound
could be a little less smooth, and a bit more precise in its attack phase. Bassists like to use the
terms drier and more bite to describe this phenomenon.
1 Load the E-Bass Fingered Basic setting.
2 Choose the standard Lo Mid Hi model from the Model pop-up menu in the Body EQ section.
3 Reduce the low bass frequencies by setting the Low knob to a value of −0.30.
4 Boost the mid-range frequencies substantially by setting the Mid knob to a value of 0.50. Drag
the Mid Frequency slider to a value of 0.26.
5 You’ll probably nd that the boosting of the low mid frequencies is a little too strong at this
point, so return the Mid value to 0.30.
6 The sound could stand to be a little more wiry, so set the High knob to a value of 0.30.
7 To nish o, set the Level knob (to the right of the amplitude envelope) to a value of −3 dB.
The sound is now as loud as possible, without the low notes distorting.
8 Save this sound setting as E-Bass Fingered Basic EQ1.