
User Manual


Table Of Contents
- MainStage User Manual
- Contents
- An Introduction to MainStage
- Setting Up Your System
- The MainStage Interface
- Getting Started With MainStage
- Before You Begin
- Choosing a Concert Template
- Selecting and Playing Patches
- Adding a Patch
- Renaming a Patch
- Adding a Channel Strip to a Patch
- Changing a Channel Strip Setting
- Learning Controller Assignments
- Mapping Screen Controls to Parameters
- Trying Out Full Screen and Perform Modes
- Customizing the MainStage Window
- Working With Concerts
- Working in Edit Mode
- Working With Patches in Edit Mode
- Working With Channel Strips in Edit Mode
- Selecting Channel Strips
- Choosing Channel Strip Settings
- Resetting a Channel Strip
- Editing Channel Strips in MainStage
- Renaming a Channel Strip
- Choosing the Channel Strip Color
- Changing the Channel Strip Icon
- Showing Signal Flow Channel Strips
- Creating Keyboard Layers and Splits
- Setting the Velocity Range and Offset
- Creating Controller Transforms
- Filtering MIDI Messages
- Deleting Channel Strips
- Mapping Screen Controls
- Working With Sets in Edit Mode
- Working at the Set Level
- Overriding Concert- and Set-Level Mappings
- Sharing Patches and Sets Between Concerts
- Working in Layout Mode
- Performing Live With MainStage
- Key Commands
- Setting MainStage Preferences
- Index
56 Chapter 6 Working in Edit Mode
Creating Keyboard Layers and Splits
If you play a keyboard controller, you can easily create keyboard layers and splits in
your MainStage patches. You create layers and splits by adding two or more channel
strips to a patch and defining key ranges for each channel strip.
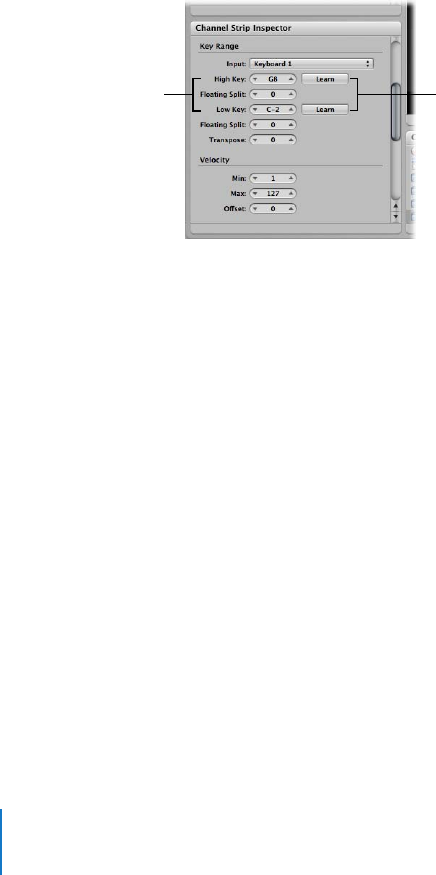
Defining a Key Range
The key range defines the range of notes on the keyboard that trigger sound from a
software instrument in a channel strip. You can define key ranges so that channel strips
overlap (for layered sounds) or are separate (for splits).
To define a key range for a channel strip:
1 In the Channel Strips area, select the channel strip.
2 In the Channel Strip Inspector, click the Learn button next to the Low Key value slider.
3 On your keyboard controller, press the key you want to set as the lowest key in the key
range.
4 Click the Learn button again to turn off Learn mode for the Low Key.
5 Click the Learn button next to the High Key value slider.
6 On your keyboard controller, press the key you want to set as the highest key in the key
range.
7 Click the Learn button again to turn off Learn mode for the High Key.
When you play the patch, you hear the channel strip when you play notes inside the
key range. When you play notes outside the key range, no sound is generated from the
channel strip.
Setting Floating Split Points
When a key range has a floating split point, the notes that define the boundaries of the
key range ends change depending on the keys you play as you approach the boundary
of the key range.
Set the high key and
low key using these
value sliders.
You can also click Learn
and play the
corresponding note on
your music keyboard.