Motion HomePages.
505.book Page 2 Wednesday, June 30, 2004 5:58 PM Apple Computer, Inc. © 2004 Apple Computer, Inc. All rights reserved. Under the copyright laws, this manual may not be copied, in whole or in part, without the written consent of Apple. Your rights to the software are governed by the accompanying software license agreement. The Apple logo is a trademark of Apple Computer, Inc., registered in the U.S. and other countries.
2505.
2505.book Page 4 Wednesday, June 30, 2004 5:58 PM 4 91 92 Working With Filters Animating Filters With Parameter Behaviors Chapter 3 95 95 96 97 102 103 103 104 106 108 108 112 112 113 113 114 116 118 Your No.
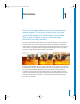
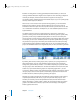
2505.book Page 5 Wednesday, June 30, 2004 5:58 PM 1 Orientation 1 Allow us to introduce Motion, a new school of interactive motion graphics. The best part of this school is the time spent on the playground—the freedom to let the Wind blow, to Spin, to Spring, to Glow, or to Throw things about with just a drag and drop. To create motion and effects in Motion, you simply drag a behavior (such as Spin or Throw), or a filter (such as Glow) to your object and let go.
2505.book Page 6 Wednesday, June 30, 2004 5:58 PM Behaviors are designed for creating generalized, fluid motion effects, as well as for creating animated effects that might be too complex or time-consuming to keyframe manually. For example, when the Vortex behavior is applied to an object, all surrounding objects automatically orbit around that object. Or, you can quickly specify that only certain objects are affected.
2505.book Page 7 Wednesday, June 30, 2004 5:58 PM About Motion In Motion, you create motion graphics and basic compositing projects with imported images (such as Adobe Photoshop or Illustrator files), image sequences, QuickTime movies, audio files, as well as objects created within Motion. These objects include text, masks, shapes, and particles. All media imported into Motion, or elements created within a project, are referred to as objects.
2505.book Page 8 Wednesday, June 30, 2004 5:58 PM Getting Started The first steps in any project are to determine your project settings and bring in your media files (unless you are generating content solely from within Motion). A Motion project is a file that contains information that references all media that you import into a project, content created within the project itself (such as shapes, text, and particles), and any filters, behaviors, or animation applied to those objects.
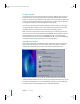
2505.book Page 9 Wednesday, June 30, 2004 5:58 PM The following example project uses the NTSC Broadcast SD (Standard Definition) project preset. For more information on creating new projects and project presets, see Chapter 2, “Creating and Managing Projects,” in Motion Help. To create a project: 1 From the Welcome Screen, click Start with a New Project. The Select Project Preset dialog appears. 2 Choose NTSC Broadcast SD from the Preset pop-up menu. Choose a project preset.
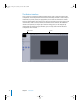
2505.book Page 10 Wednesday, June 30, 2004 5:58 PM The Motion Interface Once a project is created, the Motion interface appears and is comprised of two main components: The Utility window and the Canvas. The Utility window is used to import media files, to preview, select, and apply effects, and to edit and animate the controls for those applied effects. The Canvas is the main area in which to view your project and its elements, as well as select, transform, and animate those elements.
2505.book Page 11 Wednesday, June 30, 2004 5:58 PM The Project pane is used to organize and reorder project elements and to control audio. The Timing pane contains the full-featured Timeline, Keyframe Editor, and Audio Editor, which give you an editable, global view of your project, including all project elements and animated parameters. Utility window Project pane Canvas Timing pane The following sections discuss the Utility window and the Canvas, in an order that represents a typical workflow.
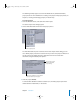
2505.book Page 12 Wednesday, June 30, 2004 5:58 PM The Utility Window The Utility window contains the following tabs: • File Browser: Use the File Browser to select and import media files (single images, image sequences, QuickTime movies, and audio files). • Library: Use the Library to browse, select, and apply effects to the objects in your project, as well as to access content such as preset particles and gradients.
2505.book Page 13 Wednesday, June 30, 2004 5:58 PM Note: Like the Mac OS X Finder, you can display the browser contents in icon or list view.
2505.book Page 14 Wednesday, June 30, 2004 5:58 PM 2 In the upper pane of the browser, select the location of the media file you want to bring in to your project. The contents of that location appear in the lower pane of the browser. 3 In the lower pane of the browser, do one of the following: • If the file is not in a folder, select the file. • If the file is located in a folder, double-click the folder, and then select the file.
2505.book Page 15 Wednesday, June 30, 2004 5:58 PM Note: To bring in multiple files, you can Shift-click or Command-click the files (in icon or list view), or drag-select (when in list view). The files are placed in the same position in the Canvas. To move the individual files, click away from the selected files to deselect them, then drag the individual images.
2505.book Page 16 Wednesday, June 30, 2004 5:58 PM In addition to the Dashboard, an active bounding box appears in the Canvas around the selected object. The default onscreen controls for the bounding box include handles for scaling and rotating, and a pivot point. Handle Rotation handle Bounding box Pivot point These controls let you transform and animate objects directly in the Canvas.
2505.book Page 17 Wednesday, June 30, 2004 5:58 PM Note: When a Photoshop file contains more layers than can be displayed in the drop menu, the Choose Layer option appears in the drop menu. Once Choose Layer is chosen, use the Pick Layer to Import dialog to select which layer to import. To import an Illustrator PDF file: 1 In the File Browser, select the Illustrator PDF file. 2 Drag the file to the Canvas. The file creates a single object in a Motion layer.
2505.book Page 18 Wednesday, June 30, 2004 5:58 PM • Mini-Timeline: The mini-Timeline allows you to add objects to your project, to move objects in time, and to trim the duration of an object without having to go into the Timing pane, which contains the full Timeline. Toolbar Canvas Mini-Timeline Current Frame field Project Duration field The Toolbar The left side of the Toolbar contains tools for transforming objects onscreen, creating shapes, and panning and zooming the Canvas.
2505.book Page 19 Wednesday, June 30, 2004 5:58 PM The right side of the Toolbar contains icons that add filters, behaviors, and particle emitters to objects or layers, as well as show and hide the Motion interface components. Switch to File Browser Make Particles icon Switch to Inspector Tab Add Behavior icon Show/Hide Timing pane Add Filter icon Show/Hide Dashboard Show/Hide Project pane Switch to Library Tab Note: You can customize the Toolbar to better suit your own workflow.
2505.book Page 20 Wednesday, June 30, 2004 5:58 PM m To switch the time display in a project from frames to timecode: Click the stopwatch next to the Project Duration field or next to the Current Frame field. Stopwatch m Project Duration field To change the length of an existing project: Enter a new project duration in the Project Duration field (located in the lower-right portion of the Canvas adjacent to the transport controls).
2505.book Page 21 Wednesday, June 30, 2004 5:58 PM Note: You can also start and stop playback by pressing the Space bar. To quickly return to the beginning of a project, press Home. During playback, the Status Bar (located below the Toolbar) displays the project’s fps (frames per second). In the Appearance pane of Motion Preferences, you can also choose to display Color (the color the pointer is over in the Canvas) and Coordinates (the position of the pointer in the Canvas) information in the Status Bar.
2505.book Page 22 Wednesday, June 30, 2004 5:58 PM To animate the position of an object using motion sketch (during playback): 1 In the transport controls, enable Record (or press A). 2 Click Play (or press the Space bar). 3 Drag the object you want to animate in the Canvas. To animate the position and rotation of an object: 1 In the transport controls, enable Record (or press A). 2 Go to the frame where you want to set the first keyframe. 3 In the Canvas, position the object.
2505.book Page 23 Wednesday, June 30, 2004 5:58 PM Note: You can also drag the Play Range arrows to define a playback range. As you drag the In or Out point, the new In or Out point frame number is displayed. The Mini-Timeline You can use the mini-Timeline to import files, as well as to quickly slip objects in time or trim the duration of an object (without having to open the Timing pane and display the full Timeline).
2505.book Page 24 Wednesday, June 30, 2004 5:58 PM 3 Make one of the following choices from the drop menu: • Choose Composite to place the objects on top of one another. The objects are positioned in the order selected—the last object selected is placed at the top of the object list. • Choose Sequential to place the objects one after the other. The objects are positioned in the order selected—the last object selected in the File Browser is placed at the end of the sequence.
05.book Page 25 Wednesday, June 30, 2004 5:58 PM The Library categories are listed in the left column of the Library, and the subcategories appear in the right column. For example, when the Behaviors category is selected, the Behaviors subcategories (All, Basic Motion, Parameter, Particles, Simulations, Text Animation, and Text Sequence) appear in the right column. The contents of the subcategory appear in the lower pane of the Library, which is referred to as the stack.
2505.book Page 26 Wednesday, June 30, 2004 5:58 PM The following table describes the Library folders, categories, and subcategories. Library folder or category Description Behaviors category Includes the Basic Motion, Parameter, Particles, Simulations, Text Animation, and Text Sequence behavior subcategories. Filters category Includes the Blur, Border, Color Correction, Distortion, Glow, Keying, Matte, Sharpen, Stylize, Tiling, Time, and Video filter subcategories.
2505.book Page 27 Wednesday, June 30, 2004 5:58 PM Previewing Items in the Library You can preview items in the stack before bringing the item into your project. For example, in the Particle Emitters category, click a preset in the Library stack to play the particle system in the Preview area at the top of the Library tab. Some particle emitters let you drag the pointer in the Preview area to see how the emitter looks when it moves.
2505.book Page 28 Wednesday, June 30, 2004 5:58 PM In the following steps, a play range of 60 frames is set in a 300-frame project. After that, two behaviors from the Basic Motion group are applied to an object in the Canvas. The applied behaviors create a simple animation in which an image fades in and scales up. Next, the speed and simplicity of filter application is demonstrated with a color correction filter added to the object. To set a 60-frame play range: 1 In the Current Frame field, enter 60.
2505.book Page 29 Wednesday, June 30, 2004 5:58 PM When the “+” (plus) sign appears next to the pointer, the behavior can be “dropped” on the object. The Fade In/Fade Out Dashboard should appear. If the Dashboard is not displayed, press D. By default, the object’s opacity fades in from 0 percent to 100 percent over the first 20 frames of the object, and fades out from 100 percent to 0 percent over the last 20 frames.
2505.book Page 30 Wednesday, June 30, 2004 5:58 PM 2 In the Toolbar, click the Add Behavior icon, then choose Basic Motion > Grow/Shrink from the pop-up menu. Add Behavior icon The Fade In/Fade Out Dashboard is replaced by the Grow/Shrink Dashboard. Note: To select and apply behaviors and filters using the Toolbar icons, you must first select an object. 3 In the Grow/Shrink Dashboard, click the edge of the box and drag outward. The object scales up over time.
2505.book Page 31 Wednesday, June 30, 2004 5:58 PM Motion Dashboards Whenever an object is added to your project, or an effect is applied to an object, the Dashboard for that object or effect (behavior, filter, mask, text, shape, and so on) appears by default (if the Dashboard is not hidden). The Dashboard is a floating window that contains a group of commonly-adjusted parameters for the selected object or effect.
2505.book Page 32 Wednesday, June 30, 2004 5:58 PM The second image shows the Emitter tab in the Inspector. The emitter contains a single particle cell (the text object “stingray,” as shown at the bottom of the tab in the Particle Source parameter). A particle emitter can have multiple particle cells (which can include text objects, images, or shapes drawn in Motion).
2505.book Page 33 Wednesday, June 30, 2004 5:58 PM m To display the Dashboard, do one of the following: In the Toolbar, click the Dashboard icon. m Select the object or effect, then press D (or F7). Dashboard icon m To hide the Dashboard, do one of the following: Click the close button on the Dashboard. m In the Toolbar, click the Dashboard icon. m To reposition the Dashboard: Drag on a blank area of the Dashboard.
2505.book Page 34 Wednesday, June 30, 2004 5:58 PM The Inspector While the Dashboard contains the “popular” controls, think of the Inspector as the school principal—with its eye on everything. The Inspector contains all parameters— including the parameters found in the Dashboards—for all objects and effects within a project.
2505.book Page 35 Wednesday, June 30, 2004 5:58 PM The Inspector contains four tabs: Properties, Behaviors, Filters, and Object. The first three tabs—Properties, Behaviors, and Filters—are common to all objects. The fourth, the Object tab, changes depending on the object that is selected. The following sections provide a brief description of the four tabs. Properties Tab The Properties tab contains controls for the basic object properties, such as Position, Rotation, Scale, Blend Modes, Opacity, and so on.
2505.book Page 36 Wednesday, June 30, 2004 5:58 PM Behaviors Tab The Behaviors tab contains all controls for any behaviors that are applied to the currently selected object. If no behaviors are applied to the currently selected object, the Behaviors tab is empty. Filters Tab The Filters tab contains all controls for any filters that are applied to the currently selected object. If no filters are applied to the currently selected object, the Filters tab is empty.
2505.book Page 37 Wednesday, June 30, 2004 5:58 PM Note: When an image is the selected object, the Image tab is empty because all of the image parameters are displayed in the common Properties tab. Inspector Controls The parameters in the Inspector are edited by several different types of controls, such as sliders, value sliders, dials, color wells, pop-up menus, and so on. This section provides a brief description of the Inspector’s parameter controls.
2505.book Page 38 Wednesday, June 30, 2004 5:58 PM m To change values in normal increments, do one of the following: Drag left or right in the value field. m Click the decrement arrow (to the left of the field) to decrease a value, or click the increment arrow (to the right of the field) to increase a value. m If you have a three-button mouse with a scroll wheel, click in the value field and use the scroll wheel on the mouse.
2505.book Page 39 Wednesday, June 30, 2004 5:58 PM m To reset an individual parameter: Click the Animation menu icon, then choose Reset Parameter. Dials Drag a dial to control parameters such as the angle of gradients and the rotation of objects. Dial Checkboxes Use checkboxes to turn objects on and off. This applies to filters and behaviors, drop shadows, four-corner pinning, cropping, and so on.
2505.book Page 40 Wednesday, June 30, 2004 5:58 PM Color wells Use the color wells to set a color for drop shadows, shape fills, text properties, and so on. m To select a color, do one of the following: Click the color well and select a color from the Colors window. Color well Color picker modes (wheel, slider, image palette, crayons) Use to pick a color from your image. Drag the slider to lighten or darken the selected color. Drag in the color wheel to select a color.
2505.book Page 41 Wednesday, June 30, 2004 5:58 PM m Control-click a color well to display the color picker, and drag in the color spectrum to select a color. Drag here to lighten or darken the selected color. Displays original color Displays new color The Animation menu In the Inspector, notice that most of the parameters are followed by a “–” button at the end of the parameter row.
2505.book Page 42 Wednesday, June 30, 2004 5:58 PM 3 In the Properties tab, click the Animation menu in the Position parameters, then choose Add Keyframe. Animation menu A filled gray diamond appears in the Animation menu, indicating that a keyframe exists at that frame. The keyframe is set to the current position. 4 Position the object. The keyframe updates to the new position values. 5 Go to the next frame where you want to create a keyframe. 6 Choose Add Keyframe from the Animation menu.
2505.book Page 43 Wednesday, June 30, 2004 5:58 PM The Project Pane When media (such as movies, images, and image sequences) is brought into Motion, it becomes an object in a layer. Shapes, text, and masks created within Motion also become objects in a layer. Any imported media is added to the Media tab, which acts as a sort of storage unit for your media. Shapes, text, and other objects created within Motion are not added to the Media tab.
2505.book Page 44 Wednesday, June 30, 2004 5:58 PM m Choose Window > Show Project Pane (or press F5). The Project pane appears. The Project pane contains three tabs that allow you to view the objects in your project. Layers Tab The Layers tab displays the structure of your project. The main building block of a project is a layer. A layer contains objects and the behaviors and filters applied to those objects. Filters and behaviors can also be applied to layers.
2505.book Page 45 Wednesday, June 30, 2004 5:58 PM Audio The Audio tab allows you to control the volume (gain) and panning (balance) of an audio track, as well as turn tracks on or off, solo a track, add and remove tracks, and search for tracks. For more information, see “Audio” on page 162. Using the Layers Tab Use the Layers tab to assist in building your project.
2505.book Page 46 Wednesday, June 30, 2004 5:58 PM Adding Media to the Layers Tab Any media you have dragged to the Canvas from the Library (or imported by choosing File > Import) appears in the Layers tab. You can also drag media directly to the Layers tab. To add media directly to the Layers tab: 1 In the File Browser or Library, select the file you want to import. 2 Drag the file to the Layers tab, and do one of the following: • To add the file to an existing layer, position the file over the layer.
2505.book Page 47 Wednesday, June 30, 2004 5:58 PM • To add the file to a new layer, position the file over the lower, empty portion of the Layers list. When a black outline appears around the whole Layers list, release the mouse button. • To add the file in between the existing objects of a layer, position the file over the two existing objects. When the position indicator appears, release the mouse button.
2505.book Page 48 Wednesday, June 30, 2004 5:58 PM To swap media in the Layers tab: 1 In the File Browser, select the file you want to use to replace the existing object. 2 Drag the file to the Layers tab, and position the file over an existing object. When a black outline appears around the object, release the mouse button. The object is replaced with the new file. Note: Media that is replaced in the Layers tab is not replaced or removed from the Media tab.
2505.book Page 49 Wednesday, June 30, 2004 5:58 PM m To select multiple objects, do one of the following: To select consecutive objects, drag in the empty space between the thumbnail preview and the object icon and name. You can also press Shift and click the uppermost and lowermost object you want in the list. m Press Shift and select the objects. m To select objects that are not consecutive, press Command, then select the objects.
2505.book Page 50 Wednesday, June 30, 2004 5:58 PM m m 50 To move an object beneath an object with an applied behavior or filter: In the Layers tab, click the name of the object or layer and drag up or down in the list with the pointer to the left of the behavior or filter icons. When the position indicator appears where you want to place the object or layer, release the mouse button.
2505.book Page 51 Wednesday, June 30, 2004 5:58 PM As shown in the following image, a new layer is created from the repositioned object. Turning Layers and Objects On or Off You can turn layers and objects on or off in the Layers tab. An object that is turned off is invisible to the composite. Objects that are turned off are not rendered in your final project. m To turn an object on or off: In the Layers tab, click the activation checkbox. A checkmark in the box indicates an active object.
2505.book Page 52 Wednesday, June 30, 2004 5:58 PM m To lock and unlock a layer or object: In the Layers tab, click the lock icon for the object you want to lock or unlock. In the Canvas, a red line appears around the edge of a locked object. Unlocked Locked Renaming Layers and Objects When files are imported, Motion uses the filename as the object or layer name. You can rename the objects in the Layers tab. To rename a layer or object: 1 In the Layers tab, double-click the name of the object.
2505.book Page 53 Wednesday, June 30, 2004 5:58 PM Note: If you do not select another layer to paste the object into, the object is pasted into its original layer. Use the Edit menu, the shortcut (Control-click) menu, and the Canvas for additional Duplicate, Cut, and Delete commands. In addition to the Layers tab, you can also copy, duplicate, and delete objects in the Canvas and Timeline.
2505.book Page 54 Wednesday, June 30, 2004 5:58 PM The grouped objects are nested into a layer within the original layer. The new layer is named “Layer” by default. The grouped objects are nested into a new layer. Note: You can also group layers. When two or more layers are grouped, a new layer is created that contains the original layers. You cannot group objects from different layers. m To ungroup grouped objects: Choose Object > Ungroup (or press Command+Option+G).
2505.book Page 55 Wednesday, June 30, 2004 5:58 PM The default blend mode is Normal. An object with a Normal blend mode above another object in the list merely sits over that image with its normal colors. When a different blend mode is applied to the upper object, the color pixels in the top image are blended with the lower image in a certain way.
2505.book Page 56 Wednesday, June 30, 2004 5:58 PM m To adjust the object opacity: Drag the Opacity slider. m To select a blend mode: Click the Blend Mode button and choose a mode from the pop-up menu. Note: You can also Control-click an object in the Layers tab or Canvas and choose a blend mode, or choose Object > Blend Mode > (blend mode). The objects within a layer can be set to different blend modes, and the layer itself can also be set to a blend mode.
2505.book Page 57 Wednesday, June 30, 2004 5:58 PM 2 Select a transform mode. The object transform modes are also available in the onscreen controls in the Canvas. To display the modes, Control-click a selected object, then choose an object transform mode from the shortcut menu. For all of the following transforms, ensure that the object is selected (a bounding box appears around a selected object in the Canvas). You can select an object in the Layers tab or directly in the Canvas.
2505.book Page 58 Wednesday, June 30, 2004 5:58 PM Note: To lock the movement of the object to the X or Y axis, or to 90-degree angles, press Shift while you drag the object. To lock the movement of multiple objects, first select the objects, release the mouse button, click one of the selected objects, then press Shift and move the objects. m To rotate the object: Drag the rotation handle. Note: To rotate the object in 45-degree increments, press Shift while rotating the object.
2505.book Page 59 Wednesday, June 30, 2004 5:58 PM 2 To edit the shadow Blur and Opacity parameters, use the object Dashboard. To edit all shadow properties, including color, use the Properties tab in the Inspector. The shadow is applied to the object as a whole. If the object contains an alpha channel, the alpha channel is respected by the drop shadow.
2505.book Page 60 Wednesday, June 30, 2004 5:58 PM The following table briefly describes the alignment tools in the View options. Canvas View menu Function Grid Displays a grid in the Canvas. You can change the grid color and spacing in the Alignment section of Canvas Preferences. Guides Enabled by default, allow you to drag out and manually position a horizontal or vertical guide. To create a guide, the Rulers must also be enabled in the View menu.
2505.book Page 61 Wednesday, June 30, 2004 5:58 PM 2 The Playground 2 The playground lets you explore the possibilities of your project. Throw objects about, or easily create complex motion with simulation behaviors. Add filters for that extra wow factor, or combine filters and behaviors for unique new looks. Let your mind go, and your motion graphics project will follow. About Behaviors Behaviors are the heart of Motion.
2505.book Page 62 Wednesday, June 30, 2004 5:58 PM With the exception of the Text Sequence behaviors, the duration of a behavior is the length of the object to which it is applied. Although behaviors are designed for more flexible graphics, you can shorten or stop the effect of the Basic Motion behaviors (such as Grow/Shrink and Throw) by shortening their durations in the Timeline. For more information on editing behaviors in the Timeline, see “Modifying Behaviors in the Timeline” on page 102.
2505.book Page 63 Wednesday, June 30, 2004 5:58 PM Parameter behaviors: Parameter behaviors can be applied to any object parameter, and their effects are limited to just that parameter. For example, you can apply the Oscillate parameter behavior to the Opacity parameter of an object to make the object rhythmically flash on and off. The same Parameter behavior can be added to different parameters, resulting in completely different effects.
2505.book Page 64 Wednesday, June 30, 2004 5:58 PM Text Animation and Text Sequence behaviors: Text Animation and Text Sequence behaviors animate the parameters specific to text titling effects. For example, the Crawl Left behavior automatically animates a text object to move across the screen from right to left, while the Type On behavior reveals a text object one character at a time. The Text Sequence behaviors allow you to create animations that move through the characters of a text object over time.
2505.book Page 65 Wednesday, June 30, 2004 5:58 PM m Select the object to which you want to apply a behavior. Then, click the Add Behavior icon in the Toolbar and choose the behavior you want to apply. Add Behavior icon To apply a behavior to multiple objects: 1 Select all of the objects to which you want to apply the behavior. 2 Do one of the following: • Choose a behavior from the Add Behavior pop-up menu in the Toolbar. • Select a behavior in the Library, then click Apply in the Preview area.
2505.book Page 66 Wednesday, June 30, 2004 5:58 PM Note: Generally, you can change the stacking order of the Simulation behaviors with no effect on the animation. Changing the stacking order of other behaviors, however, does affect the result. These include many of the Parameter behaviors, such as Negate and Average, and the Snap Alignment to Motion behavior (from the Basic Motion subcategory).
2505.book Page 67 Wednesday, June 30, 2004 5:58 PM For more information on duplicating, removing, locking, and renaming behaviors, see Chapter 5, “Using Behaviors,” in Motion Help. Working With Basic Motion Behaviors The following section provides a quick introduction to working with the Basic Motion behaviors. In the first example, an object is animated to move across the screen using the Throw behavior. In the second example, an object is animated to spin while traveling along a set path.
2505.book Page 68 Wednesday, June 30, 2004 5:58 PM 2 Set the rate and direction of the Throw. • Click in the center of the Dashboard and drag outward in the direction you want the object to move. • The smaller the arrow, the slower the rate of the Throw. To increase the rate of the Throw once the arrow is dragged to the limit, drag the Zoom slider to zoom out of the Dashboard controls then drag again.
2505.book Page 69 Wednesday, June 30, 2004 5:58 PM It is important to remember that applying a behavior to an object applies a rate of change to an object’s parameters, and does not create editable keyframes. For fine tuning, many behaviors can be converted to keyframes. For more information, see “Converting Behaviors to Keyframes” on page 118. You can affect some of the Basic Motion behaviors in the Timeline.
2505.book Page 70 Wednesday, June 30, 2004 5:58 PM Important: As mentioned previously, changing the duration of a behavior in the Timeline does not have the same effect on all behaviors. While you can shorten, stop, or change the rate of the Basic Motion behaviors in the Timeline, you cannot stop or change the motion of a Simulation behavior in the Timeline. However, you can affect the rate of a Simulation behavior by changing its duration in the Timeline. Remember, you cannot control “Mother Nature.
2505.book Page 71 Wednesday, June 30, 2004 5:58 PM The object stops at the frame where the Stop behavior bar starts. For more information on working with Parameter behaviors, see “Using Parameter Behaviors” on page 84. Using the Motion Path Behavior The Motion Path behavior is an easy way to create predictable motion (without having to use keyframes) by adding an editable motion path for an object to follow.
2505.book Page 72 Wednesday, June 30, 2004 5:58 PM m To change the shape of the path, do one of the following: Click either point at the end of the path to change the path’s start and end location. m To create Bezier handles at the end points, Command-click and drag away from the point. Flattening out the motion path at a control point slows the animation of the object as it approaches the point. This is also known as ease. m To add points to the path, Option-click or double-click the path.
2505.book Page 73 Wednesday, June 30, 2004 5:58 PM m To change the acceleration or deceleration at the start or end of the path: In the Motion Path Dashboard (or Inspector), click the Speed pop-up menu, then choose one of the following: • • • • To make the object travel at a constant speed on the path, choose Linear (default). To make the object slowly begin its path animation, choose Ease In. To make the object slowly end its path animation, choose Ease Out.
2505.book Page 74 Wednesday, June 30, 2004 5:58 PM The two applied behaviors work together so that the object spins as it travels along the motion path. Working With Simulation Behaviors The following section provides a quick introduction to working with the Simulation behaviors. In the first example, a group of objects is animated to fall and bounce on the bottom of the screen using the Gravity and Edge Collision behaviors.
2505.book Page 75 Wednesday, June 30, 2004 5:58 PM The motion path created by the Gravity behavior appears in the Canvas, and the object falls. Because the object is applied to the group, all objects in the group fall at the same rate. If Gravity is applied to only the small, orange center circle, for example, only the orange circle falls. 2 To increase the rate of the falling object, drag the Acceleration slider in the Gravity Dashboard or Inspector toward the right.
2505.book Page 76 Wednesday, June 30, 2004 5:58 PM When the Edge Collision behavior is applied to a group, and the Affect Objects parameter is disabled, the entire grouped is “bounced” off the bottom of the screen at the anchor point of the group. When the Edge Collision behavior is applied to a group and Affect Objects is turned off, the layer (group) bounces at the edge of the screen at its anchor point. 3 In the Edge Collision Dashboard (or Inspector), turn on Affect Objects.
2505.book Page 77 Wednesday, June 30, 2004 5:58 PM When the bottom edge of each object hits the lower edge of the screen, the object is deflected and bounces upward. As the project plays, each object bounces up and down. Other Simulation behaviors that also include the Affect Objects parameter include Align To Motion, Drag, Gravity, Random Motion, and Rotational Drag. Using the Orbit Around and Vortex Behaviors The Orbit Around behavior makes an object orbit around another object in a perfect circle.
2505.book Page 78 Wednesday, June 30, 2004 5:58 PM To use the Orbit Around behavior: 1 Apply the Orbit Around behavior to the object (or group of objects) that you want to circle around a target object. In this case, the Orbit Around behavior is applied to the group of objects (circles) in the project. The orange circle in the center of the Canvas is in a separate layer from the rest of the objects. When the Orbit Around behavior is first applied, no animation occurs.
2505.book Page 79 Wednesday, June 30, 2004 5:58 PM 2 Do one of the following: • In the Layers tab, click-drag the name of the object that you want the other objects to circle around, and drop it in the Object well of the Orbit Around Dashboard or Inspector. • In the Layers tab, drag the name of the object that you want the other objects to circle around, and drop it onto the Orbit Around behavior.
2505.book Page 80 Wednesday, June 30, 2004 5:58 PM 3 In the Orbit Around Dashboard (or Inspector), make sure Affect Objects is turned on. When Affect Objects is turned on, all objects within the layer move around the target object. Other Simulation behaviors that also use a target object include Attracted To, Drift Attractor To, Repel From, and Spring.
2505.book Page 81 Wednesday, June 30, 2004 5:58 PM By default, Related Objects is selected in the Vortex Affect parameter. Because the circle is the only object in the layer, nothing happens. When Related Objects is selected, all objects that exist in the same layer as the object to which the Vortex behavior is applied move around the object to which the Vortex behavior is applied.
2505.book Page 82 Wednesday, June 30, 2004 5:58 PM To set only the circles to vortex using Specific Objects: 1 In the Dashboard or Inspector, set the Vortex Affect parameter to Specific Objects (without moving any objects). 2 If it is not displayed, show the Behaviors tab in the Inspector. In the Vortex parameters, an Affected Objects list appears. To apply the vortex to specific objects, drag the objects from the Layers tab to the Affected Objects list.
2505.book Page 83 Wednesday, June 30, 2004 5:58 PM Any objects that are added to the Affected Objects list swirl around the object to which the Vortex behavior is applied. To set only the circles to swirl using Related Objects: 1 In the Layers tab, move the object with the applied Vortex behavior into the layer that contains the objects you want to swirl around the object. 2 In the Dashboard or Inspector, set the Vortex Affect parameter to Related Objects.
2505.book Page 84 Wednesday, June 30, 2004 5:58 PM Behaviors vs. Keyframes Behaviors do not add keyframes to object parameters. Instead, a behavior automatically generates a range of values that are applied to an object’s parameters, which animate the object over the duration of that behavior. With the exception of the Text Sequence behaviors, the duration of a behavior is the length of the object to which it is applied. Keyframes, however, apply specific values directly to a parameter.
2505.book Page 85 Wednesday, June 30, 2004 5:58 PM In the first example, the Orbit Around behavior is applied to the upper dolphin object, and the lower dolphin object is set as the target object. The behavior animation path appears in red and forms a perfect circle around the lower dolphin object. To show the animation path of a selected object, make sure Animation Path is selected in the View pop-up menu.
2505.book Page 86 Wednesday, June 30, 2004 5:58 PM In the second image, the Drag parameter of the Orbit Around behavior is adjusted in the Inspector. After the Drag parameter is modified, the circle animation path becomes a spiral. In the last image, the Oscillate parameter behavior is applied to the Drag parameter of the Orbit Around behavior. The spiral animation path becomes more irregular. The effect of a Parameter behavior on an object depends on the parameter to which it is applied.
2505.book Page 87 Wednesday, June 30, 2004 5:58 PM For example, applying the Oscillate Parameter behavior to the Scale parameter makes the size of the object vary between alternate extremes, from very small to very large. As shown in the following images, if you apply the Oscillate behavior to the Position parameter of an object that is moving on a straight path across the screen, the object travels in graceful waves up and down the newly-shaped path.
2505.book Page 88 Wednesday, June 30, 2004 5:58 PM 3 Control-click the parameter (such as Position), then choose a Parameter behavior (such as Oscillate) from the Parameter behavior shortcut menu. To apply a Parameter behavior to an object parameter using drag and drop: 1 In the Library, select the Parameter behavior you want to apply. 2 Drag the selected Parameter behavior to the object in the Canvas (or Layers tab). 3 In the Behaviors tab of the Inspector, expand the Parameter behavior.
2505.book Page 89 Wednesday, June 30, 2004 5:58 PM 4 In the Apply To parameter (the last parameter in the list), choose the property to which you want to apply the parameter from the Go pop-up menu. Notice in the Go pop-up menu that the Parameter behavior can be applied to any text parameter. The parameters that appear in the Go pop-up menu depend on the object to which the Parameter behavior is applied.
2505.book Page 90 Wednesday, June 30, 2004 5:58 PM Where Parameter Behaviors Appear Once a Parameter behavior has been applied to an object, the small behavior icon appears in the Animation menu to the right of the affected parameter in the Properties, Behaviors, or Filters tab. This indicates at a glance that a behavior is influencing that parameter. Like other behaviors, the Parameter behaviors also appear in the Layers tab and the Timeline.
2505.book Page 91 Wednesday, June 30, 2004 5:58 PM m To remove a Parameter behavior: In the Layers tab or Timeline, select the behavior, then do one of the following: • Choose Edit > Delete. • Control-click the behavior, then choose Delete from the shortcut menu. • Press Delete. Note: You can also select a behavior in the Behaviors tab, then press Delete. Working With Filters Filters are the spice of a motion graphics project’s life (or were until behaviors came along).
2505.book Page 92 Wednesday, June 30, 2004 5:58 PM Animating Filters With Parameter Behaviors This section provides a quick overview of applying Parameter behaviors to a filter. In this example, a Bloom filter is applied to an object and its Brightness parameter is keyframed. Then, a Randomize Parameter behavior is applied to the Threshold parameter of the Bloom filter. To apply a Bloom filter to an object: 1 In the Library, select the Filters category, then the Glow subcategory.
2505.book Page 93 Wednesday, June 30, 2004 5:58 PM 4 Go to the last frame of the filter animation, and set the last Brightness value. This example uses a Brightness value of 56. 5 Play the project. The image brightens over the duration of the animation. 6 Disable Record (press A). To apply a Parameter behavior to the Threshold parameter of the Bloom filter: 1 In the Filters tab of the Inspector, select the Threshold parameter of the Bloom filter.
2505.book Page 94 Wednesday, June 30, 2004 5:58 PM 3 Click the behavior icon (Animation menu), then choose Randomize. The Behaviors tab is selected and the Randomize parameters are displayed. 4 Adjust the Randomize settings. 5 Click the Filters tab and play the project (press the Space bar). Rather than a smooth transition between the Brightness values, the Threshold values are randomly animated.
2505.book Page 95 Wednesday, June 30, 2004 5:58 PM 3 Your No. 2 Pencil 3 Sharpen those pencils! It’s time to get serious with the full-featured Timeline and flexible keyframing options that allow you to create and edit precision animation in a friendly, clean curve editor.
2505.book Page 96 Wednesday, June 30, 2004 5:58 PM m To display the Timeline, do one of the following: In the Toolbar, click the Timing icon (in the upper-right corner of the interface). Timing icon m Drag the drag handle directly below the Play button in the transport controls. Drag handle m Choose Window > Layouts > Cinema. m Press F6. Cinema layout is ideal for use with Cinema displays. This layout moves the Inspector to the right side of the interface and shows the Timeline and Layers tab.
2505.book Page 97 Wednesday, June 30, 2004 5:58 PM The Timeline In the Timeline, each object is represented by a colored bar that sits on a gray, horizontal track. The object type is identified by the color of its bar. You can show or hide the tracks for layers and objects or audio, as well as masks, behaviors, and filters applied to those layers and objects. You can also display keyframes in the Timeline, which can be moved or deleted.
2505.book Page 98 Wednesday, June 30, 2004 5:58 PM In the second image, the Show Behaviors and Show Filters options are enabled. Each image has an applied behavior (Fade In/Fade Out), and the text object has an applied text behavior (Text Tracking) and filter (Directional Blur). The bar color for behaviors and filters is different. Note: You can modify the way objects are displayed in the Timeline in the Appearance group of Motion Preferences.
2505.book Page 99 Wednesday, June 30, 2004 5:58 PM Slip: When an object is slipped, the content of the object is changed without affecting its location in the track or duration. In other words, a slip allows you to use a different portion of a clip without changing its duration or location in time. An object can only be slipped after the object has been trimmed. Since there is no footage, behaviors and filters cannot be slipped.
2505.book Page 100 Wednesday, June 30, 2004 5:58 PM To trim an object by setting the In or Out point: 1 Select the object you want to trim. 2 Move the playhead to the frame of the new In or Out point. 3 Choose Mark > Mark In (or press I) to set a new In point or choose Mark > Mark Out (or press O) to set a new Out point. The clip’s duration is trimmed to the new In and Out points. To slip an object: 1 Position the pointer above the object you want to slip, and press Option.
2505.book Page 101 Wednesday, June 30, 2004 5:58 PM If you drag a single object to the Timeline, different drop options appear when you drag the file over a layer track, or within a layer track. If you drag to the layer track, the drop options are Composite, Insert, and Overwrite. If you drag to an object within a layer, the Exchange option is added to the drop options.
2505.book Page 102 Wednesday, June 30, 2004 5:58 PM The new object is inserted into the track. The original object bar is split into two bars, and the frames that follow the inserted object are pushed out later in time. For more information on using the drop menus, see Chapter 4, “Using the Timeline,” in Motion Help. Modifying Behaviors in the Timeline The Timeline can be an important tool for modifying behaviors.
2505.book Page 103 Wednesday, June 30, 2004 5:58 PM Important: You can trim the Out point of the Basic Motion behaviors so that the behavior’s effect stops before the end of the object. This rule does not apply to the Simulation behaviors, however. Changing the duration of a Timeline bar for a Simulation behavior does stop the “active” force on the object, but does not stop the motion.
2505.book Page 104 Wednesday, June 30, 2004 5:58 PM Record button: When the Record button is enabled (in the transport controls), any change in value to a parameter—whether in the Canvas, a Dashboard, or the Inspector—results in the creation of a keyframe. Animation menu: Located in the Inspector, this menu allows you to set explicit keyframes at any time, for any parameter. For each keyframe, you add a keyframe first, then adjust the parameter.
2505.book Page 105 Wednesday, June 30, 2004 5:58 PM 3 In the Canvas, click the View menu and make sure that Animation Path is enabled. 4 In the Canvas, position the object. The first keyframe is created and appears in the center of the object. 5 Go to the frame where you want the animation to end. 6 Move the object to its end position. As you drag, the animation path is drawn and the second keyframe is created. Chapter 3 Your No.
2505.book Page 106 Wednesday, June 30, 2004 5:58 PM Note: Do not drag the actual keyframe (the red point) to move the object. Rather than creating a new keyframe, you merely reposition the existing keyframe. 7 Disable Record (press A). Using Animation Paths An animation path displays the motion of an object over time in the Canvas. Once you have created an animation that transforms an object (with two or more keyframes), you can change the shape of the path to modify the object’s animation.
2505.book Page 107 Wednesday, June 30, 2004 5:58 PM m To reset the control points on an animation path: Command-click the point. This creates a Linear point—continue dragging to create new tangent handles. m To break tangent handles: Press Command and drag the end of a handle. m To reset tangent handles: Press Command and drag the end of a handle. m To delete a control point: Select the point and press Delete, or Control-click the point, then choose Delete from the shortcut menu. Chapter 3 Your No.
2505.book Page 108 Wednesday, June 30, 2004 5:58 PM Keyframe Interpolation Basics As mentioned in “Keyframe Basics” on page 103, interpolation is what Motion uses to set the parameter values for the frames in between keyframes. Since keyframes are set to specific values, the in-between frames must be “filled in” with values to create a smooth transition between the two keyframes.
2505.book Page 109 Wednesday, June 30, 2004 5:58 PM The Keyframe Editor, located in the Timing pane, is not displayed by default. m To show the Keyframe Editor: In the Timing pane, click the Keyframe Editor tab. By default, the animated parameters are listed in the parameter list and their curves are displayed in the Keyframe Editor. In the parameter list, only the Position parameters appear. This is because only the position of the object is animated in this example.
2505.book Page 110 Wednesday, June 30, 2004 5:58 PM You can also create and save custom curve sets. For more information, see Chapter 6, “Keyframes and Curves” in Motion Help. Note: You can also choose to show specific parameters in the Keyframe Editor by using the Animation menu in the Inspector. Modifying Keyframes The Keyframe Editor is an ideal environment for manipulating your keyframes because you can see their values, placement in time, and how the changes you make affect the animation curves.
2505.book Page 111 Wednesday, June 30, 2004 5:58 PM To add a keyframe: 1 Position the pointer over the animation curve you want to modify, then press Option. 2 When the pointer turns into a +, click the curve. Keyframe can be added A keyframe is added to the curve. Added keyframe 3 Drag the keyframe to set a new value. m To delete a keyframe, do one of the following: Select the keyframe on the curve, then press Delete.
2505.book Page 112 Wednesday, June 30, 2004 5:58 PM Checking Your Selection Like the in-context Inspector and Dashboards, the parameters displayed in the Keyframe Editor depend on what objects are selected (when Active or Animated are selected from the Show menu). If you select one object in the Layers tab, Canvas, or Timeline, only parameters for that object are accessible in the Keyframe Editor.
2505.book Page 113 Wednesday, June 30, 2004 5:58 PM To record fewer keyframes: 1 Choose Mark > Recording Options. The Recording Options dialog appears. 2 Select from the following recording options: • Off: Creates a keyframe at every frame (in which movement is applied). • Reduced: Simplifies the curve. • Peaks Only: Creates keyframes at only the frames with the greatest shifts in value, for example, when a change in direction occurs.
2505.book Page 114 Wednesday, June 30, 2004 5:58 PM To animate the opacity of an object using the Dashboard: 1 In the transport controls, enable Record (press A). 2 Select the object that you want to animate. 3 Go to the frame in which you want to begin the fade in. 4 In the object Dashboard, drag the Opacity slider to 0. An Opacity keyframe is created. 5 Go to the frame in which you want to end the fade in. 6 Drag the Opacity slider to 100. A second Opacity keyframe is created.
2505.book Page 115 Wednesday, June 30, 2004 5:58 PM A gray diamond that represents the keyframe appears to the right of the parameter name. Whenever you are parked on a frame that contains a keyframe, the diamond appears filled in. The gray diamond indicates an Opacity keyframe (with a value of 0 percent) at the current frame. 5 Go to the frame in which you want to end the fade in. 6 Drag the Opacity slider to 100 (or enter 100 in the value field).
2505.book Page 116 Wednesday, June 30, 2004 5:58 PM 5 Click the Animation menu icon, then choose Add Keyframe. An Opacity keyframe is created. 6 Go to the frame where you want to end the fade in. 7 Click the Animation menu icon, then choose Add Keyframe. Important: As mentioned earlier, a second keyframe must be added before you adjust the parameter of the object. If you adjust the parameter before adding a second keyframe, you shift the entire curve (because Record is disabled).
2505.book Page 117 Wednesday, June 30, 2004 5:58 PM In the following example, the Kaleidoscope filter is applied to a single image. The filter is animated over time to create a moving pattern generated from the single image. Original image To keyframe a filter: 1 Apply the Kaleidoscope filter (located in Library > Filters > Tiling) to an object. 2 Go to frame 1 and enable Record (press A). 3 In the Kaleidoscope Dashboard (press D), set a value for the Segment Angle and Offset Angle.
2505.book Page 118 Wednesday, June 30, 2004 5:58 PM The animated filter makes it seem like you are looking at the image through a rotating kaleidoscope. Image with keyframed Kaleidoscope filter applied Note: You can also animate filters using the same methods discussed in “Keyframing in the Dashboard” on page 113 and “Keyframing in the Inspector” on page 114. Converting Behaviors to Keyframes Behaviors are best suited for fluid effects in which precise timing is not a requirement.
2505.book Page 119 Wednesday, June 30, 2004 5:58 PM If a behavior can be baked, the Convert to Keyframes command appears in the Object menu when the behavior is selected. If the Convert to Keyframes command is dimmed, the keyframes cannot be generated from the behavior. In the following example, keyframes are created from the Fade In/Fade Out and Spin behaviors that are applied to an object. To convert an applied behavior to keyframes: 1 Select the object with the applied behaviors.
2505.book Page 120 Wednesday, June 30, 2004 5:58 PM The curves for the converted keyframes appear in the graph area of the Keyframe Editor. 6 Edit the animation curve as necessary. For more information on working with the Keyframe Editor, see “Using the Keyframe Editor” on page 108. 120 Chapter 3 Your No.
2505.book Page 121 Wednesday, June 30, 2004 5:58 PM 4 Arts and Letters 4 Take the powerful Motion text tools for a spin, and then introduce yourself to the amazing possibilities of particles. Creating and Animating Text Text is the first love of many motion graphics artists. Edgy, bold, romping, or graceful, the right blend of fonts and animation can set the mood for your project. In Motion, text is created directly in the Canvas, or in the Text Editor of the Text tab in the Inspector.
2505.book Page 122 Wednesday, June 30, 2004 5:58 PM Text behaviors are ideal for interactively designing titles and other text animations— you don’t have to set keyframes, wait for a preview, and play the preview. You can apply a Text Animation or Text Sequence behavior to a text object while your project plays back, as well as make interactive adjustments to the behavior parameters. Like other behaviors, text behaviors are applied at the beginning of the text object.
2505.book Page 123 Wednesday, June 30, 2004 5:58 PM 3 In the Still Images & Objects group, set the Create Objects At parameter to Start of project. Select “Start of project” to create objects at the first frame of the project, regardless of the current frame. To add text to your project in the Canvas: 1 In the Layers tab, select the layer to which you want to add text. 2 In the Toolbar, click the Text tool (or press T). Text tool 3 Click in the Canvas, then begin typing.
2505.book Page 124 Wednesday, June 30, 2004 5:58 PM 5 If there is no Dashboard present, press D to display the text object Dashboard. The Text Dashboard contains the following commonly used text controls: • • • • • • • • • Opacity Blend Mode Family Typeface Color Size Tracking Line Spacing Alignment The complete set of text parameters, including the Dashboard parameters, is located in the Text Inspector.
2505.book Page 125 Wednesday, June 30, 2004 5:58 PM m Select the text object, and display the Inspector. In the Format pane of the Text tab, edit the text in the Text Editor (at the bottom of the Format pane). Text Editor To preview different font families for a text object in the Canvas: 1 Select the text object. 2 In the Dashboard or Text Format pane, click the Family pop-up menu arrow. The font family list appears.
2505.book Page 126 Wednesday, June 30, 2004 5:58 PM To modify characters within a text object: 1 Click the Text tool (press T). 2 In the text object, drag to select the characters you want to modify. 3 Use the Dashboard or Inspector to modify the selected characters. Editing Text Style While you can use the Dashboard to change the color of a text object, the text Style pane contains controls to change the fill of a text object and to adjust its opacity and softness.
2505.book Page 127 Wednesday, June 30, 2004 5:58 PM Note: To select a color from the Canvas (or anything on your computer’s desktop), click the Color Picker tool in the Colors window, position the tool over the color, then click. Applying a Gradient to a Text Object In the Style pane of the Text tab, you can create and animate gradient fills for text objects. To create a text object gradient: 1 Select the text object. 2 In the Style pane, choose Gradient from the “Fill with” pop-up menu.
2505.book Page 128 Wednesday, June 30, 2004 5:58 PM To change gradient colors: 1 Click the Gradient disclosure triangle to display the Gradient Editor. Distribute Tags button Transparency tag Transparency bar Color bar Reverse Tags button Location control (small carat) Color tag Gradient type (Linear or Radial) Angle controls 2 To change the color of a gradient tag, do one of the following: • Double-click a gradient color tag. The Colors window appears.
2505.book Page 129 Wednesday, June 30, 2004 5:58 PM To save a custom gradient to the Library: 1 Click the Gradient Library pop-up menu, then choose Save Gradient. Gradient Library pop-up menu 2 In the Save Preset To Library dialog, type the preset name, then click Save. The preset is added to the Gradients category in the Library. The next time you apply a preset gradient from the Gradient Library, the new gradient appears in the preset list.
2505.book Page 130 Wednesday, June 30, 2004 5:58 PM m m To apply a behavior to a text object, do one of the following: In the Library, select the Behaviors category. Click the Text Animation or Text Sequence subcategory, then select a behavior from the stack. Drag the behavior to a text object in the Canvas, Layers tab, or Timeline. Select the text object, click the Add Behavior icon in the Toolbar, then choose a behavior from the Text Animation or Text Sequence submenu.
2505.book Page 131 Wednesday, June 30, 2004 5:58 PM Note: For information on using filters, see “Working With Filters” on page 91. For information on animating filters, see “Keyframing Filters” on page 116. Applying Behaviors to Text Objects Since text objects are like other objects in Motion, you can apply any behavior type to a text object, such as Basic Motion behaviors. You can also apply a combination of text behaviors with the other behavior types.
2505.book Page 132 Wednesday, June 30, 2004 5:58 PM To apply the Text Tracking text behavior: 1 In the transport controls, click Play (or press the Space bar). 2 From the Library, drag the Text Tracking behavior from the Text Animation subcategory to the text object. The text tracking is animated and the Tracking Dashboard (press D) appears. You can adjust the Tracking rate in the Dashboard or Inspector. As the project plays, the animated Tracking values are visible in the Format pane of the Inspector.
2505.book Page 133 Wednesday, June 30, 2004 5:58 PM Text Behaviors vs. Keyframes The Text Tracking behavior generates a range of values in the Tracking parameter without creating any keyframes. To create an animation in which the tracking must hit distinct values at specific frames, use keyframing rather than a behavior. To keyframe the Tracking parameter of a text object: 1 Select the text object. 2 Go to the frame where you want to start the tracking animation. 3 Enable Record (press A).
2505.book Page 134 Wednesday, June 30, 2004 5:58 PM The following example shows how to use the Sequence behavior to animate the Opacity and Scale parameters of a text object in sequence. Original image and text objects To add the Sequence behavior: 1 Select the text object. 2 From the Library, drag the Sequence behavior from the Text Animation subcategory to the text object. The Sequence Dashboard appears and the behavior is added to the text object in the Layers list.
2505.book Page 135 Wednesday, June 30, 2004 5:58 PM In the Canvas, the Sequence bounding box appears. Before any animation occurs, you must explicitly add a parameter to the behavior from within the Inspector. Until a parameter is added, Dashboard adjustments have no effect. To use the Sequence behavior: 1 With the Sequence behavior selected, display the Behaviors tab in the Inspector.
2505.book Page 136 Wednesday, June 30, 2004 5:58 PM The second group of parameters is the Sequence Control group, which includes options for setting the direction of the animation, whether the animation is applied per character, per word, or per text object, and so on. Add or Remove parameters Sequence Control group 2 In the Parameter row, click the Add button, choose Format, then Scale from the submenu.
2505.book Page 137 Wednesday, June 30, 2004 5:58 PM Note: Often, you can enter values larger than a parameter’s slider allows by typing in the value slider. 4 Click the Play button (or press the Space bar). The first character begins at 100 percent, scales up to 500 percent, and then scales back down to 100 percent. The animation sequence moves through the text object. The animation cycles through each character because the Select parameter is set to Character by default.
2505.book Page 138 Wednesday, June 30, 2004 5:58 PM As the animation sequences through the text object, small white lines travel with the animation. These lines represent selection—whatever is in between the two solid white lines is the current selection, and receives the full effect of the animation. The soft line represents the selection falloff, and “leads” the next character into the animation. Selection indicators You can customize and animate the location of the selection.
2505.book Page 139 Wednesday, June 30, 2004 5:58 PM Notice that each character fades in and settles before the next character’s animation begins. To create a softer transition between each character, you can adjust the Spread parameter. m To adjust the Spread parameter: In the Sequence Behaviors tab, drag the Spread slider (or type a value in the value slider field). This example uses a Spread value of 3. For more information on the Text Sequence behavior, see Chapter 7, “Using Text,” in Motion Help.
2505.book Page 140 Wednesday, June 30, 2004 5:58 PM As with any object in Motion, you can keyframe the particle emitter and particle cell parameters. For example, you can keyframe the position of a particle emitter so that the emitter moves across the screen spreading sparkles like a magic wand. Particle Systems Motion particle systems use objects, referred to as cells, as the mold for the particles that are generated by the emitter. You can use nearly any object in Motion as a source for a particle cell.
2505.book Page 141 Wednesday, June 30, 2004 5:58 PM For even more variation, you can apply Parameter behaviors to particle cells. Combining the power of behaviors with the inherent particle system parameters allows you to easily create complex, limitless effects that are nearly impossible to accomplish any other way. Adding Particles to Your Project There are two ways to add particles to a project. The first method—and the easiest—is to apply a preset particle effect from the Library into your project.
2505.book Page 142 Wednesday, June 30, 2004 5:58 PM The selected particle system is added to your project at the center of the Canvas. If no layer is selected when the particle emitter is added to a project, a new layer is created for the particle system in the Layers tab and Timeline. If a layer is selected when the emitter is added, the particle system is added to the selected layer. m Drag the particle system to the Canvas at the position where you want it to appear.
2505.book Page 143 Wednesday, June 30, 2004 5:58 PM In the following basic example, a single, 120 x 240 pixel image called “jelly” is used as a particle source over a background image to create a smack of jellyfish. Note: “Smack” is the animal group name for jellyfish. Not as bad as an “implausibility” of gnus, but not as good as a “rhumba” of rattlesnakes, either. To create a custom emitter: 1 In the Layers tab, select the object you want use as a particle cell source (or “nozzle”).
2505.book Page 144 Wednesday, June 30, 2004 5:58 PM • In the Canvas, the emitter bounding box appears, which can be transformed using the onscreen controls. • The particle appears in the Canvas in the same location as the original object. Although it appears as if the particle is selected, it is actually the bounding box for the emitter. • The Emitter Dashboard is displayed. If you have hidden the Dashboard, press D.
2505.book Page 145 Wednesday, June 30, 2004 5:58 PM By default, 30 particles per second are emitted in all directions, and each one moves away at approximately 100 pixels per second. Modifying a Particle System Once you create a particle system, it performs according to its default parameters in the Emitter and Particle Cell tabs (located in the Inspector). You can use the Emitter or Particle Cell Dashboard to easily change the basic parameters of an emitter or cell.
2505.book Page 146 Wednesday, June 30, 2004 5:58 PM The following image shows the default Emitter settings. Note: For particle emitters with multiple cells, some Dashboard parameters are displayed as percentages, so that adjusting the emitter parameters simultaneously modifies the effect of each cell’s parameters relative to one another.
2505.book Page 147 Wednesday, June 30, 2004 5:58 PM Emission Angle: Drag to define the direction of the Emission Range. Speed: Arrows (within the defined Emission Range) let you drag to define the speed at which particles are emitted. Drag the arrow to adjust the Emission Angle and the Speed. Once the Emission Range is narrowed and the Speed lowered, the particles emit from a smaller area more slowly.
2505.book Page 148 Wednesday, June 30, 2004 5:58 PM Once the Birth Rate slider is lowered, fewer particles are emitted. Using the Inspector As with all objects in Motion, the Inspector contains all parameters for a particle emitter and particle cells. When an emitter only contains a single particle cell, the parameters for that cell appear in the Emitter tab, as well as the Particle Cell tab.
2505.book Page 149 Wednesday, June 30, 2004 5:58 PM 5 Extra Credit 5 As the last step in your introduction to Motion, learn about keying and masking, audio, and how to export your final project. Keying and Masking Blue and green screen shots are often used as elements in a motion graphics project. In Motion, you apply keying filters to “pull” color keys. Keying filters remove a specified color from an image and leave other colors intact.
2505.book Page 150 Wednesday, June 30, 2004 5:58 PM In the following example, an elephant is shot on a blue screen (or in this case, to be honest, the sky) and is to be composited onto an animated background as an element for a title sequence for a wildlife broadcast show. Blue screen element Background element To create the composite, the blue screen element is positioned on top of the background element in the Layers list.
2505.book Page 151 Wednesday, June 30, 2004 5:58 PM Once the layers are positioned, a keying filter is applied to the blue screen element. The keying filter you select depends on the type of element with which you are working, as different filters yield better results on some types of shots than others. For more information on the keying filters, see Chapter 9, “Using Filters,” in Motion Help. Final composite Once the color key is pulled and refined, the composite is complete.
2505.book Page 152 Wednesday, June 30, 2004 5:58 PM Adjust the Primatte RT parameters: 1 In the Primatte RT Dashboard, or the Inspector > Filters tab, choose Matte from the Output Type pop-up menu. Output Type pop-up menu The matte is displayed in the Canvas. When the Primatte RT filter is first applied to the image, it automatically starts to pull the key. However, often the matte is not clean— there are many gray areas.
2505.book Page 153 Wednesday, June 30, 2004 5:58 PM The matte is improved, but still has some problem areas. b Drag the Matte Density slider slowly to the left until the areas that should be opaque become solid white. c Set the Output Type to Processed Foreground. The composite is displayed. Often, the key is good, but the image color may be affected. In this example, the elephant’s color is still too red. By default, Primatte RT applies an estimated spill suppression value.
2505.book Page 154 Wednesday, June 30, 2004 5:58 PM Note: In the Primatte RT filter, the Matte Density and Spill Suppression values cannot be set to a value lower than Noise Removal. Since the grass in the blue screen image is nearly the same color as the subject, it is not keyed out. To remove the grass in the lower portion of the foreground image, use a mask. This is discussed in the following section. For more information on the keying filters, see Chapter 9, “Using Filters” in Motion Help.
2505.book Page 155 Wednesday, June 30, 2004 5:58 PM Masking an Image In the following example, a garbage mask is added to the matte from the previous “Creating a Key” section. To mask an image: 1 In the Layers tab or Canvas, select the object with the applied keying filter, or the filter itself. In the Toolbar, the Mask tools become available. 2 In the Toolbar, select the Bezier (default) Mask tool. Bezier Mask tool The pointer changes to a pen.
2505.book Page 156 Wednesday, June 30, 2004 5:58 PM Because masks are set to Add mode by default, the image outside of the closed mask is removed. To remove the image inside the mask, you must set the mask to Subtract. 5 In the Mask Dashboard or Inspector tab, set the Mask Blend Mode to Subtract. The image area inside the mask is removed. Note: When a second mask is added, the blend mode of the second mask is also set to Add by default.
2505.book Page 157 Wednesday, June 30, 2004 5:58 PM To remove additional “garbage” from a key, set any additional masks to Subtract mode. Once the masks are applied, the grass (the white portion of the matte) that was left by the keying filter is removed from the alpha channel of the elephant image. Editing Mask and Shape Control Points Use the following guidelines to edit mask and shape control points. m m m m m m To move a control point: In the Canvas, drag the point.
2505.book Page 158 Wednesday, June 30, 2004 5:58 PM m To reset tangent handles: Press Command and drag the end of a handle. m To change a control point from smooth to linear: Control-click the point, then choose Smooth or Linear from the shortcut menu. For more information, see Chapter 11, “Using Shapes and Masks,” in Motion Help. Using a Shape as a Mask In the following example, an animated rectangular shape is applied to an image as an image mask.
2505.book Page 159 Wednesday, June 30, 2004 5:58 PM Note: Press Shift while drawing the shape to constrain the shape’s proportions. To animate the scale of the rectangular shape: 1 In the Behaviors > Basic Motion subcategory, select the Grow/Shrink behavior. 2 Drag the Grow/Shrink behavior to the shape (in the Canvas or Layers tab). 3 In the Dashboard, drag the box outward to scale up the shape.
2505.book Page 160 Wednesday, June 30, 2004 5:58 PM In the Layers tab, an image mask is added to the selected object. At this point, no mask has been applied. Empty Image Mask well 3 Do one of the following: • In the Layers tab, drag the name of the shape that you want to use as a mask to the Image Mask object. When a black outline appears around the Image Mask object and an arrow appears next to the pointer, release the mouse button.
2505.book Page 161 Wednesday, June 30, 2004 5:58 PM • In the Image Mask Dashboard, click-drag the shape that you want to use as a mask to the Mask Source well (drag the name of the shape from the Layers tab). • Display the Mask tab in the Inspector. Click-drag the shape that you want to use as a mask to the Image well in the Mask Source parameters (drag the name of the shape from the Layers tab).
2505.book Page 162 Wednesday, June 30, 2004 5:58 PM Since the default Mask Blend Mode is set to Add, the shape masks the stingray image and reveals the image below the stingray (the dolphin image). Once an object has been applied as an image mask, the original object is disabled in the Layers tab. Disabled mask source object 4 To reveal the dolphin image using the animated mask, you can do one of two things: • Change the Mask’s Blend Mode to Subtract. • Invert the mask. Stencil is turned on by default.
2505.book Page 163 Wednesday, June 30, 2004 5:58 PM You can work with audio in the Audio tab (located in the Project pane), the Timeline, and the Audio Editor. Adding and Removing Audio Files This section provides a quick overview of how to add and delete audio files. m To import an audio file, do one of the following: In the File Browser, select the audio file you want to import and drag the file to the Canvas or Project pane. You can also click the Import button in the Preview area.
2505.book Page 164 Wednesday, June 30, 2004 5:58 PM m To display the Audio tab: In the Project pane, click the Audio tab. All loaded audio tracks are listed. The following image shows the Audio tab controls. Mute button Solo button Volume (Level) slider Master audio area Level meters m To enable the Master audio controls: In the Audio tab, click in the Master audio area. The Master audio track is selected. This track represents the automatic sum of all audio tracks in your project.
2505.book Page 165 Wednesday, June 30, 2004 5:58 PM The Audio Editor displays the waveform for the selected audio file. Transport Controls Use the transport controls in the Audio Editor to play the audio files in your project. You can also rewind to the beginning of the file, pause, or stop playback. Jump to start of audio track Play Marked Audio Region Play Audio Scrub Audio button To play an audio track: 1 In the Audio tab, select the track you want to play. 2 Click the Play button.
2505.book Page 166 Wednesday, June 30, 2004 5:58 PM m To play from the start of a track: Click the Rewind button. Note: If the file has been trimmed, Rewind takes you to the starting trim point. To play a range of frames: 1 Turn on the Play Region button. 2 Type the start frame number in the In field, and the end frame number in the Out field. The audio track is trimmed to match the defined play region. 3 Click Play.
2505.book Page 167 Wednesday, June 30, 2004 5:58 PM Note: If you have installed Compressor, you can choose Export using Compressor. Using Compressor allows you to batch render a project. 3 Use the following guidelines to assign your export settings: • Save As: Type the filename for your output file in the Save As field. • Where: Use the Where pop-up menu to navigate to the folder where you want to save the file. To show the system browser, click the arrow button to the right of the Save As text field.
2505.book Page 168 Wednesday, June 30, 2004 5:58 PM • Include: Use the Include pop-up menu to choose to export video with audio, only video, or only audio with your render. • Use play range: Turn on the “Use play range” checkbox if you have set a play range, rather than the entire project, to be exported. 4 Click Export. The Export Progress dialog appears. When the export is completed, the Export Progress dialog closes.