
2


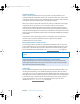

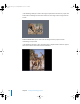


Table Of Contents
- Motion User Manual
- Contents
- Motion 2 Documentation and Resources
- Getting To Know Motion
- Creating and Managing Projects
- Creating New Projects
- Managing Projects
- Editing Project Properties
- Browsing Media Files in Motion
- File Types Supported by Motion
- Adding Media to Your Project
- Managing Objects in Your Project
- Deleting Objects From a Project
- Exchanging Media in a Project
- Object Media Tab Parameters
- Using Media in the Library
- Organizing Layers and Objects in Motion
- The Background of Your Project
- Selecting Objects and Layers in the Layers Tab
- Reorganizing Objects in the Layers Tab
- Nesting Layers Inside Other Layers
- Grouping and Ungrouping Objects
- Showing and Hiding Layers and Objects
- Fixing the Size of a Layer
- Locking Layers and Objects
- Collapsing and Uncollapsing Layer Hierarchies
- Renaming Layers
- Searching for Layers and Objects
- Sorting Layers and Objects in the Media Tab
- Customizing and Creating New Templates
- Basic Compositing
- Using the Timeline
- Using Behaviors
- Keyframes and Curves
- Using Text
- Working With Particles
- The Anatomy of a Particle System
- Using Particle Systems
- Creating Graphics and Animations for Particle Systems
- Advanced Particle System Controls
- Animating Objects in Particle Systems
- Using Behaviors With Particle Systems
- Applying Filters to Particle Systems
- Particle System Examples
- Saving Custom Particle Effects to the Library
- Using the Replicator
- The Difference Between the Replicator and a Particle System
- The Anatomy of the Replicator
- Using the Replicator
- Advanced Replicator Controls
- Animating Replicator Parameters
- Using the Sequence Replicator Behavior
- Using Behaviors With Replicators
- Applying Filters to Replicators
- Saving Custom Replicators to the Library
- Using Filters
- About Filters
- Working With Filters
- An Introduction to Filters
- Working With Filters
- Enabling, Renaming, and Locking Filters
- Copying, Pasting, and Moving Filters
- Reordering Filters
- Changing Filter Timing
- Blur Filters
- A Fun Effect That Can Be Used With All the Blur Filters
- Border Filters
- Color Correction Filters
- Distortion Filters
- Glow Filters
- Keying Filters
- Matte Filters
- Sharpen Filters
- Stylize Filters
- Tiling Filters
- Working With Third-Party Filters
- Working With Generators
- Using Shapes and Masks
- Working With Audio
- Exporting Motion Projects
- Keyboard Shortcuts
- Video and File Formats
- Supported File Formats
- Standard Definition vs. High Definition Video Formats
- Popular Video Codecs for File Exchange
- What Is Field Order?
- Using Square or Nonsquare Pixels When Creating Graphics
- Differences in Color Between Computer and Video Graphics
- Using Fonts and Creating Line Art for Video
- Scaling Imported High-Resolution Graphics
- Creating Graphics for HD Projects
- Integration With Final Cut Pro
- Using Gestures
- Index

Chapter 2 Creating and Managing Projects 167
The image is scaled—the equivalent of using the Transform tool to scale down the
image in the Canvas while pressing Shift. To observe that the image is merely
transformed and has not changed resolution, select the image file in the Media tab of
the Project pane, and then display the Media tab Inspector. The Fixed Width and Fixed
Height parameters display the resolution of the original file.
The image is scaled to fit the largest X or Y value of the image to that of the Canvas. In
the following example, a 1142 x 757 JPEG image is imported into an NTSC D1 project.
Down-Res to Canvas Size: This setting changes the resolution of the imported image
so that the image fits the project size while maintaining its aspect ratio.
The original image resolution remains
unchanged.
01112.book Page 167 Sunday, March 13, 2005 10:36 PM