
5.1.1


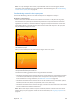
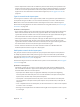


Table Of Contents
- Contents
- Chapter 1: Motion basics
- Chapter 2: Introduction to the Motion interface
- Chapter 3: Motion menus
- Chapter 4: Preferences
- Chapter 5: User interface controls
- Chapter 6: Create and manage projects
- Chapter 7: Basic compositing
- Chapter 8: Timeline
- Timeline overview
- Manage Timeline layers
- Manage Timeline layers overview
- Enable Timeline tracks
- Timeline track display
- Collapse and expand groups and layers
- Lock Timeline tracks
- Manage audio-video links
- Timeline view options
- Zoom in the Timeline
- Adjust Timeline track height
- Customize track display
- Name objects in the Timeline layers list
- Manage track order
- Nest groups and layers
- Add objects to the Timeline
- Edit objects in the Timeline
- Display and modify keyframes in the Timeline
- Work in the ruler
- Markers
- Mini-Timeline
- Chapter 9: Behaviors
- Behaviors overview
- Behaviors versus keyframes
- Browse for behaviors
- Where applied behaviors appear
- Use behaviors
- Modify behaviors
- Work with behaviors
- Behavior order of operations
- Modify behavior timing
- Combine behaviors with keyframes
- Animate behavior parameters
- Save and share custom behaviors
- Basic Motion behaviors
- Parameter behaviors
- Retiming behaviors
- Simulation behaviors
- Additional behaviors
- Chapter 10: Rigs and widgets
- Chapter 11: Final Cut Pro X templates
- Final Cut Pro X templates overview
- Template types
- How templates work
- Create and edit an effect
- Create and edit a title
- Create and edit a transition
- Create and edit a generator
- Use images in template placeholders
- Publishing parameters in templates
- Animation and timing in templates
- Template markers
- Template resolution
- Using masks in templates
- Template files and media save location
- Add multiple display aspect ratios to a template
- Tips for creating templates
- Chapter 12: Keyframing
- Chapter 13: Keying
- Chapter 14: Particles
- Particles overview
- Anatomy of a particle system
- Particle systems and layer sizes
- Create particle systems
- Adjust a particle emitter in the HUD
- Adjust a particle emitter and its cells in the Inspector
- Adjust a particle emitter in the Properties Inspector
- Particle Emitter Timing controls
- Create graphics for particle systems
- Animate objects in particle systems
- Use masks with particle systems
- Apply filters to particle systems
- Particle system examples
- Save custom particle effects to the Library
- Chapter 15: Replicator
- Replicator overview
- Anatomy of a replicator
- About replicator cell source layers
- Create a replicator
- Adjust a replicator and cells in the HUD
- Adjust a replicator and cells in the Inspector
- Adjust a replicator in the Properties Inspector
- Replicator Timing controls
- Use replicator onscreen controls
- Use image and geometry objects
- Animate replicators
- Animate replicators overview
- Apply behaviors to replicators
- Special behavior considerations
- Apply the Sequence Replicator behavior
- Add parameters to the Sequence Replicator behavior
- Adjust the Sequence Control parameters
- Sequence Replicator controls
- Use the Sequence Replicator Custom Traversal option
- Use Parameter behaviors with the Sequence Replicator behavior
- Display replicator animation curves in the Keyframe Editor
- Use replicators in 3D space
- Use masks with replicators
- Apply filters to replicators
- Save custom replicators to the Library
- Chapter 16: Text
- Text overview
- Set preferences for text
- Create text
- Use text files created externally
- Ways to edit text
- Text tools in the toolbar
- About fonts
- Text HUD
- Text Inspector
- Edit text format
- Edit text style
- Edit text layout
- Text Layout pane
- Layout controls in the Layout pane
- Text Rendering controls in the Layout pane
- Behavior controls in the Layout pane
- Type On controls in the Layout pane
- Path Options controls in the Layout pane
- Text path-related tasks
- Margins controls in the Layout pane
- Tab controls in the Layout pane
- Margin and tab-related tasks
- Text glyphs
- Find and replace text
- Apply filters to text
- Chapter 17: Animated text
- Animated text overview
- Text animation behaviors
- Sequence Text behavior
- Scroll Text behavior
- Text Tracking behavior
- Type On behavior
- Preset Text Sequence behaviors
- Save a modified text behavior to the Library
- Use behaviors to animate text in 3D
- Animate text with keyframes
- Animate with the Transform Glyph tool
- Add nontext behaviors to text
- Chapter 18: Generators
- Chapter 19: Filters
- Filters overview
- Browse and preview filters
- Apply and remove filters
- Filter performance considerations
- Filters and cropping
- Adjust filters
- Animate filter parameters
- Apply behaviors to filter parameters
- Publish filter parameters and onscreen controls
- Manipulate alpha channels using filters
- Blur filters
- Border filters
- Color Correction filters
- Distortion filters
- Glow filters
- Sharpen filters
- Stylize filters
- Tiling filters
- Time filters
- Video filters
- Chapter 20: Shapes, masks, and paint strokes
- Shapes, masks, and paint strokes overview
- Draw simple shapes
- Add shapes from the Library
- Draw complex spline shapes and masks
- Edit shape fill, outline, and feathering
- Draw paint strokes
- Edit control points
- Edit control points overview
- Display control points
- Select and deselect control points
- Move control points to adjust a shape
- Modify shape edges
- Transform multiple control points
- Add and delete control points
- Lock control points
- Edit Bezier control points
- Edit B-Spline control points
- Use dynamic guides and snapping
- Shape parameters
- Edit shapes as layers
- Shape behaviors
- Keyframe the Shape Animation parameter
- Save shapes and shape styles
- Copy styles between shapes
- Masks and transparency
- Convert between shapes and masks
- Chapter 21: 3D compositing
- Chapter 22: Motion tracking
- Motion tracking overview
- How a tracker works
- Tracking behaviors
- Tracking workflows
- Adjust onscreen trackers
- Strategies for better tracking
- General tracking guidelines
- Basic strategies to improve tracking results
- Advanced strategies to improve tracking results
- Track perspective, scale, or rotational shifts
- Track obscured or off-frame points
- Track retimed footage
- Basic strategies to improve stabilization
- Remove black borders from stabilized clips
- Track groups
- Save tracks
- Tracking behavior controls
- Chapter 23: Audio
- Chapter 24: Share Motion projects
- Share Motion projects overview
- Share to Apple devices
- Share to iMovie, GarageBand, and other Apple applications
- Create a DVD, Blu-ray disc, AVCHD disc, or disk image
- Share to email
- Publish to video-sharing sites
- Export a QuickTime movie
- Export audio only
- Export an image sequence
- Export a still image
- Export for HTTP Live Streaming
- Export using Compressor
- Render settings
- Background rendering
- About Share Monitor
- Chapter 25: About rasterization
- Chapter 26: Video and file formats
- Chapter 27: Gestures
- Chapter 28: Keyboard shortcuts
- Keyboard shortcuts overview
- Enable function keys on portable Macintosh computers
- General interface commands
- Menu commands
- Audio list
- Tools
- Transport controls
- View options
- Miscellaneous
- HUD
- File Browser
- Inspector
- Keyframe Editor
- Layers
- Library
- Media list
- Timeline editing and navigating
- Keyframing commands
- Shape and Mask commands
- Toolbar
- 3D commands
- Use the Command Editor
Chapter 16 Text 658
•
Wave: A wavy path (a sine wave) dened by one point at the beginning and one
point at the end, and controlled by the End Point, Amplitude, Frequency, Phase, and
Damping parameters.
•
Geometry: A shape path where the object travels along the edge of a shape or mask. An
animated shape can be used as the text path source—for example, a circle shape with an
applied Oscillate Shape behavior.
•
Path Type: Use this pop-up menu, available when Path Shape is set to Open Spline or Closed
Spline, to choose how to manipulate the shape of the path. There are two menu choices:
•
Bezier: Lets you manipulate the keyframe curve by dragging Bezier handles. For more
information about creating and adjusting Bezier curves, see Edit Bezier control points on
page 850.
•
B-Spline: Lets you manipulate the keyframe curve by dragging B-Spline points. B-Splines
are manipulated using points—there are no tangent handles. The points themselves do
not lie on the surface of the shape. Instead, each B-Spline control point is oset from the
shape’s surface, magnetically pulling that section of the shape toward itself to create a curve.
B-Splines are extremely smooth: By default, there are no sharp angles in B-Spline shapes,
although you can create sharper curves, if necessary. For more information about working
with B-Spline curves, see Edit B-Spline control points on page 852.
•
Radius: Drag this slider, available when Circle is the dened path shape, to change the size of
the circular path. Click the disclosure triangle to adjust the X radius and Y radius.
Note: When the Text tool is selected, you can also use onscreen control points to resize the
circle. Press Shift to resize the X and Y radii uniformly.
•
Size: Drag this slider, available when Rectangle is the dened path shape, to change the size of
the rectangular path. Click the disclosure triangle to adjust the X scale and Y scale.
Note: When the Text tool is selected, you can also use onscreen control points to resize the
rectangle. Press Shift to resize the X and Y scales uniformly.
•
Start Point: Adjust these value sliders, available when Wave is selected in the Path Shape
pop-up menu, to set the location of the start point on the wave’s path. The left value slider
sets the X coordinate of the start point. The right value slider sets the Y coordinate of the
start point. The start point can also be adjusted using the wave’s onscreen controls (active by
default when the Text tool is selected).
•
End Point: Adjust these value sliders, available when Wave is selected in the Path Shape
pop-up menu, to set the location of the end point on the path. The left value slider sets the X
coordinate of the end point. The right value slider sets the Y coordinate of the end point. The
end point can also be adjusted using the wave’s onscreen controls (active by default when the
Text tool is selected).
•
Amplitude: Drag this slider, available when Wave is selected in the Path Shape pop-up menu, to
dene half the distance from the highest point to the lowest point in the wave. Higher values
result in more extreme waves.
•
Frequency: Drag this slider, available when Wave is selected in the Path Shape pop-up menu, to
set the number of waves. Higher values result in more waves.
•
Phase: Adjust this dial, available when Wave is selected in the Path Shape pop-up menu, to
dene the percentage of the oset of the waves from the start and end points of the path.
When set to 0% (default), the wave begins and ends at half the distance from the highest
point to the lowest point in the wave. When set to 90%, the wave begins and ends at the
highest point in the wave. When set to –90%, the wave begins at the lowest point in the wave.
When set to 180%, the waves are the same as 0%, but inverted.
67% resize factor