Newton Backup Utility User’s Guide for the Windows Operating System
K Apple Computer, Inc. © 1995 Apple Computer, Inc. All rights reserved. Under the copyright laws, this manual may not be copied, in whole or in part, without the written consent of Apple. Your rights to the software are governed by the accompanying software license agreement. The Apple logo is a trademark of Apple Computer, Inc., registered in the U.S. and other countries.
Contents 1 Getting Started 1 About the Newton Backup Utility Installation requirements 1 2 Connecting a Newton PDA to your computer Attaching the cable 2 3 Installing the Newton Backup Utility Preparing your computer 3 5 Opening the Newton Backup Utility 5 Selecting the type of connection on your computer Preparing your Newton PDA 6 Selecting a type of connection on your Newton PDA Establishing a connection Creating your first backup Exiting the utility 5 6 7 8 9 iii
2 Backing Up and Restoring Information About backup files 11 11 Backing up cards 12 Previous backups 12 Creating backup files 13 Backing up all information and packages 13 Backing up selected information and packages Backing up a storage card 15 Changing the location of the BACKUPS directory Restoring information and packages Tips on managing backups 3 Installing Packages 14 16 18 20 21 Installing a package onto your Newton PDA Installing packages by dragging 21 22 Installing a package
1 Getting Started This chapter describes how to connect your Newton personal digital assistant (PDA) to your computer, install the Newton Backup Utility, and use the utility to create your first backup. About the Newton Backup Utility With the Newton Backup Utility, you can connect your Apple MessagePad or other Newton PDA to your Windows-based computer and do the following: m Back up Newton information and store it on your computer.
Installation requirements To use the Newton Backup Utility with your computer, you need the following: m An IBM PC or compatible computer with an Intel 80386 or later version microprocessor m A VGA display or better m Windows 3.1, or Windows NT 3.5 or later, or Windows 95. (If you are using Windows 3.1, you must turn on your computer’s file-sharing and virtual memory functions. If they are not already on, see the Appendix for information about turning on these functions.
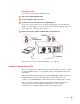
Attaching the cable To connect your Newton PDA and PC by cable: 1 Turn off your computer and Newton PDA. 2 Choose an available serial port on your PC. 3 Connect the end of the cable with 9 holes to the appropriate port. If you have a 25-pin serial port, use an adapter supplied with your cable. Push the smaller end of the adapter onto the 9-hole end of the cable. Then plug the larger end of the adapter into a matching 25-pin serial port.
To install the Newton Backup Utility software: 1 Place the Setup 1 disk in the appropriate floppy disk drive. 2 In the Program Manager, choose Run from the File menu. If you have Windows 95, click the Start button and choose Run. A window appears. 3 Type A:\SETUP and click OK. If you are using the B drive, type B:\SETUP instead. 4 Follow the on-screen instructions. Depending on the version of Windows that you’re using, you may be asked to restart Windows.
Preparing your computer To prepare your computer for communication with a Newton PDA, follow these steps. IMPORTANT If you are using Windows 3.1, you must turn on your computer’s file-sharing and virtual memory functions. If they are not already on, see the Appendix for information about turning on these functions. Opening the Newton Backup Utility To open the utility: m On your computer, open the NBU directory and double-click the NBU.EXE file.
2 In the Select Port to Listen On list, click the port you’re using to connect to your Newton PDA. If a port is in use, its name will not appear in the list. IMPORTANT If your computer is not capable of supporting high-speed communication with your Newton PDA, set the communication speed to 9600 bits per second (bps). You must also set your Newton PDA to communicate at 9600 bps.
3 If necessary, tap “Connect via” to change the type of connection. A list of connections appears. 4 Choose Serial or Serial 9600-Windows. IMPORTANT If your computer is not capable of supporting high-speed communication with your Newton PDA, choose “Serial 9600-Windows.” Note: Although other options may appear, such as Modem or AppleTalk, do not select one of them. The Newton Backup Utility does not support these types of connection with a computer using Windows.
In addition, the Newton Backup Utility buttons appear on your Newton screen. You can use the Newton Backup Utility buttons on your computer or on your Newton PDA to back up and restore files, or install packages. For more information about using the utility from your Newton PDA, see Chapter 4. Creating your first backup After you establish a connection, you can backup the information and packages on your Newton PDA and store the backup on your computer.
Exiting the utility To end a connection and exit the Newton Backup Utility: m Choose Exit from the File menu. The connection is ended and the Newton Backup Utility window disappears. You can also end a connection from your Newton PDA by tapping the close box (marked by X) next to the Newton Backup Utility buttons.
2 Backing Up and Restoring Information The previous chapter described how to use the Newton Backup utility to create your first backup. This chapter describes how to do additional backups and how to restore information you’ve backed up. IMPORTANT The instructions in this chapter apply to Newton PDAs that use the Newton 2.0 operating system. If you’re upgrading your Newton PDA to Newton 2.0, make sure you read the instructions that came with your upgrade kit before you use the Newton Backup Utility.
Backing up cards When you back up a storage card, a separate backup file is created with the name of the card. If you haven’t entered a name for your card, the file is called CARD. If you back up more than one unnamed card, the backup files are named CARD.NBK, CARD2.NBK, CARD3.NBK, and so on. Backup file for an unnamed storage card Backup file for information in your Newton PDA’s internal memory Note: You should name all your storage cards.
Creating backup files You can back up all information and packages on your Newton PDA or you can just back up selected information and packages. The following section describes how to back up all information. To back up selected information and packages, see “Backing Up Selected Information and Packages” later in this chapter. Backing up all information and packages Before you begin, make sure your Newton PDA is connected to your computer.
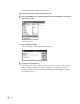
A window appears with a list of items to back up. To select an item, click the box next to it until you see an X. List of applications and other items on your Newton PDA. To see more items on the list, use the scroll bar. Select to include all packages (including packages from third-party software publishers) in the backup. This box only appears if you have packages installed on your Newton PDA. Click here to select all information on your Newton PDA.
To back up selected information on your Newton PDA: 1 Open the Newton Backup Utility and establish a connection. See Chapter 1 for instructions. 2 On your computer, click the Backup button. A window appears with a list of information to back up. Select the information you want to back up. Select to include all packages (including packages from third-party software publishers) in the backup. This box only appears if you have packages installed on your Newton PDA. 3 Select the information to back up.
3 Click Backup. The Backup window appears. The bottom of the window includes a list of cards currently inserted in your Newton PDA. To select an item to back up, click to put an X in the box next to it. Click this box to back up a card. 4 Make sure the card you want to back up is selected. Also select any items you want to back up from the list. 5 Click Backup. After a few minutes, the card is backed up and a backup file with the name of the card appears in your BACKUPS directory.
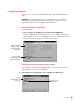
3 Click the General tab. Shows the current location of the BACKUPS directory. Click to change the location of the BACKUPS directory. This window now shows the directory path set for backing up your Newton PDA information. 4 To change the directory, click Browse. A window appears. 5 Select a new location for your BACKUPS directory. 6 Click OK. The new location you specified is saved and the window disappears. 7 Establish a connection from your Newton PDA.
Restoring information and packages If something goes wrong and you lose information on your Newton PDA, you can restore information from the latest backup file on your computer. You can restore all information in a backup file or select which information you want to restore. You can also restore the information from storage cards you’ve backed up. WARNING Restoring replaces information on your Newton PDA with information from a backup file on your computer.
3 In the window that appears, choose the file that contains the information you want to restore. You can also restore the information from storage cards you’ve backed up. Select the latest backup file for your Newton PDA. To restore a card, select the latest backup file for the card. Note: With the Newton Backup Utility, you can restore information from a card backup file to a card. You cannot restore information from a card backup file to your Newton’s internal memory.
5 Select the items you want to restore. 6 Click Restore. Information you selected is restored to your Newton PDA. A status window on your computer keeps you informed of the progress. When you restore, only information and packages on your Newton PDA that have corresponding information and packages in the backup file are replaced.
3 Installing Packages This chapter describes how to use the Newton Backup Utility to install packages. You can install packages on your Newton PDA or on a storage card. Installing a package on your Newton PDA A package is a special file that adds features to your Newton PDA. Examples of packages include applications, electronic books, and system updates. Before you begin, make sure your Newton PDA is connected to your computer.
5 In the window that appears, select the package you want to install and click OK. The package is installed on your Newton PDA. A status window on your computer keeps you informed of the progress. To stop installing, click Cancel on your computer or tap the Stop button on your Newton PDA. To stop installing, tap Stop. Note: If you stop a package installation, the connection between your Newton PDA and your computer is broken. You'll need to re-establish the connection from your Newton PDA.
4 Drag the icons to the Newton Backup Utility window. Installing a package onto a storage card You can install packages on a storage card rather than in your Newton PDA’s internal memory. 1 Insert the card in your Newton PDA. 2 In the slip that appears, select “Save new info and packages on this card.” 3 Follow the steps described in the previous section, “Installing a Package On Your Newton PDA.
4 Using the Newton Backup Utility From Your Newton PDA This chapter describes how to use the Newton Backup Utility from your Newton PDA instead of from your computer. Using the utility Before you begin, make sure your Newton PDA is connected to your computer. For instructions, see “Connecting a Newton PDA to Your Computer” in Chapter 1. To use the Newton Backup Utility from your Newton PDA: 1 On your computer, double-click the Newton Backup Utility icon.
Finding files on your computer When you restore files or install packages, a slip appears with a list of files on your computer. You locate files from your Newton PDA just as you would from your computer. The files in the disk or directory you choose are listed here. Tap the up or down arrow to see more files in the list. Tap to open a directory. Tap to select a different disk on your computer. Tap to change the file type displayed in the list.
3 In the Extras Drawer, tap Connection k. A slip appears. Tap to change connection preferences. 4 Tap the information button and choose Prefs from the list of choices. A slip appears with a list of connection preferences. Not used by the Newton Backup Utility Select to end a connection if no activity occurs for over one minute. Select to automatically back up all information and packages when you tap Backup.
5 Troubleshooting This chapter describes some common problems you may encounter when using the Newton Backup Utility. For problems related to your Newton PDA, see the handbook that came with your Newton PDA. For the latest product and troubleshooting information, see the Read Me file located in the NBU directory. An error message appears when I try to install the Newton Backup Utility. m Make sure your computer meets the installation requirements. See “Installation Requirements” in Chapter 1.
I can’t create a backup file. m Make sure your Newton PDA is connected to your computer. See “Connecting a Newton PDA to Your Computer” in Chapter 1. m Make sure you’ve selected the correct type of connection on your computer. See “Preparing Your Computer” in Chapter 1. m Make sure you’ve selected the correct type of connection on your Newton PDA. See “Preparing Your Newton PDA” in Chapter 1. m Make sure you establish a connection from your Newton PDA. See “Establishing a Connection” in Chapter 1.
A communication error occurs when I try to transfer information between my computer and the Newton PDA. m Some computers can’t support high-speed communication with the Newton PDA. Set both the Newton Backup Utility on your computer and your Newton PDA to communicate at 9600 bps. On your computer, choose Settings from the Newton menu, then click the Communications tab. Choose 9600 bps for the port speed and then click OK. On your Newton PDA, open the Extras drawer and tap Connections.
Appendix Setting Up Windows 3.1 for the Newton Backup Utility To run the Newton Backup Utility with Windows 3.1, you must turn on your computer’s file-sharing and virtual memory functions, if they are not already on. Turning on file sharing To turn on file sharing, edit your AUTOEXEC.BAT file. Using an editor, such as Edit, open the AUTOEXEC.BAT file and add the following line: Share When the computer runs the AUTOEXEC.BAT file, it will turn on file sharing.
Turning on virtual memory If virtual memory is not on, follow these steps to turn it on. 1 In the Main window on your computer, double-click the Control Panel icon. 2 In the Control Panel window, double-click the 386 Enhanced icon. The 386 Enhanced window appears on your computer. 3 Click the Virtual Memory button. Another window appears.
4 Click the Change button. The window expands, showing options that allow you to specify which disk drive should be used for virtual memory. Click here to select a different disk to use for virtual memory. The window shows the currently selected disk and the amount of available space for virtual memory. 5 Use the currently selected hard disk drive, or select a different drive from the Drive drop-down list and click OK. A message appears asking you to confirm that you want to change your settings.
Index A C adapters 2 Apple MessagePad 1 applications backing up 13–15 installing 21–23 restoring 18–20 AUTOEXEC.BAT file, editing 33 cable. See serial cable card backing up 12, 15–16 installing package on 23 CARD file 12 CARD.NBK file 12 Change button (Virtual Memory window) 35 communication speed 5–6 computers.
F, G M files AUTOEXEC.BAT 33 CARD 12 CARD.NBK 12 finding from Newton PDA 26 NBU.EXE program 4–5 NEWTON.NBK 11 README 3, 29 file sharing 33 memory not enough 30 virtual 34–35 menu commands, problems choosing 29 H hardware requirements 2 I, J, K IBM PC and compatible computers.
P, Q S packages backing up all 13–14 backing up on Newton PDA 8 backing up selected 14–15 installing from Newton PDA 26 installing on Newton PDA 21–23 installing on storage card 23 problems with 30 restoring 18–20 PC connecting Newton PDA to 2–3 establishing a connection on Newton PDA 7–8 installation requirements 2 preparing for communication 5–6 selecting connection type 5–6 storing backups 8–9 using high–speed communications 7 using more than one 20 PDA (personal digital assistant).