Newton Press User’s Guide For Windows
Apple Computer, Inc. © 1996 Apple Computer, Inc. All rights reserved. Under the copyright laws, this manual may not be copied, in whole or in part, without the written consent of Apple. Your rights to the software are governed by the accompanying software license agreement. The Apple logo is a trademark of Apple Computer, Inc., registered in the US and other countries.
Newton Press About Newton Press What is Newton Press? vii What is a Newton book? viii How do I create a book? x Reading the book on a Newton PDA 1 Getting Started In this package xii 1 1 System requirements 2 Connecting your Newton PDA to your computer Attaching the cable 3 Installing Newton Press 5 Installation troubleshooting Starting Newton Press 6 7 Getting your computer ready Creating a book 7 9 Getting your Newton PDA ready Locating the new book Problems? 3 12 13 13 Content
Exiting Newton Press 2 Creating a Book 14 15 Dragging and dropping a book onto a Newton PDA Creating a new book 17 Navigating your document Copying and pasting 18 19 Bringing documents into a book Adding a new document 19 20 Dragging and dropping a document for editing Adding multiple documents into a book file Bringing graphics into a book 26 Saving and opening your work in progress Saving your work in progress 28 3 Formatting Your Newton Book 29 About the Newton Press application window
4 Creating a Table of Contents 43 Using the Table of Contents window Adding topics to the table of contents Viewing topic markers in a book Adding topics automatically 44 45 46 46 Editing topics in the Table of Contents window 46 Deleting topics from the Table of Contents window 5 Linking 47 49 Creating link s 50 Breaking links 52 Checking links 52 6 Saving and Installing Book Packages Creating a book package 53 Installing a package on a Newton PDA Preparing the computer 7 Setting Prefer
8 Viewing Your Book on a Newton PDA Opening a book on a Newton PDA Viewing pages 63 64 65 Using a table of contents 65 Using Newton Book Reader controls Going to a specific page 67 Copying parts of a book 70 Annotating books 72 Printing and faxing a book Closing a Newton Book 9 Troubleshooting 66 73 74 75 Problems installing the software 75 Problems editing and formatting a book Problems adding documents to a book 75 76 Problems installing a book package on a Newton PDA General question
About Newton Press What is Newton Press? Newton Press is an ideal application for creating and distributing electronic documents as Newton books that can be reviewed and annotated on a Newton PDA. With Newton Press, you can create read-only electronic documents, complete with text and graphics, that anyone with a Newton PDA can use. You can quickly create Newton books by combining text and graphics from other applications into your Newton Press documents.
What is a Newton book? A Newton book is an electronic document created for viewing on a Newton PDA. With Newton Press, you can create and publish a variety of documents such as business reports, reference materials, price sheets, product listings and tables for display on Newton PDAs. You can create company reports and documents that someone with a Newton PDA can keep for easy reference.
You can create company directories and other lists that Newton PDA users can refer to on the job or in the field, taking advantage of the portability of the Newton PDA. And you can create documents with graphics and charts that provide Newton PDA users with effective and persuasive visual tools for communicating information.
Newton Press enables you to create a wide variety of books that can effectively convey your information. How do I create a book? Creating a book is roughly a four-step process: m You first open the Newton Press application and type or add the content of your book. You can then format the book to look the way you want it. m You can create a table of contents that readers can use to move about the different topics of a book.
m You can name and record identifying information about your book. m And last, you save the book as a package that you can install on a Newton PDA. Add documents to your book, including text and graphics. Type and edit text and format your book for easy readability. Create a book package and install it on a Newton PDA. With Newton Press, you can easily take the text and graphics from many commonly used applications on your computer and place them in a new book.
As you work with a book in Newton Press, you can see how it will appear on a Newton PDA screen. You can then edit and format the book to give it a polished look that’s easy to read. You can also create books that have special features such as tables of contents and linked pages that let readers quickly jump to the information they want to see. Once your book is complete, you then save the book as a package.
1 Getting Started This chapter explains how to install and set up the Newton Press software. It also provides instructions for connecting your computer and Newton PDA and trying out the Newton Press application. In This Package Check the contents of your Newton Press package.
System Requirements To install the Newton Press application and use it with a Newton PDA, you need m An IBM PC or a compatible computer with Intel 80386 or later version microprocessor m A VGA display or better m Windows 3.1, or Windows NT 3.5 or later version,or Windows 95. (If you are using Windows 3.1, you must turn on your computer’s filesharing and virtual memory functions. If they are not already on, see Appendix A for information about turning on these functions.
Connecting Your Newton to Your Computer Before you can transfer information between the PC and Newton PDA, you need to connect the two machines with a serial cable. Newton Press communicates with the Newton PDA through a serial port on your PC. PC serial ports come in two sizes—9-pin and 25-pin. On some computers a serial port may be labeled COM1, COM2, COM3, COM4, or SERIAL. For more information on setting serial port settings, see “Setting a Type of Connection” later in this chapter.
3 Plug the other end of the cable into the Newton PDA’s communication port. Serial ports Newton PDA communication port Serial cable That’s it! You can go on to “Installing Newton Press,” next. IMPORTANT You can use the Newton Press application to create and format books on your computer without connecting a Newton PDA to your computer. To install a book package on a Newton PDA, however, you must connect it.
Installing Newton Press Before your computer can communicate with your Newton PDA, you need to install Newton Press on your computer. You’ll need the disks that came with this manual. The Newton Press installation program, SETUP.EXE, installs the Newton Press files. For information about the files installed on your hard disk, see the Readme file installed with your Newton Press software.
3 Type a:\setup and choose OK. If you are using the B drive, type B:\SETUP instead. When you’re ready to begin, click OK. Type the drive and command here to run the Install program. 4 Click here to move to the floppy drive and select INSTALL.EXE. Follow the on-screen instructions. Newton Press is installed in the Press directory. Depending on the version of Windows that you’re using, you may be asked to restart Windows. It’s important that you restart Windows so that communications can work properly.
Starting Newton Press Now that you’ve installed the computer software, you must set your computer software and the Newton PDA to communicate. Getting your computer ready After connecting your computer and Newton PDA, you next must open the Newton Press application program and specify the communications port that you have used. You don’t need to specify the port again unless you change to a different port later.
2 Choose Preferences from the Edit menu. The Preferences window appears. 3 Click the Install tab. The Install options appear. 8 Chapter 1 4 If the Port option isn’t set to the correct port, click the Port drop- down list and select the communications port you want to use. 5 Click OK.
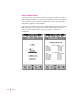
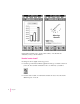
You’ve now set up the Newton Press application to communicate over your selected communications port. Next, let’s start creating a book by adding some text to an empty document. Creating a book 1 Click the Add button in the Newton Press window. The Add window appears. 2 Select the Annual file in the Samples directory and click OK. Newton Press adds the Annual Report file to the book, formatting it for display on a Newton PDA screen.
3 Inspect the newly added text by clicking the Up and Down arrows on the Newton Press window to move from page to page. You can browse the information that you’ve added to this book. The information that appears on the screen, however, is not yet a Newton package that can be installed on a Newton PDA. Now you’ll save the book as a package and then install it on your Newton PDA 4 Click the Create button. The Create window appears.
5 Type a new name for the package, or use the one that already appears in the File Name box, and click OK. Newton Press saves the Newton book as a package in the Press directory. It also automatically prepares to install the package on your Newton PDA. (You can turn this automatic installation feature off, if you wish. See Chapter 9, “Setting Preferences” for more information.) You’re now ready to set up the Newton PDA to communicate with the computer.
Getting your Newton PDA ready To get your Newton PDA ready to receive a new package, you must specify the type of connection you’ve made between the device and your computer. To set up and open a connection on the Newton PDA: 1 Turn on the Newton PDA. 2 Tap the Extras drawer ´. 3 In the Extras Drawer, tap Connection k. You may have to show all icons to see the Connection icon. A slip appears. This slip shows the type of connection currently set for your Newton PDA.
Your computer and Newton PDA establish a connection, and Newton Press installs the new Newton Book package in the Extras Drawer. Locating the new book You can now open and view the new book package on your Newton PDA. 1 On the Newton PDA, tap the Extras Drawer. A new book with the title you gave it appears in the extras drawer. 2 Tap the book to open it. Congratulations! You’ve created and installed your first book on a Newton PDA.
Exiting Newton Press When you no longer want to use Newton Press, you can exit the application and unplug the Newton PDA from its connection to the computer or network. To exit the Newton Press application: m On your computer, choose Exit from the File menu to close the Newton Press application. If you have a book open that you haven’t saved, the application displays an alert box asking if you want to save your work. Click Save to save your work or Don’t Save to discard the book.
2 Creating a Book Newton Press provides fast and flexible ways of creating Newton books.
Dragging and dropping a book onto a Newton PDA Once your computer and Newton PDA are connected, you can quickly move information from your computer to your Newton PDA. Drag a document onto the Newton Press application icon. The application automatically creates a fully formatted book. After creating the book, the application installs it as a package on the Newton PDA.
Creating a new book In addition to dragging and dropping information on the application, you can create new books by opening the Newton Press application. When the application opens, it creates a new empty document. If Newton Press is already open, and you have a Newton book open, you save the current book and then open a new one. To create a new empty book when Newton Press has a document open: m Choose New from the File menu.
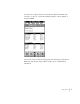
Text you type appears at the insertion point. Text is automatically formatted to fit the size of a Newton PDA screen, providing an accurate picture of how your book will look. You can select and edit text using standard editing procedures. You can select an entire document and change its font characteristics and text alignment by choosing the Select All command in the Edit menu. You can cut, copy, and paste text and graphics and choose font characteristics, alignment, and other formatting options.
Click these arrows to move forward or backward page by page. To move from page to page: m Click the down or up arrow to move to the next or previous page. To move to a specific page: 1 Choose Go To Page from the Book menu. The Go to Page window appears. 2 Type a page number and click Go To. You can also click the Last Page button to go to the end of the document. If you have created a table of contents, you can also use it to go to specific pages.