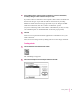
Getting Started This chapter explains how to install and set up the Newton Press software. It also provides instructions for connecting your computer and Newton personal digital assistant (PDA) and trying out the Newton Press application. In this package Check the contents of your Newton Press package.
System requirements To install the Newton Press application and use it with a Newton PDA, you need m a Macintosh computer or a compatible computer using the Macintosh OS m system software version 7.0 or a later version m at least 1.
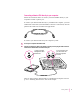
Connecting a Newton PDA directly to your computer Follow the instructions below to connect your Newton PDA directly to your computer’s modem or printer port. To connect your Newton PDA directly to your Macintosh computer, you need a Macintosh serial cable (with mini-DIN-8 connectors on both ends). You can purchase this cable from an authorized Apple dealer. To connect your Newton PDA and your computer by cable: 1 Turn off your computer and Newton PDA.
Connecting a Newton PDA over an AppleTalk network Follow the instructions below to connect your Newton PDA to an AppleTalk network. If your computer is connected to an AppleTalk network, you can connect the Newton PDA to the network, too. To connect the device, you must have a LocalTalk or other type of AppleTalk connection kit, available from an Apple-authorized dealer. Be sure to purchase the same type of LocalTalk connector box and cable that your network uses.
Make sure AppleTalk is active. If not, click the AppleTalk Active button. If instructions appear on screen, follow them. Make sure AppleTalk is active. That’s it! You’ve linked a Newton PDA to your Macintosh computer on a AppleTalk network. Installing Newton Press The Newton Press package comes with two disks that contain the Newton Press software and a program called the Installer that copies the software onto your hard disk. Follow the steps in this section to install the software.
These instructions tell you how to restart your computer with the extensions turned off (which prevents incompatible software from interfering with the installation) and how to use the Installer program. 1 Quit any application programs that are open. 2 While holding down the Shift key on the keyboard, choose Restart from the Special menu. Don’t release the Shift key until you see the “Extensions Off” message on your screen, or until your normal desktop appears.
8 Click the Install button. The Installer takes a few moments to calculate what needs to be done and then begins to copy files. 9 When you see a message reporting that installation was successful, click Restart. Congratulations! You’ve installed the Newton Press application software. Installation troubleshooting If the Installer can’t complete the installation, you’ll see a message. Here are some ways to fix some common problems. m Make sure that you have the correct hardware or system software.
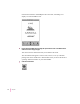
To set the Newton Press connection preferences: 1 Double-click the Newton Press icon to open the application. The Newton Press window appears. 2 Choose Preferences from the Edit menu. The Preferences dialog box appears.
3 In the Installing section, click the Connect via Network or Connect via Serial button, according to the type of cable connection that you’ve used. If you have a direct connection to the computer, click Connect via Serial and then choose the type of port that the cable is connected to by choosing Modem or Printer from the Port pop-up menu. If you are using LocalTalk cables and connection, click the “Connect via Network” option.
Newton Press adds the Annual Report file to the book, formatting it for display on a Newton PDA screen. 3 Inspect the newly added text by clicking the Up and Down arrows on the Newton Press window to move from page to page. You can browse the information that you’ve added to this book. The information that appears on the screen, however, is not yet a Newton package that can be installed on a Newton PDA. Now you’ll save the book as a package and then install it on your Newton PDA.
The Create dialog box appears. 5 Type a new name for the package, or use the one that already appears in the “Save Book Package as” box, and click Save. Newton Press saves the Newton book as a package in the Newton Press folder. It also automatically prepares to install the package on your Newton PDA. (You can turn this automatic installation feature off, if you wish. See Chapter 7, “Setting Preferences” for more information.) You’re now ready to set up the Newton PDA to communicate with the computer.
3 In the Extras Drawer, tap Connection k. You may have to set your Newton PDA to show all icons to see the Connection icon. A slip appears. This slip shows the type of connection currently set for your Newton PDA. Shows the connection set for your Newton PDA. Tap to select another connection type, if necessary. Note: If your Newton PDA uses a version of the Newton operating system earlier than version 2.0, the slip may appear slightly different.
6 Choose “Other computer” to see a list of computers on the network. A slip appears listing computers. If you see the Macintosh computer you want, tap its name. Tap here to change zones and see other Macintosh computers. Note: Instead of choosing “Other computer,” you can choose “Other worksite” and create a worksite slip. See the handbook that came with your Newton PDA for more information on creating a worksite slip. 7 Select a computer from the list and tap X to close the slip.
8 Tap Connect. Your computer and Newton PDA establish a connection, and Newton Press installs the new Newton Book package in the Extras Drawer. Locating the new book Let’s check to see that your Newton book was installed on your Newton PDA. 1 On the Newton PDA, open the Extras Drawer. A new book with the title you gave it appears in the Extras Drawer. If the new book does not appear in the Extra Drawer, see the next section, “Problems,” for more information. 2 Tap the book icon to open it.
If problems persist, see Chapter 9, “Troubleshooting,” for solutions to common problems encountered when installing software or installing books on a Newton PDA. Quitting Newton Press When you no longer want to use Newton Press, you can close it and unplug the Newton PDA from its connection to the computer or network. To quit the Newton Press application: m On your computer, choose Quit from the File menu to close the Newton Press application.
2 Creating a Book Newton Press provides fast and flexible ways of creating Newton books.
Dragging and dropping a book onto a Newton PDA Once your computer and Newton PDA are connected, you can quickly move information from your computer to your Newton PDA. Drag a document onto the Newton Press application icon. The application automatically creates a fully formatted book. After creating the book, the application installs it as a package on the Newton PDA.
Creating a new book In addition to dragging and dropping information onto the application, you can create a new book by opening the Newton Press application. When the application opens, it creates a new empty document. If Newton Press is already open, and you have a Newton book open, you save and close the current book, and then open a new one. To create a new empty book when Newton Press has a document open: 1 Close the currently open document by clicking the close box.
You can select and edit text using standard Macintosh editing procedures. You can select an entire document and change its font characteristics and text alignment by choosing the Select All command in the Edit menu. You can cut, copy, and paste text and graphics and choose font characteristics, alignment, and other formatting options. For more information about formatting your document, see Chapter 3, “Formatting Your Newton Book.
To move to a specific page: 1 Choose Go To Page from the Book menu. The Go to Page dialog box appears. 2 Type a page number and click Go To. By the way: If you have an extended keyboard, you can also jump directly to the beginning of a document by pressing Home and to the end by pressing End. If you have created a table of contents, you can also use it to go to specific pages. For more information about creating and using a table of contents, see Chapter 4, “Creating a Table of Contents.
The Newton Press application can bring in files created by many commonly used Macintosh applications. For more information about the kinds of documents you can add, see the Readme file installed with the Newton Press software. Adding a new document Before you add a document, make sure that the text and any graphics within the document can be added successfully. Newton Press can add many types of documents that incorporate text and graphics.
To add a document to a book: 1 With a book open in the Newton Press application, click the Add button or choose Add from the File menu. The Add dialog box appears. 2 Select the name of the document you want to add and click Add. The Newton Press application begins to add the document to your book. If the application finds fonts that are not available on a Newton PDA, a dialog box appears asking you to select a Newton PDA font to substitute.
Note: When you add a file, the name of the file is also added to the table of contents. If you don’t want the file name added to the table of contents, you can turn this option off. For more information, see Chapter 7, “Setting Preferences,” and Chapter 4, “Creating a Table of Contents.” Dragging and dropping a document for editing To add a document to a book quickly, you can drag a document icon into the open Newton Press window.
Adding multiple documents to a book file You can add multiple documents to a book. Each time you add a document, the Newton Press application adds the new document to the end of the book. As you add documents, remember to save your work in progress periodically. Should a power outage or other problem arise, you can open your last version of the book without losing your work. For information about saving your work in progress, see “Saving and Opening Your Work in Progress” later in this chapter.
Your graphics must be in a file format that Newton Press can use. Newton Press can open PICT files and bitmapped files, that is, graphics created as dots or pixels with an application program such as MacPaint II. It can also open several other file formats. For a list of available translators, see the Readme file installed with the Newton Press software. This is a clip art image. You can use clip art in your books.
Tip: Many graphics applications allow you to save images as PICT files. You can also convert some graphics to PICT or bitmapped images by producing screen captures of an image while it is on your Macintosh screen. Press x-Shift-3 on your Macintosh to capture an image of your entire screen. You can then open this image in a paint application and select and resize the graphic. You can also create screen captures using special screen capture applications.
Naming and identifying a book You can record information about your book, such as a title, the name of the package, the author of the book, and other information. You can also select the look of the icon that represents the book on a Newton PDA. To name the book and pick an icon, click Title in the Newton Press window or choose Title from the Book menu. The Title dialog box appears. Choose an icon from the pop-up menu at the top of the dialog box.
You can also enter additional information about a book when you click More Choices. The Title dialog box expands and you can type a long name, an ID, ISBN, or other identifying number, the name of the author, copyright information, and the date. Note: Be sure to give your books a unique title and long name. You cannot install a Newton book package on your Newton PDA if a package with the same title and long name already resides on the Newton PDA.
Saving and opening your work in progress As you work on your book, it’s a good idea to save your work as you go. Saving your work in progress creates a file that you can open later and change with the Newton Press application. Saving your work this way ensures that you have a backup copy of your book should you need one. This work file is not a package that can be downloaded to a Newton PDA for viewing. It is a file you can open and continue working on until your book is completed.
Opening your work in progress You can open a Newton Press document that you have saved as a work in progress by double-clicking it on the desktop. You can also open it from within the Newton Press application. To open a book that you’ve saved as work in progress from within the application: 1 Close the currently open document, if there is one. 2 Choose Open from the File menu. The Open dialog box appears. 3 Select the file you want to open and click Open.
3 Formatting Your Newton Book You can enhance the appearance of a Newton book by formatting it for display on a Newton PDA.
About the Newton Press application window The Newton Press application window presents a view of how a book will appear on a Newton PDA. This window shows your book formatted to fit the dimensions of a Newton PDA screen. You can set the amount of information that appears on each page, change fonts to those used by Newton PDAs, and format text to be most readable on the screen.
If a document will require many small formatting changes after it is added to Newton Press, it’s sometimes easiest to format the document using the original application. You’ll find template files that are preformatted for the Newton screen installed with your Newton Press software. Template files are provided for many of the most commonly used Macintosh applications. You can copy and paste your document into a template file and then make necessary formatting changes.
When you choose Insert Page Break, Newton Press starts a new page moving the text to the next page. After entering or adding the text of a book, you can then page through it, dividing pages to provide the most readable layout. To insert a page break: 1 Click in the text where the page should start. 2 Choose Insert Page Break from the Format menu.
To remove a page break: 1 Go to the page that has the page break marker. Choose Show Indicators from the Format menu to display page break markers, if necessary. 2 Click in the top left corner of the page where the line appears. Your insertion point should be in the first character position at the top of the screen. When it is, the command Remove Page Break becomes available in the Format menu. 3 Choose Remove Page Break from the Format menu.
To create a header for a book: 1 Choose Header from the Format menu. An untitled header appears at the top of the screen. 2 Select the header and edit the text. To remove the header later, choose Header again from the Format menu. Using fonts Newton PDAs can display three fonts: New York, Geneva, and Espy Sans. Therefore, all the text in a book must be in one of these three fonts.
To change the font: 1 Click to create an insertion point or select the text you want to change. 2 Choose the font, size, and style you want from the Font, Size, and Style menus. You can also choose Select All from the Edit menu to select an entire document and change the font characteristics and text alignment of the document. (You cannot make other formatting changes to the entire document.
After you click OK, the Font Substitution dialog box may reappear showing another font that needs substitution. Again, select the Newton PDA font you want to substitute. If you’d like to always use your current font substitution settings without having to see the dialog box, you can set a preference so that the dialog box no longer appears and font substitutions are always made automatically. For more information about setting the Font Substitution preference, see Chapter 7, “Preferences.
Aligning text You can change the alignment of text within the margins of the book. You can left-align text, center it, or align it on the right margin. You can align a single paragraph or a group of paragraphs. You cannot change the alignment of individual lines within a paragraph.
To change text alignment: 1 Click the paragraph or select the paragraphs that you want to align. 2 Choose Align Left, Align Center, or Align Right from the Format menu. Using tabs You can set tabs for your text to create lists and tables of information. When you choose Show Tabs from the Format menu, the Tab window appears. You use this window to set tabs for the currently selected text. To see the tab markers for a specific paragraph, click the paragraph. Tab marker Click here to add a new marker.
You can also precisely position tab stops on the ruler. Double-click a tab marker on the ruler and a Tab dialog box appears in which you can specify a tab position. Type a number and specify “in” for inches, “cm” for centimeters, “mm” for millimeters, or “pt” for points to indicate the measuring system you’re using. Type the position of the tab marker here. To set tab stops: 1 Click where you want to create tabbed text, or select the text you want to set up with tabbed spacing.
Creating tables You can create tables in a book by first setting up your tab stops and then entering the table information. Tab markers set to create columns of text. You can also add documents that have tables. If you’re adding a document with tables, the tables must be formatted as text separated by tab characters. After adding such a document, you can select the table and arrange the tab stops to reformat the table to fit the screen.
Creating borders When formatting text, you can place borders around selected paragraphs or graphics to make them stand out or increase legibility. A single-line border appears around the paragraphs to which you apply a border. You can add borders around individual paragraphs or groups of paragraphs. To apply a border: 1 Select the text you want to place a border around. 2 Choose Border from the Format menu.
Inverting text To make headings and specific paragraphs of text stand out, you can invert the text so that it appears as white text against a black background. Inverting text is especially useful for creating distinctive headings in your books. Inverted text To invert selected text: 1 Select the text you want to invert. 2 Choose Invert from the Format menu. To change inverted text back to normal, select the text and choose Invert from the Format menu again.
4 Creating a Table of Contents You can give readers a convenient way to quickly view different topics in a book by creating a table of contents. The Newton Press application provides a Table of Contents window that can list book headings or topics. When readers open the Table of Contents window on their Newton PDAs, they can tap a topic and have that page of your document instantly appear.
Using the Table of Contents window The Table of Contents window lists any table of contents topics that you’ve added to the current book. Overview button To open the Table of Contents window: m Click the Overview button on the Newton Press window, or choose Show Table of Contents from the Book menu. To close the Table of Contents window: m Click the Overview button again on the Newton Press window, click the close box on the Table of Contents window, or choose Hide Table of Contents from the Book menu.
Adding topics to the table of contents You can add as many topics to a table of contents as you want. Once you add a topic, the Table of Contents window opens automatically showing you the new topic. Select the topic text. Click here to add the topic to the Table of Contents window. To add a topic to the table of contents: 1 Select the text in the book that you want added to the table of contents. 2 Click the Topic button, or choose New Topic from the Book menu.
Viewing topic markers in a book You can view markers in a book that show where table of contents topics link. To see markers for table of contents topics in a book: m Choose Show Indicators from the Format menu. To hide the markers, choose Hide Indicators from the Format menu. Adding topics automatically You can have the Newton Press application automatically add a topic to the table of contents each time you import a file into your book.
Deleting topics from the Table of Contents window When you delete information from a book, corresponding table of contents topics are not deleted. You can remove topics from the Table of Contents window when necessary. To delete a topic from the table of contents: 1 Click the Overview button on the Newton Press screen to open the Table of Contents window. 2 Click the topic you want to delete. 3 Press the Delete key, or choose Delete Topic from the Book menu.
5 Linking In some books, text may refer to information that appears on another page. For example, a paragraph may refer to a table at the end of a document. With a Newton book, you can create instant cross-references to other parts of a book by linking. Linking paragraphs or graphics allows the reader to tap a paragraph or graphic and instantly see the cross-referenced information. Tap here to display another page of the book.
Creating links Links allow you to easily move from one paragraph or graphic to a related portion of your document. If you want, you can create two links from one part of a book to another and back again to allow readers to easily switch between information. When you create a link, you see a line indicator drawn around the linked text or graphic. (You can also hide the line indicators by choosing Hide Indicators from the Format menu.) Newton PDA users reading your book will not see the indicator.
To create a link: 1 Click the paragraph or graphic that you want to link to another page. 2 Choose Make Link from the Book menu. The Make Link dialog box appears providing instructions for completing the link. 3 Use the Go To dialog box, the up or down arrows, or the table of contents window to display the page that holds the destination of the link. The pointer changes to indicate that you are in the process of linking. To cancel the linking process, you can press Command-period.
Checking links As you create a book, you may want to check the links between parts of your book. Checking links helps ensure that you haven’t mistakenly linked unrelated information and have links which lead to the wrong destination. To check links: 1 Click the linked paragraph that you want to check. 2 Choose Follow Link from the Book menu to go to the destination of the link. Newton Press displays the linked information.
6 Saving and Installing Book Packages When you finish creating a Newton book on your computer, you create the final book package that you can download to a Newton PDA. You can then distribute the book package to Newton PDA users.
To create a book package: 1 Click the Create button on the Newton Press screen, or choose Create Package from the File menu. A dialog box appears. 2 Type a name for your book package. Choose a location for your book package on your hard disk or in a folder, if you want. 3 Click Save. Installing a package on a Newton PDA You can install book packages as well as other kinds of Newton packages on a Newton PDA. To install a package, you must connect the Newton PDA to your computer or network.
Preparing the computer To install a package on your Newton PDA, do the following on your computer: 1 Choose Install Package from the File menu. The Install Package dialog box appears. 2 Click the name of the book package that you want to install. 3 Click Open. Newton Press then waits for you to establish a connection from your Newton PDA. Preparing the Newton PDA To install a package on your Newton PDA, do the following on your Newton PDA: 1 Open the Extras Drawer ´. 2 Tap Connection k.
7 Setting Preferences You can set preferences so that the Newton Press application creates books in the easiest and most convenient way for you.
Selecting preference settings To set Newton Press preferences, you choose Preferences from the Edit menu. The Preferences dialog box appears. Location for saved packages You can specify the folder into which Newton Press places your newly created books. When you create a book by dragging a document onto the Newton Press application icon, Newton Press places the newly created book in this folder.
Importing preference If you add documents into a book, you can conveniently have Newton Press automatically add an item to the table of contents. To have Newton Press add file names to the table of contents: m Click the box next to “File names in table of contents” until an X appears. Leave this option deselected (no X) when you don’t want the application to place file names in the table of contents. Text preferences Newton PDAs can display three fonts: Espy Sans, Geneva, and New York.
To have the Font Substitution dialog box appear each time a decision about font substitution is required: m Select the “Ask about font substitution” option. If you want fonts substitution done without notifying you, deselect the “Ask about Font Substitution” option (no X in checkbox). The Macintosh keyboard produces quotation marks for both opening and closing double quotation marks (") and single quotation marks (').
Installing preferences When you drag a file onto the Newton Press application icon, the application can create a book and automatically install it on your Newton PDA. To automatically install books this way, the “Install book after creating” option must be selected in the Preferences dialog box. You must have the Newton PDA connected to your computer and ready for the installation of a package.
Sound preference As you work on your Newton Press book, you can turn the Newton sound effects on or off. This setting does not affect the sounds heard by the Newton PDA user. To turn Newton sound effects on: m Click the Newton sound effects checkbox until an X appears.
8 Viewing Your Book on a Newton PDA When you install a book package on a Newton PDA, the package appears with its own icon and title. When you open the book, the Newton Book Reader application, built into your Newton PDA, launches enabling you to view the book on a Newton PDA.
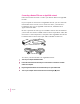
Opening a book on a Newton PDA You can only have one Newton book open at a time. The book icon is in the Extras Drawer. An example of a book icon installed in the internal memory. To open a Newton book: 1 Tap the Extras Drawer and locate the Newton book icon. 2 Tap the book icon. The open book appears on the screen. An example of a digital book. These controls may appear slightly different depending on the version of the Newton operating system on your Newton PDA.
Viewing pages You can move page by page through a document. To move forward or backward through a book: m Tap the up or down arrows to turn the page. Using the table of contents A Newton book may have a table of contents that lists the topics in the book. You can quickly view a particular topic by tapping it. To use the table of contents to see a specific topic: 1 Tap the Overview button. The table of contents appears listing the topics of the book.
Using Newton Book Reader controls When a book is open, two small buttons may appear in bottom right corner of the document. To see the Newton Book Reader controls, tap the button on the left. Tap here to open the Newton Book Reader controls. Note: These buttons may appear slightly different or not at all depending on the type of Newton PDA and the version of the Newton operating system that your PDA uses. These controls allow you to move to a specific page by writing a page number or setting a bookmark.
Going to a specific page When the controls appear, the number of the currently displayed page appears in the page number button. To move to a specific page: 1 Tap the page number button. A slip appears. 2 Write the number of the page you want to see. To close the slip without moving to a different page, tap X. Setting a bookmark To set a bookmark: 1 Display the page you want to mark. 2 Tap the control button to open Newton Book Reader controls, if they are not already open.
4 Tap the “Mark page” button. A new image for that page is added to the bookmark slip. Note: If you are using a version of the Newton operating system earlier than version 2.0, the Unmark button does not appear. If you don’t want to create a new bookmark, tap the X at the bottom right corner of the slip. If you create more than six bookmarks, the last bookmark is added to the slip and the first bookmark you created is erased. Displaying marked pages To display a marked page: 1 Tap the Bookmark button.
Removing bookmarks You can remove bookmarks when you want. Note: If you are using a version of the Newton operating system earlier than version 2.0, the Unmark button does not appear on the Bookmark slip and you cannot eliminate specific bookmarks. When the bookmark slip holds six bookmarks, adding a new bookmark replaces one of the old ones. To erase a bookmark: 1 Tap the Bookmark button. The bookmark slip appears. 2 Tap Unmark. A list appears.
Copying parts of a book You can select and copy parts of a book and move the copied text to another application. To copy parts of a Newton book: 1 Go to the part you want to copy. 2 To select the item, hold the pen down on or near the item until a heavy mark appears and you hear a squeak. Then draw the highlighting mark over or around the item. Your Newton PDA places a box around the selected item. Selected text to copy.
3 Drag the selected item to the side, top, or bottom of the screen. The item becomes a small box, waiting for you to place it in another document. Selected text becomes a box. 4 Tap the X to close the book. 5 Open the item where you want the selected information to appear. The small box indicating the selected item appears. The box with the selected information appears.
6 Drag the box where you want it to be placed. 7 Tap the selection to deselect it. The information appears where you placed it. Annotating books You can add your own annotations to a book by tapping the Markup button. You cannot edit a book on a Newton PDA. You can however, add notes by writing, drawing, or typing text with the on-screen keyboard. You can also hide your annotations. After marking up a book, you can print it or fax it with your annotations.
2 Make the annotations you want. You can write, draw, or use the on-screen keyboard. To hide your annotations, tap the Markup button again. Printing and faxing a book You can print or fax all or part of a book when your Newton PDA is connected to a printer or fax modem. If you annotated the book, your annotations will be shown as well. To print or fax a book: 1 Connect your Newton PDA to a printer, a fax modem, or a fax modem card.
5 In the list that appears, tap Print Book or Fax. A page number slip appears on top of the print or fax slip. 6 Write the page numbers you want to print or fax. 7 Tap X to close the page number slip. 8 Enter the appropriate information in the print or fax slip. 9 Tap Print Book or Fax, then tap Now or Later. For more detailed information about printing or faxing, see the manual that came with your Newton PDA. Closing a Newton book To close the book: m Tap X in the bottom of the window.
9 Troubleshooting This chapter provides solutions to problems commonly encountered when installing the Newton Press software and using it to create or download book packages. If you have a problem, try the suggestions in this chapter. If, after trying the suggested solutions, you still can’t solve the problem, call 1-800SOS-APPL (1-800-767-2775) in the United States. Outside the United States, contact your local Apple-authorized dealer.
Problems editing and formatting a book Why do the fonts appear distorted on the Newton Press screen? The required fonts, Espy Sans, Geneva, and New York, are installed when your install the Newton Press software. Check that you have not removed one of these required fonts from your System Folder. If you have, you can install the software again to re-install the fonts. I set a tab for some text, but the marker has disappeared from the Tab window.
Problems adding documents to a book I’m having trouble adding a document to my Newton Press book. What should I do? Check that the document is in a format that Newton Press can add. See the Readme file installed with your Newton Press software for a list of formats that Newton Press can translate. If you don’t see your application format listed, try saving your document in a format that is listed.
Problems installing a book package onto a Newton PDA I can’t install a package onto the Newton PDA. First, check that you have correctly connected the Newton PDA and your computer. See Chapter 1, “Getting Started” for instructions for connecting the two devices. Also check that you have set the preferences that tell Newton Press the type of cable connection you have. See Chapter 7, “Setting Preferences” for an explanation about how to set the connection preferences.
General questions A message says that my computer is running out of memory. Try closing other applications that may be open. Also try allocating more memory for use by Newton Press. See your computer’s manual for information about selecting an application and allocating more memory to it. I removed old files from the System Folder and now Newton Press won’t start up. If you have recently removed files from your system, check that you have not removed files required by Newton Press.
If you can’t find what you’re looking for in this index, look in Macintosh Guide— available in the Guide (h) menu on your computer.
books.
E editing graphics 26–27 text 20, 34–35 topics in the table of contents 50 troubleshooting 80 Edit menu Copy/Paste commands 27 Preferences command 8, 62 Select All command 20, 34, 39, 80 Undo command 55 End key 21 erasing.
H L hard disk space requirements 2, 6, 7 hardware requirements 2 Header command (Format menu) 38 headers, creating 37–38 help, phone number for 79 Hide Indicators command (Format menu) 50, 54 Hide Table of Contents command (Book menu) 48 Home key 21 left-aligned text 41 linking, defined 53 links breaking 54, 55 checking 56 creating 54–55 restoring 55 LocalTalk connection kit 4 locking disks 5 I, J, K icons book (Newton PDA) 68 Installer 6 Newton Press 18 selecting for a book 28 identifying a book 28–29
new page. See page breaks Newton Book Reader annotating books 70, 76–77 closing a book 70, 78 controls illustrated 70 copying and pasting parts of a book 74–76 going to a specific page 70, 71–72 overview 67 printing or faxing a book 70, 77–78 setting/removing bookmarks 70, 71–73 Newton books. See book packages; books Newton PDA.
R Readme file document and graphics formats supported 22, 26, 81 files installed with Newton Press 5, 83 late-breaking information 14, 79 template files 35 translators 26 Remove Page Break command (Format menu) 37 removing bookmarks (Newton Book Reader) 73 borders 45 files from your system, troubleshooting 83 headers 38 page breaks 36–37 table of contents topics 51 tab stops 43 resizing graphics 26, 27 Return to Link command (Book menu) 55 right-aligned text 41 Routing button (Newton Book Reader) 77 ruler,
text.
Newton Press User’s Guide for the Macintosh Operating System
K Apple Computer, Inc. © 1995 Apple Computer, Inc. All rights reserved. Under the copyright laws, this manual may not be copied, in whole or in part, without the written consent of Apple. Your rights to the software are governed by the accompanying software license agreement. The Apple logo is a trademark of Apple Computer, Inc., registered in the US and other countries.
Contents About Newton Press What is Newton Press? vii What is a Newton book? viii How do I create a book? x Reading the book on a Newton PDA 1 Getting Started In this package xii 1 1 System requirements 2 Connecting your Newton PDA to your computer 2 Connecting a Newton PDA directly to your computer Connecting a Newton PDA over an AppleTalk network Installing Newton Press 7 7 Getting your computer ready Creating a book 7 9 Getting your Newton PDA ready Locating the new book Problems? 4
2 Creating a Book 17 Dragging and dropping a book onto a Newton PDA Creating a new book 19 Navigating in your document Copying and pasting 20 21 Bringing documents into a book Adding a new document 21 22 Dragging and dropping a document for editing Adding multiple documents to a book file Bringing graphics into a book 28 Saving and opening your work in progress Saving your work in progress 31 3 Formatting Your Newton Book 33 About the Newton Press application window Removing a page break Usi
4 Creating a Table of Contents 47 Using the Table of Contents window Adding topics to the table of contents Viewing topic markers in a book Adding topics automatically 48 49 50 50 Editing topics in the Table of Contents window 50 Deleting topics from the Table of Contents window 5 Linking 51 53 Creating links 54 Breaking links 55 Checking links 56 6 Saving and Installing Book Packages Creating a book package 57 Installing a package on a Newton PDA Preparing the computer Location of saved
8 Viewing Your Book on a Newton PDA Opening a book on a Newton PDA Viewing pages 68 69 Using the table of contents 69 Using Newton Book Reader controls Going to a specific page 71 Copying parts of a book 74 Annotating books 70 76 Printing and faxing a book Closing a Newton book 9 Troubleshooting 67 77 78 79 Problems installing the software 79 Problems editing and formatting a book Problems adding documents to a book 80 81 Problems installing a book package onto a Newton PDA General ques
About Newton Press What is Newton Press? Newton Press is an ideal application for creating and distributing electronic documents as Newton books that can be reviewed and annotated on a Newton personal digital assistant (PDA). With Newton Press, you can create read-only electronic documents, complete with text and graphics, that anyone with a Newton PDA can use. You can quickly create Newton books by combining text and graphics from other applications into your Newton Press documents.
What is a Newton book? A Newton book is an electronic document created for viewing on a Newton PDA. With Newton Press, you can create and publish a variety of documents such as business reports, reference materials, price sheets, product listings, and tables for display on Newton PDAs. You can create company reports and documents that someone with a Newton PDA can keep for easy reference.
You can create company directories and other lists that Newton PDA users can refer to on the job or in the field, taking advantage of the portability of the Newton PDA. And you can create documents with graphics and charts that provide Newton PDA users with effective and persuasive visual tools for communicating information.
Newton Press enables you to create a wide variety of books that can effectively convey your information. How do I create a book? Creating a book is roughly a four-step process: m You first open the Newton Press application and type or add the content of your book. You can then format the book to look the way you want it. m You can create a table of contents that readers can use to move about the different topics of a book.
m You can name and record identifying information about your book. m And last, you save the book as a package that you can install on a Newton PDA. Add documents to your book, including text and graphics. Type and edit text. Format your book for easy readability. Create a book package and install it on a Newton PDA. With Newton Press, you can easily take the text and graphics from many commonly used applications on your computer and place them in a new book.
Once your book is complete, you then save the book as a package. By connecting a Newton PDA to your computer or network, you can transfer your book package to the Newton PDA where readers can open and view it at any time. Reading the book on a Newton PDA When you install a book on a Newton PDA, users can open books, view and annotate pages, and even fax and print the document. For more information about using the Newton Book reader, see Chapter 8, “Viewing Your Book on a Newton PDA.