Nike + iPod Sensor
KKApple Inc. © 2009 Apple Inc. All rights reserved. Apple, the Apple logo, iPod, iPod nano, iPod touch, and iTunes are trademarks of Apple Inc., registered in the U.S. and other countries. iPhone is a trademark of Apple Inc. iTunes Store is a service mark of Apple Inc., registered in the U.S. and other countries. NIKE and the Swoosh Design are trademarks of NIKE, Inc. and its affiliates, and are used under license. The Nike + iPod Sport Kit is covered by one or more of U.S.
Contents 4 4 5 11 11 14 14 14 15 16 16 17 18 18 19 20 22 23 24 25 26 28 Welcome to Nike + iPod Your Personal Workout Assistant Quick Start Using Nike + iPod Calibrating Nike + iPod Setting the Units of Distance Entering Your Weight Locking Your Device During a Workout Getting Spoken Feedback Using a PowerSong Pausing a Workout Receiving Calls During a Workout Changing Music During a Workout Sending Workouts to Nikeplus.
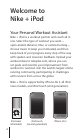
Welcome to Nike + iPod Your Personal Workout Assistant Nike + iPod is a workout partner and coach all in one. Select the type of workout you want— open-ended, distance, time, or calorie-burning— choose music to keep you motivated, and then keep track of your progress every step of the way with spoken and onscreen feedback. Upload your workout data to nikeplus.com, where you can set goals and monitor your improvement from workout to workout.
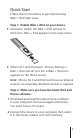
Quick Start Follow these instructions to get started using Nike + iPod right away. Step 1: Enable Nike + iPod on your device. mm iPod nano: Attach the Nike + iPod receiver to iPod nano. Nike + iPod appears in the main menu. mm iPhone 3G S and iPod touch: Choose Settings > Nike + iPod and set it to On. A Nike + iPod icon appears on the Home screen. Note: iPhone 3G S and iPod touch have an internal receiver; no externally attached receiver is required.
3 If iTunes indicates your iPod needs an update, click Update and follow the onscreen instructions. Step 3: Insert the Nike + iPod Sensor in your Nike+ ready shoe. mm Lift the insole of the left shoe, remove the foam insert from the pocket underneath, and replace it with the sensor. Lift the insole and place the sensor in the pocket, flat side up.
Step 4: Choose a type of workout. An open-ended workout ÂÂ iPod nano: Choose Nike + iPod > New Workout > Basic. ÂÂ iPhone 3G S and iPod touch: Choose Nike + iPod > Basic. A workout with a time goal ÂÂ iPod nano: Choose Nike + iPod > New Workout > Time. ÂÂ iPhone 3G S and iPod touch: Choose Nike + iPod > Time. A workout with a distance goal ÂÂ iPod nano: Choose Nike + iPod > New Workout > Distance. ÂÂ iPhone 3G S and iPod touch: Choose Nike + iPod > Distance.
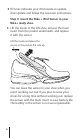
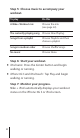
Step 5: Choose music to accompany your workout. To play Do this A Nike+ Workout mix Choose the mix (see page 22). The currently playing song Choose Now Playing. Songs from a playlist Choose Playlists and then choose a playlist. Songs in random order Choose Shuffle Songs. No music Choose None. Step 6: Start your workout. mm iPod nano: Press the Center button and begin walking or running. mm iPhone 3G S and iPod touch: Tap Play and begin walking or running. Step 7: Monitor your progress.
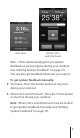
iPod nano iPhone 3G S and iPod touch Nike + iPod automatically gives you spoken feedback on your progress during your workout (see “Getting Spoken Feedback” on page 15). You can also get feedback whenever you want it. To get spoken feedback manually: mm iPod nano: Press the Center button at any time during your workout. mm iPhone 3G S and iPod touch: Press the Home button at any time during your workout.
Step 8: End your workout. You can end your workout at any time. If you continue working out after you reach your time, distance, or calorie goal, your progress continues to be monitored. To end your workout: mm iPod nano: Press the Play/Pause (’) button to pause your workout. Then press the Menu button and choose End Workout. mm iPhone 3G S and iPod touch: Tap End Workout. If the device is locked, press the Home button and tap Pause. Then drag the slider and tap End Workout.
2 Click Send in the dialog that asks if you want to send your workout data to nikeplus.com. You can do it later if you don’t want to do it now. 3 Click Visit in the dialog that asks if you want to go to nikeplus.com. The nikeplus.com website opens with your most recent workout graphed on the homepage. 4 Click Save Your Runs, then click Sign Me Up and follow the onscreen instructions. See “Sending Workouts to Nikeplus.com” on page 18 for more information.
To calibrate Nike + iPod for running and walking: 1 iPod nano: Choose Nike + iPod > Settings > Sensor > Calibrate. iPhone 3G S and iPod touch: Choose Nike + iPod > Calibration. 2 Choose Run or Walk and enter a distance. Note: You must enter at least a quarter of a mile for calibration to be successful. 3 Choose music to accompany your calibration workout. 4 iPod nano: Press the Center button. iPhone 3G S and iPod touch: Tap Play. Then run or walk the set distance at a steady, natural pace.
You can also calibrate Nike + iPod using the workout you just finished. This is useful if you’ve traveled a known distance that doesn’t match the summary distance displayed on your device. To calibrate using your latest completed workout: mm iPod nano: Choose End Workout, and then choose Calibrate. Set the correct distance you walked or ran, and press the Center button. mm iPhone 3G S and iPod touch: Tap End Workout, then tap Calibration and set the correct distance you walked or ran.
Setting the Units of Distance You can set Nike + iPod to measure your workouts in either miles or kilometers. To set the units of distance: mm iPod nano: Choose Nike + iPod > Settings, and set Distances to Miles or Kilometers. mm iPhone 3G S and iPod touch: Choose Settings > Nike + iPod > Distances, and then choose Miles or Kilometers. Entering Your Weight To enter your weight: mm iPod nano: Choose Nike + iPod > Settings > Weight, and then enter your weight.
Getting Spoken Feedback As you work out, Nike + iPod periodically gives spoken feedback on your status. You can choose a female or male voice, or turn off feedback. To set the voice type or turn spoken feedback off: mm iPod nano: Choose Nike + iPod > Settings, and then set Spoken Feedback to Male, Female, or Off. mm iPhone 3G S and iPod touch: Choose Settings > Nike + iPod > Spoken Feedback, and then choose Male, Female, or Off. If spoken feedback is turned off, you can still get spoken feedback manually.
On iPhone 3G S and iPod touch, all spoken feedback languages are supported automatically. Using a PowerSong Choose a song that motivates you and make it your PowerSong. You can switch quickly to it at any time during your workout. To choose a PowerSong: mm iPod nano: Choose Nike + iPod > Settings > PowerSong, and then choose a song. mm iPhone 3G S and iPod touch: Choose Settings > Nike + iPod > PowerSong, and then choose a song.
mm iPhone 3G S and iPod touch: Tap Pause. Or, if the device is locked, press the Home button once and then tap Pause. Tap Play to resume your workout. Receiving Calls During a Workout You can use iPhone 3G S to answer calls as usual during your workout. When you receive a call, your workout is automatically paused when you answer. To answer a call: mm Tap Answer, or press the mic button if you’re wearing the stereo headset. If iPhone 3G S is locked, drag the slider to unlock it.
Changing Music During a Workout You can change your music during a workout without losing your workout data. Your workout is paused during the music transition. To change music during a workout: 1 iPod nano: Press the Menu button and choose Change Music. Your workout pauses. iPhone 3G S and iPod touch: If the device is not locked, tap Pause. If it is locked, press the Home button, drag the slider to unlock, and tap Pause. Finally, tap Change Music. 2 iPod nano: Choose new music.
2 Open iTunes on your computer, click Nike + iPod, and then select “Automatically send workout date to nikeplus.com.” 3 Click “Visit nikeplus.com” below the checkbox or click Visit in the dialog that appears if you’ve already set your workout to be sent automatically. The nikeplus.com website opens with your most recent workout graphed on the homepage. 4 Click Save Your Runs and log in, or register if you haven’t already done so. When your device isn’t connected to your computer, you can go to www.nikeplus.
To erase a single workout session: 1 Choose Nike + iPod > History and choose a workout session. 2 iPod nano: Choose a workout session, click the Center button, and then choose Delete. iPhone 3G S and iPod touch: Tap Edit, choose a workout session, and then tap Delete. On iPhone 3G S and iPod touch, you can delete all workout sessions from History by tapping Clear at the top of the History screen. Creating Custom Workout Shortcuts Custom workout shortcuts let you easily choose and repeat a workout.
Note: You can create custom workout shortcuts only on iPhone 3G S and iPod touch (2nd generation). To delete a custom workout shortcut on iPhone 3G S and iPod touch: mm Choose Nike + iPod, and then tap My Workouts. Tap Edit, choose a shortcut, and then tap Delete. Finally, tap Done. To choose a custom workout shortcut on your device: mm iPod nano: Choose Nike + iPod, and then choose a shortcut. Shortcuts are named according to the type of workout and music. They can’t be deleted.
Purchasing Nike+ Workouts You can purchase and download Nike+ Workouts featuring continuous music mixed with professional coaching. When you purchase a Nike+ Workout, you get a single workout track with music and voiceover, and you also get all the individual songs in the mix. Choose mixes for your level and style of workout. To purchase a Nike+ Workout: 1 Open iTunes and click iTunes Store on the left side of the window, then type “Nike Sport Music” in the iTunes search field.
Using a Nike+ Compatible Remote You can use a Nike+ compatible remote (sold separately) to control Nike + iPod wirelessly while you work out. Before using a remote for the first time, you must link it to your iPod nano receiver, iPhone 3G S, or iPod touch. To link to a Nike+ compatible remote (sold separately): mm iPod nano: Connect your Nike + iPod receiver to your iPod nano, choose Nike + iPod > Settings > Sensor > Link, and then follow the onscreen instructions.
Linking to Another Sensor You can use your iPod nano, iPhone 3G S, or iPod touch with more than one Nike + iPod Sensor. Each time you use an iPhone 3G S or iPod with a different sensor, you must link to that sensor. You may want to do this, for example, if there’s more than one person in your family with a sensor and Nike+ ready shoes.
Note: If you link to a previously linked sensor, Nike + iPod detects your calibration settings. You don’t need to recalibrate. Putting the Nike + iPod Sensor to Sleep The sensor is awake and on by default. If you want to store the sensor for a long period of time or stop it from transmitting, you can put it to sleep. To put the sensor to sleep: mm Use a pen or a paper clip to hold down the Sleep/Wake button for three seconds. Sleep/Wake button Hold down for three seconds to put to sleep. Press to wake.
Important Safety Information WARNING: Failure to follow these safety instructions could result in injury or damage. Exercising Before starting any exercise program, you should have a complete physical examination by your physician. Do a warmup or stretching exercise before beginning any workout. Be careful and attentive while exercising. Slow down, if necessary, before adjusting your device while running. Stop exercising immediately if you feel pain, or feel faint, dizzy, exhausted, or short of breath.
Avoid hearing damage Permanent hearing loss may occur if earphones are used at high volume. Set the volume to a safe level. You can adapt over time to a higher volume of sound that may sound normal but can be damaging to your hearing. If you experience ringing in your ears or muffled speech, stop listening and have your hearing checked. The louder the volume, the less time is required before your hearing could be affected.
Learning More, Service, and Support Answers to frequently asked questions about Nike + iPod Go to www.apple.com/support/nikeplus. Service and support for the Nike + iPod Sensor and Receiver Go to www.apple.com/support/nikeplus. Service and support for Nike+ ready shoes or the nikeplus.com website Go to www.nikeplus.com. Information about using iTunes Open iTunes and choose Help > iTunes Help. Information about using iPod Go to www.apple.com/support/ipod. Information about using iPhone 3G S Go to www.apple.
Regulatory Compliance Information FCC Compliance Statement This device complies with part 15 of the FCC rules. Operation is subject to the following two conditions: (1) This device may not cause harmful interference, and (2) this device must accept any interference received, including interference that may cause undesired operation. See instructions if interference to radio or television reception is suspected.
If your computer system does cause interference to radio or television reception, try to correct the interference by using one or more of the following measures: • Turn the television or radio antenna until the interference stops. • Move the computer to one side or the other of the television or radio. • Move the computer farther away from the television or radio. • Plug the computer into an outlet that is on a different circuit from the television or radio.
Responsible party (contact for FCC matters only): Apple Inc. Corporate Compliance 1 Infinite Loop MS 26-A, Cupertino, CA 95014 Wireless Information FCC Wireless Compliance for the Nike + iPod Sensor. The antenna used with this transmitter must not be colocated or operated in conjunction with any other antenna or transmitter subject to the conditions of the FCC Grant. Industry Canada Statement This Class B device meets all requirements of the Canadian interference-causing equipment regulations.
Exposure to Radio Frequency Energy The radiated output power of the included devices is far below the FCC radio frequency exposure limits. Disposal and Recycling Information The Nike + iPod Sensor contains a battery. Dispose of your Nike + iPod Sensor according to local environmental laws and guidelines. When discarding shoes, remove the Nike + iPod Sensor and dispose of it properly. For information about Apple’s recycling program, go to www.apple.com/environment.
European Union—Disposal Information: The symbol above means that according to local laws and regulations your product should be disposed of separately from household waste. When this product reaches its end of life, take it to a collection point designated by local authorities. Some collection points accept products for free.
Unione Europea: informazioni per l’eliminazione Questo simbolo significa che, in base alle leggi e alle norme locali, il prodotto dovrebbe essere eliminato separatamente dai rifiuti casalinghi. Quando il prodotto diventa inutilizzabile, portarlo nel punto di raccolta stabilito dalle autorità locali. Alcuni punti di raccolta accettano i prodotti gratuitamente.
www.apple.com/ipod/nike www.apple.